Yet Another Gold Test

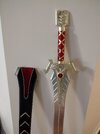
PART 8: Yellow and red food coloring with Liquitex High Gloss Varnish over Alclad II Polished Aluminum over black gloss

View attachment 1756297

(Yes, I dumped food coloring directly into the Liquitex bottle!)

Wow, super interesting. I was able to get quite a nice shine on this part. Following an online guide, I placed 16 drops of yellow and 6 drops of red food coloring in a 4oz bottle and shook. There is a little bit of a technique to applying the colored lacquer: I painted it on thick and quickly, and then I very quickly painted it "off" using my paintbrush and a paper towel. The varnish badly wants to pool in lower areas and then dry in orange clots. So before it gets tacky, I use the same brush, wipe it off with a paper towel and remove as much of the varnish as possible. And repeat until all the varnish is visibly gone. And that's the first coat. Then wait 3 hours between coats.

I had to do this 8 TIMES to get what you'll see below. TWO DAYS of painting a small part.

And while it's shiny and well protected, there are those few key cons here:
  • It came out too dark (maybe less red would work?).
  • It wants to pool in the lower areas (see the bottoms of the feathers).
  • It takes too many coats and hours!
I think if this was my only option, I might experiment to get the right color and go for it. The pictures can't do justice to how shiny it is.

I think there are absolutely good applications for this approach, and I am keeping my bottle. The darker gold/brass will give me an amazing foundation for a weathered Headpiece for the Staff of Ra, for example. It might even serve for a Chachapoyan idol (with a touch less red). But not for a bright gold for an Ark of the Covenant. It's a truly excellent brass color. I love it for that.

And I do LOVE how well protected and shiny the part is!

I will photograph again after I add the clearcoat and again after a light wash, and will update this post!

View attachment 1756294 View attachment 1756296

And at proper viewing distance:

View attachment 1756295
I think this is the same technique one of the C-3PO builders uses, but he uses a HVLP gun to spray it on.
 
PART 2: Barnabas Blattgold Gold Leaf and Speedball Mona Lisa Adhesive

View attachment 1752920

I chose not to go with the Speedball Mona Lisa gold leaf this time, because those sheets had a backing that you have to peel off. These BB sheets are completely by themselves, and while extra flimsy, I was able to push the gold leaf into the cracks and crevices a bit better, and prevent as nearly much cracking as in my other projects. Even so, some cracking was inevitable, and a second application over the cracks was necessary. But they filled up just fine!

The color is good, the detail is excellent (even shows my un-sanded 8K resin layer lines), it's super shiny. It's hard to convey via photos how shiny it really is, but you can get an idea from the distance shot below. The photos make the foil look more "fragmented" than it really looks in person; again, see the distance shot. It really looks good. And the cons are not too bad:
  • It takes a LONG time, almost an hour to do this part. But as I get better at the technique I'm sure this will shorten.
  • The gold leaf really adheres tightly, showing the layer lines! In future I think I would use a semi-thick primer first.
  • The cracks take extra applications. Next time, a base layer of spray gold might be in order? The will show the cracks much less, I think.
This is a serious contender. If I don't like the spray-on golds, I may go this route, again with a primer and gold spray underneath. I doubt I would lose much detail under those circumstances.

I will photograph again after I add the clearcoat and again after a light wash, and will update this post!

View attachment 1752919 View attachment 1756306


...and at proper viewing distance:

View attachment 1752924
Its a huge PITA, and does take a long time, but in the end, its what I used on the hilt of my "Emperor Giorgeau" sword from ST:Discovery.
 

Attachments

  • IMG_20220628_183359267.jpg
    IMG_20220628_183359267.jpg
    1.2 MB · Views: 65
PART 11: Gold Chrome Nail Polish Powder over black gloss

PXL_20240115_210053313.jpg

Wow, what an impressive shine!

Following the instructions in the video above, I applied the resin pre-coat, and cured it for 1 minute. The gold powder went on easily, and brushed odd in a way that left a very high shine! I tried over nothing and over the gloss, and the gloss made a real difference. It was also really important to brush on the glass coat as thin as possible. It's very viscous, but wants to pool, and detail can be lost.

Downsides?
  • The color is just a bit too neutral. Otherwise, it's about as good as gold leaf! (The photos show it warmer than it is.)
  • Some detail is lost in the resin.
This may be my winner, but after all is said and done, I'm going to try a touch of Candy Gold over it and see if I can tint the neutral toward gold. Just a hint of some!

EDIT: Nope, the Candy Gold turned everything a little too greenish!

PXL_20240115_204618652.jpg
PXL_20240115_204731011.jpg


And at proper viewing distance:

PXL_20240115_204835579.jpg
 
Last edited:
PART 12: Green Stuff World Chrome Gold and Antique Gold Metal over black gloss

PXL_20240115_210116810.jpg

Not so impressive, unfortunately.

These both sprayed on nicely over black gloss, but there were a couple problems:
  • The color was too "sand"-ish
  • The shine is not metallic, but plasticky.
  • The finish is grainy
Just doesn't quite work! For some reason my pics came out a bit warmer in color than the real thing.

PXL_20240115_210505938.jpg
PXL_20240115_210526336.jpg


And at proper viewing distance:

PXL_20240115_210555312.jpg
 
Mounted them all up on a spare piece of foamcore, so I can use for future reference:

PXL_20240121_221221567.jpg PXL_20240121_221234789.jpg

Is there a clear winner? Yes, Gold Leaf is the most goldy-gold, in my opinion. But very few things look like a "pure" gold, so I think there will be an application for most of these colors. For example, I've decided my Yavin Medal is going to be Rustoleum over black gloss (fourth on the top row), as I wanted paler color and a little less shine.

PXL_20240121_220711050.MP.jpg PXL_20240121_220716096.jpg

Hope this has been helpful! I can take other pictures as needed, just let me know if you have any questions.

Bill
 
I'm pretty impressed with that Rustoleum over gloss black, especially for something so accessible. Gold leaf looks great of course, but it's difficult to make it as smooth and laborious to get into corners and such. You've done a great job with this, thanks for all the hard work and posting the results!
 
What do you think works best for The Ark of the Covenant?

I think Gold Leaf would be best for the Ark of the Covenant, especially if it's a larger replica. Although I might be tempted to use the Rustoleum over gloss. And I would weather both with brown washes, for warmth.

The other really good option I would seriously consider is the Liquitex Varnish colored with food coloring. It adds more warmth and more variation in the gold, and I had lots of control because of the number of coats. I would probably use 4-6 coats, instead of the 8 in my sample. And maybe a touch less red coloring.
 

Your message may be considered spam for the following reasons:

If you wish to reply despite these issues, check the box below before replying.
Be aware that malicious compliance may result in more severe penalties.
Back
Top