Sebastein
New Member
So this project is my undergrad project to graduate from the Art Institute of Pittsburgh in March. I will doing weekly picture updates on my progress.
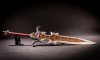
Here is one of my reference images that I am using to make the costume.

So first of all, the materials I use for the majority of my work are L200 foam(the white stuff) and Worbla(the tan stuff).
L200 foam is very similar to EVA foam or the foam used in yoga mats. I make all my own patterns for my armor and props, then trace the patterns onto the foam and cut them out with razor blades. The L200 is super easy to sand down(150 grit first, then 100 grit) to the shape you need or if two pieces need to be angled to create a pointed edge, you can cut the foam to an angle and sand it down nice and smooth. All the foam pieces are glued together with the contact cement. I have found that contact cement works best and will hold for a long, long time. All of the lava texture that was put into the Warrior armor was done with a dremel and a round tipped bit.
Worlba is a thermoplastic that is really popular when making hard surface armor. This is my first project with it but I am in love with the stuff. For a Worbla tutorial I would recommend checking out Kamui Cosplay on Facebook and YouTube. She has been working with Worbla for a while and has lots of great videos.
So a step by step as to how I made the Warrior armor would have to be as follows: (sorry if some of the stuff doesnt make sense, this is my first tutorial-esk thing)
I started with the shoes and worked my way up.
I first bought some cheep slip on shoes from Wal*Mart to use as a base. Those got covered in 1/2” L200 foam twice to build up the thickness that I wanted. After I got the thickness that I wanted, I sanded down the foam to get a more refined shape. Once everything was shapely and smooth. I drew on the lava marks where I wanted them and took out my handy dandy dremel tool and carved away the foam until It had a flowing lava look.


Next I made the thigh guards. Those were made similarly to the shoes but this time I made a Worbla base. I took some measurements from my body and transferred those numbers to some brown butcher paper and began to draw out the shape I needed. After I got the right shape drawn out, I cut it out and transferred it to some craft foam and to my sheet of Worbla, but for the Worlba pieces I left about 3/4” away from the actual pattern to allow the Worbla to be wrapped around the craft foam. The Worbla has to be cut twice so that I can be put on both sides of the craft foam. Once I have both pieces of Worbla and the craft foam I heat up the Worbla with a heat gun to about 600 degrees or so that it become malleable and flexible, then press the craft foam onto the Worbla and then put the other sheet of Worbla on top of the craft foam, heat it up and press the edges in. After its been pressed around the edges, I cut the excess off, leaving about a 1/16” to 1/8” around it all. After everything is trimmed I will heat up the entire Worbla piece and shape it the the body part I need it to be on, in this case it is my thigh. It takes a while to heat it up to be really flexible but be patient. After the piece is nice and hot and flexy, form it around your body, (Please be wearing pants, a long sleeve tee, what have you so that you do not burn your skin!) and wait for it to cool down and harden. It can take anywhere from 5 to 20 minutes to cool down completely but you have to wait it out if you want a properly formed piece. After the piece is cooled down and holds its shape, I will use the pattern that I made earlier and cut out that piece in my 1/2” thick L200 foam, glue down the Worlba piece and the foam piece, let them get really tacky and then put the two pieces together. Once everything is dried, I will draw on the lava lines and go about the same carving method as I used before on the shoes. The trim is made from some thinner foam, usually 1/8” - 1/4” foam and glued down just like the foam to Worbla. I glue on both the trim and the armor piece, let them get tacky and press.


The belt was made almost identically to the thigh guards. I drew up a pattern, cut it out of craft foam, Worbla, and L200 foam. Did everything the same for the Worbla and foam procedures. Heated, pressed, heated some more, formed to my body, glued, carved, the whole nine yards. The only thing was that were isn’t any trim on the belt so that step is obviously skipped. One extra step that was done to the belt, was that I added some elastic on the inside in the back so that I can open up the belt a little bit when putting it on but it will retain its shape when it is around my waist.


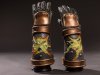
Here is all of the progress that I made in the first week of work!


Stay tuned for many more updates every week.
Here is one of my reference images that I am using to make the costume.
So first of all, the materials I use for the majority of my work are L200 foam(the white stuff) and Worbla(the tan stuff).
L200 foam is very similar to EVA foam or the foam used in yoga mats. I make all my own patterns for my armor and props, then trace the patterns onto the foam and cut them out with razor blades. The L200 is super easy to sand down(150 grit first, then 100 grit) to the shape you need or if two pieces need to be angled to create a pointed edge, you can cut the foam to an angle and sand it down nice and smooth. All the foam pieces are glued together with the contact cement. I have found that contact cement works best and will hold for a long, long time. All of the lava texture that was put into the Warrior armor was done with a dremel and a round tipped bit.
Worlba is a thermoplastic that is really popular when making hard surface armor. This is my first project with it but I am in love with the stuff. For a Worbla tutorial I would recommend checking out Kamui Cosplay on Facebook and YouTube. She has been working with Worbla for a while and has lots of great videos.
So a step by step as to how I made the Warrior armor would have to be as follows: (sorry if some of the stuff doesnt make sense, this is my first tutorial-esk thing)
I started with the shoes and worked my way up.
I first bought some cheep slip on shoes from Wal*Mart to use as a base. Those got covered in 1/2” L200 foam twice to build up the thickness that I wanted. After I got the thickness that I wanted, I sanded down the foam to get a more refined shape. Once everything was shapely and smooth. I drew on the lava marks where I wanted them and took out my handy dandy dremel tool and carved away the foam until It had a flowing lava look.
Next I made the thigh guards. Those were made similarly to the shoes but this time I made a Worbla base. I took some measurements from my body and transferred those numbers to some brown butcher paper and began to draw out the shape I needed. After I got the right shape drawn out, I cut it out and transferred it to some craft foam and to my sheet of Worbla, but for the Worlba pieces I left about 3/4” away from the actual pattern to allow the Worbla to be wrapped around the craft foam. The Worbla has to be cut twice so that I can be put on both sides of the craft foam. Once I have both pieces of Worbla and the craft foam I heat up the Worbla with a heat gun to about 600 degrees or so that it become malleable and flexible, then press the craft foam onto the Worbla and then put the other sheet of Worbla on top of the craft foam, heat it up and press the edges in. After its been pressed around the edges, I cut the excess off, leaving about a 1/16” to 1/8” around it all. After everything is trimmed I will heat up the entire Worbla piece and shape it the the body part I need it to be on, in this case it is my thigh. It takes a while to heat it up to be really flexible but be patient. After the piece is nice and hot and flexy, form it around your body, (Please be wearing pants, a long sleeve tee, what have you so that you do not burn your skin!) and wait for it to cool down and harden. It can take anywhere from 5 to 20 minutes to cool down completely but you have to wait it out if you want a properly formed piece. After the piece is cooled down and holds its shape, I will use the pattern that I made earlier and cut out that piece in my 1/2” thick L200 foam, glue down the Worlba piece and the foam piece, let them get really tacky and then put the two pieces together. Once everything is dried, I will draw on the lava lines and go about the same carving method as I used before on the shoes. The trim is made from some thinner foam, usually 1/8” - 1/4” foam and glued down just like the foam to Worbla. I glue on both the trim and the armor piece, let them get tacky and press.
The belt was made almost identically to the thigh guards. I drew up a pattern, cut it out of craft foam, Worbla, and L200 foam. Did everything the same for the Worbla and foam procedures. Heated, pressed, heated some more, formed to my body, glued, carved, the whole nine yards. The only thing was that were isn’t any trim on the belt so that step is obviously skipped. One extra step that was done to the belt, was that I added some elastic on the inside in the back so that I can open up the belt a little bit when putting it on but it will retain its shape when it is around my waist.
Here is all of the progress that I made in the first week of work!
Stay tuned for many more updates every week.