Working Web Shooter

Calebxy

Member
Hi, it's me again! :D

I know what you're thinking. Trying to make a real, working web shooter is silly and never going to work. You're probably right. However I'm not intending on making it exactly like what you're thinking of. This is going to be a one-shot device which winds back in to be used again. So it's more like a wrist mounted grapple gun in that respect. And I'm also not intending that this be strong enough to hold my weight. This'll just be for picking up objects and sticking onto doors so I can close them.

If you want a detailed explanation of how it's going to work, then you can have a read of these posts on my blog:
Web Shooters - How they are going to work - Ridiculous Inventions
Web Shooters - The Vitally Important Part - Ridiculous Inventions

However, if you don't want to read all that, then here's the summary: I'm using two motors (from some R/C cars) with wheels attached to them (not from the cars; just circular bits of cork I made myself). These will be positioned next to each other, with a little gap between them. The contraption on the end of the string (which I'll explain in more detail later) will be positioned just behind them. Then, when I press the button on my palm, a small motor attached to an arm which moves back and forth will push the contraption into the gap. The two spinning motors will therefore shoot the contraption forward at high speed (very much like how a Rayven Nerf Gun works).

Here's a diagram:

w1o9j.jpg


Hopefully that's not too messy for you. :p It's not exactly how it's going to be, since there are undoubtedly a few bits and bobs I've surely missed out (and the wiring probably isn't going to be quite like that) but you get the gist. Now here's what I've made so far:

6045727.jpg


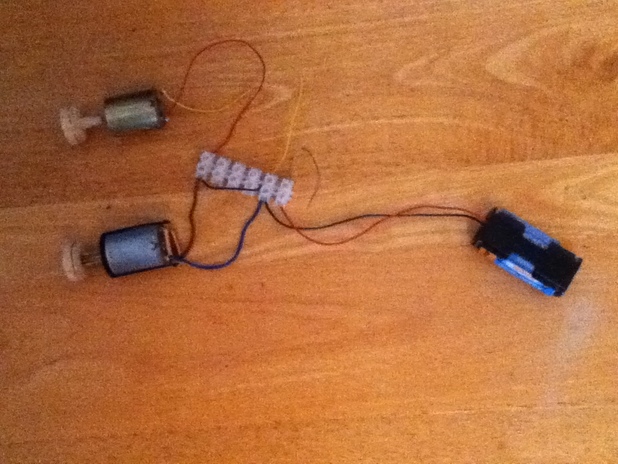
Sorry for the bad quality pictures. Anyway, now I'll explain how the contraption on the end of the string is going to work. Imagine a small rod about 3 inches long (as you can see in the diagram). That's what the device will be firing. The rod will be in quarters, attached at the base, and be able to open out into an X shape, if you get what I mean. And on the inward facing side of each part, there will be some sort of adhesive. This, hopefully, will be strong enough to be able to hold small objects, such as a plastic cup.

I've come up with two ways for the rod to open. One of them is simply that it's constantly trying to open (through means of elastic inside it or something), so when it exits the device, it can open up. However, this might cause it to get jammed inside the device. The other way I came up with was to have a "pocket" on the outward facing side of each quarter, which will create drag as the rod is flying through the air. This drag should hopefully be enough to pull the four parts open. I'm still not sure which one I'll use. Suggestions?

I would also like suggestions on what sort of adhesive to use. I was initially thinking double sided sellotape would be sufficient, but after some tests, I think not. A friend of mine suggested gorilla tape, which apparently is even better than duct tape (or something like that). Does anyone have any ideas about what to use? Ideally it should be cheap, because as one of my other friends repeatedly mentions, I'm a massive tight-wad. :p
 
Another thing I was considering was a sticky padding type thing. I don't know what it's called, but it comes in a roll, like sellotape, and you peel off the non sticky side to reveal that the other side is, in fact, sticky. So basically like double-sided tape, except it's about 1cm thick. Does anyone know what I'm talking about, and if so, what it's called and where I can get some?

Thanks in advance.
 
I first thought this thread was going to be another " Advacnded action suit*" thread , but it seem okay. Good luck with your project.


(*link in my signature for a few hours of good reading)
 
Calebxy, you may not be getting the help or replies you are wanting possibly because what you are wanting to build is not really a "Replica Prop". It's not something that exists somewhere else already. It's something that you are creating. My suggestion is to just build it with what you have at hand and see how it works.
 
Calebxy, you may not be getting the help or replies you are wanting possibly because what you are wanting to build is not really a "Replica Prop". It's not something that exists somewhere else already. It's something that you are creating. My suggestion is to just build it with what you have at hand and see how it works.

Well, to be honest, I thought the same thing before I joined. My friend William (Haystack Hair on here) said that I should join, even though my projects aren't actually props. So eventually, I did. And the thing is, my wall climbing gloves thread, even though they're even less like props (since at least Spider-Man does uses web shooters), had a decent amount of replies, and no one mentioned the fact that they weren't props or part of a costume. So I was under the impression that was acceptable, at least to a degree.

@Contec: Yes, I've seen that thread. Quite entertaining. :p And thank you.
 
Dont get me wrong, I'm not saying it shouldn't be here. it should, as it's a cool project. I'm just saying that you may have to come up with solutions yourself as it is your vision of the prop. I hope you get a working version completed and would love to see it.
 
Yeah man sounds like a cool project.

Looking forward to what you come up with!
 
Dont get me wrong, I'm not saying it shouldn't be here. it should, as it's a cool project. I'm just saying that you may have to come up with solutions yourself as it is your vision of the prop. I hope you get a working version completed and would love to see it.

Oh, I see what you mean now. I'll bear that in mind. And thanks.

@Apollo: Thank you. :D
 
An update, at last! I've now almost finished the brackets to hold the motors. Here are some pictures of them so far:

339ok0p.jpg


141eky.jpg


As you can see in the first picture, the two wheels aren't at the same height (it's actually worse than it looks in the picture), so I still need to raise that. I also have to put some card on the other sides of the motors, to stop them moving about that way. Though they're very top heavy, so obviously they'll tilt a lot when I move my hand. Therefore, I still need to figure out a way to keep them firmly where they are. Any suggestions?

But anyway, I'm pleased with the progress so far. Unfortunately, both wires from one of the motors came off while I was making these, so they need to be soldered back on. However, my [brother's] soldering iron isn't working properly. :( The tip, while hot, isn't hot enough to melt the solder. The rest of it is, though, but that's extremely awkward to work with. Does anyone know what causes this, and how to fix it? Thanks in advanced. :)
 
Done some more to the brackets:
2vvkehd.jpg


2vulkw5.jpg


As you can see there, I've made the supports to keep the motor in place properly, so now it can't move about at all (apart from up and down). The motor can still move about a little bit, so I might just put an elastic band around the two supports to hold them together more firmly.

I'm now working on the supports for the second motor.
 
I've now finished the main parts of the brackets for both motors. Now all I have to do is make the supports that go over the top of them to stop the motors from sliding up and down. Here's a picture of what I've done so far:

2d6prna.jpg


And again, does anyone know about that problem with the soldering iron? Help would be much appreciated.
 
Being completely honest, I don't see at all where you're going with your design. But this has got me extremely intrigued. I've often wondered about the logistics of at least partially functional web shooters.

Keep it up, man. I'm anxious to see how this turns out!
 
Being completely honest, I don't see at all where you're going with your design. But this has got me extremely intrigued. I've often wondered about the logistics of at least partially functional web shooters.

Keep it up, man. I'm anxious to see how this turns out!

What part don't you understand? The diagram or the photos? Or both? :p

Well, to put it simply, there are two motors with wheels attached to the ends. A small rod on the end of a long string of some sort will be pushed through the spinning motors, therefore propelling the rod forwards. It's the same way the electronic Nerf Guns work. Now onto the more complicated part. The rod will be able to open up into an X shape as it flying through the air, either by internal elastic or pockets that cause the drag of the air to open it up. Then along the insides of the rod there will be some sort of adhesive. Hopefully, this should stick to things well enough for me to be able to pull them towards me.

Does that make sense?

And thank you! :D
 
You should look at this video, to get some cool ideas on how to actually use your device.
When I saw this video, the first thing I thought of, was how can I make this automated.

 
Last edited by a moderator:
Instead of making an actual structure to go up and over the top of the motors, using the same method I used to make the main supports, I decided to just use sellotape. I put a few strips of tape (after cutting them so they are much thinner) over the top of the motors, put another strip cross-ways over the contact areas on either side, and then PVA glued over that (after mixing it with washing-up liquid so that it would stick to the sellotape). That's drying now, and I'll add a few more layers once it has.

Also, because I'm not satisfied with how firm the supports are, I'm going to put a elastic band around each pair to pull them together tightly. This should minimise how much the motors can wobble about as I move my arm.

And again, does anyone know anything about that soldering iron problem? I can't test these again until I solder the wires back on, and I can't do that without a working soldering iron (I'm not very good at soldering anyway, let alone with faulty equipment :p). Help will be very much appreciated.
 
soldering iron isn't working properly. :( The tip, while hot, isn't hot enough to melt the solder. The rest of it is, though, but that's extremely awkward to work with. Does anyone know what causes this, and how to fix it? Thanks in advanced. :)

It depends on how the tip is connected to the body of the iron. Some are screwed on, some are press-fit and some of the cheaper ones are all just one piece of metal.

1. if it's screwed on, grab the body of the iron (the larger metal part, behind the thinner tip) with one pair of pliers and grab the tip with another pair of pliers and try to screw the tip harder, into the body. -You're trying to get the best contact you can get between the body and the tip.

2. If it's press fit, put a small block of wood, face on, to the tip and use a hammer to tap the tip (with the wood between the hammer and the actual tip) tighter into the body.

3. Lastly and especially if it's all one piece of metal, take a small bit of sandpaper or metal file and clean the tip of the iron.
Cheaper irons will be made of brass or copper, with a nickel chrome plate and this sanding my wear off the chrome, to the base metal. -There's no help for this if the iron is old and the plating has already stopped conducting heat properly. The bare brass or copper will need to be cleaned more often, but will at least conduct the heat enough so the iron will at least still work.

If all else fails, break off the tip and take a large, unbent paperclip and wrap the paperclip wire tightly (using pliers) around the body of the iron, leaving about 1 inch of paperclip wire sticking out from the body. -You've just made a redneck solder tip.

IMGP1818.JPG
 
Good progress so far, I wish I'd seen this earlier, I love making little gadgets.
I've made a few things like this before, I think I used LEGO for my first try, nice and rigid, but not as much control as I'd like.
It's good you're spending a lot of time building the support structure, because controlling the tension (how much the two wheels press together) is important to get this working, too loose and you won't get enough power, too tight and you'll jam the wheels when you feed your projectile.
The other problem you may have is torque. You may find that even if you spin your motors up really fast then they stall when you try to put something in there. However, those motors you used look big enough, just make sure they have enough batteries.
Looking forward to more,

- Tom


Re: Soldering Irons
As Copper9 said it could be that your soldering iron tip isn't making good contact with the iron. However from my experience it's much more likely that it's just dirty.
You can easily tell, a well kept soldering iron should be shiny silver at the tip. If there are black spots or the whole thing is black then it may just need cleaning.(I wrecked two cheap irons before I figured this out)
Soldering Irons will build up a black oxide layer that doesn't conduct heat as well as the original coating so you need to constantly clean or re-tin your iron to prevent this.

Normally re-tinning just involves melting a copious amount of solder on your iron and making sure that the whole tip is silver then cleaning it off on a damp sponge. I do this before and after using my iron, or every few minutes if it's a long job (probably overkill)

If your iron is really black, re-tinning like this won't work, you have to manually clean the oxide off, you can buy a solder cleaning paste (a small tin of gunk that you dip your iron into and it will re-tin it) for a few bucks, or if you are careful, you can clean the oxide off with some fine wire wool (0000).
You definitely want to avoid using a file or course sandpaper as this will remove the surface coating of the iron, it may look clean but will quickly get black again and is then difficult to use.

If that was unclear, then just google re tinning a soldering iron.
 
Back
Top