Working TOS Phaser Shell Moulds

genZOD

Sr Member
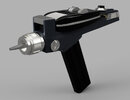
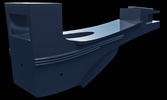
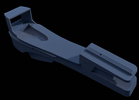
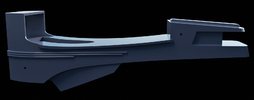
Hello All. I'm working on the P2 shell right now. I'm trying to get the basic shape right--so that I can 3D print it. After that, I'll do a bunch of sanding/filler to get all of the rounded off corners & bevels right. Then I'll make moulds for my fiberglass shell.

Anyway, to my eye the back half of my phaser is WAY to wide. I've matched the blueprints that I found online, but it looks off to me. To be fair, I've only ever seen the Diamond Select version in person.

TBH, I thought that I'd find better plans online. Anyway, help is always appreciated.

render-1.png

render-2.png
side.jpg
top.jpg
 
Last edited:
Looking good. The Diamond Select isn't that far off, really.

The main tweaks I'd recommend are giving the P1 cradle ribs a rounder, more organic shape, as well as rounding off the other corners and edges.

I'm sure there are more detailed and accurate blueprints out there, but I haven't come across them, lately.
Thanks, my plan is to hand shape the 3D print. Some of the really organic bevels & curves lend themselves to that approach, I think. Also, I need to work within the limits of my 3D printer.

And skill…
 
When I was teaching myself Autodesk Fusion 360 I created the phaser (1 and 2) as one of my first 3d models. I collected a bunch of pics from the Internet but I found that the images from the Wand Company's phaser remote showed enough detail to help me make my model.
 

Attachments

  • Phaser_prop_-_030420.jpg
    Phaser_prop_-_030420.jpg
    111.4 KB · Views: 114
Looking good. The Diamond Select isn't that far off, really.

The main tweaks I'd recommend are giving the P1 cradle ribs a rounder, more organic shape, as well as rounding off the other corners and edges.

I'm sure there are more detailed and accurate blueprints out there, but I haven't come across them, lately.
The plans I attached are the paths that I made based on some bitmapped measured drawings that I found. They're pretty much 1:1 copies using spline curves. I had to do a little adjusting (<1mm) to get the two views to align properly. Still, I think the plans I found are off a bit. Especially the area around the rear "cooling fins". Anyway, Even with better plans, I still want to do some hand shaping. I think that'll get me closer to the sculptural feel of the originals--if that makes any sense.

...and I just like doing that sort of thing.
 
I've made changes to my phaser 2 shell. I got much better plans -- so this should be much closer to the real prop. Next, I'll 3D print the model to make moulds for the final fiberglass shells. The corners on my 3D model are very sharp. I'm going to hand bevel all the edges on the 3d print. I think it will give the final product a more period accurate appearance than the mathematically perfect & consistent/symmetrical bevels from CAD.
 

Attachments

  • revised-quarter.png
    revised-quarter.png
    934.3 KB · Views: 64
  • revised-top.png
    revised-top.png
    917.8 KB · Views: 68
  • revised-side.png
    revised-side.png
    647.2 KB · Views: 69
  • revised-bottom.png
    revised-bottom.png
    963.6 KB · Views: 73
Are you planning on putting all the internal bits in there too?
This started when I built a phaser with a blue laser. I used a Diamond Select shell (with lots of modifications). I'd like to put the guts I built for that into a more accurate shell. I will try to keep all of the non-laser stuff accurate to the original props. Space will be an issue. I have most of the parts to make a brass handle. I can get the original twist plug to work, but I'll need to make modifications to get larger batteries to fit. Externally, my phaser will look as much like the "real thing" as possible. Internally, it will be similar--but with a laser stuffed into it. :)
 
genZod - Did you ever get your phaser built? Your 3D modeling looked great and hope you were able to get the laser work done! Please drop us an update ~ excited !
 
genZod - Did you ever get your phaser built? Your 3D modeling looked great and hope you were able to get the laser work done! Please drop us an update ~ excited !
LOL, I haven't had much time to work on this. On the plus side, I'm fully employed again! I did 3D print the most of the pieces, but I never went through the process of sanding/bondo so that I could pull a mold from it. But you've inspired me...

I did make an extremely dangerous blue laser/paser based on a modified Diamond Select toy.
 
Good to hear about your employment status! I hope you move forward with your phaser project now that you have steady $$$ but absolutely NO free time for a hobby! Lol. Story of our lives. Keep us in the loop if you pick it back up again.
 
I wonder if you could put a bore scope in front of the phaser one to see through a dark-but clear-plastic bit.

The top of the phaser could be a screen for a change. I think bullseyebores go inside drills for a nice effect.
 

Your message may be considered spam for the following reasons:

If you wish to reply despite these issues, check the box below before replying.
Be aware that malicious compliance may result in more severe penalties.
Back
Top