WIP: The Final Countdown Zero dogfight diorama Part 2: 1/72 Tamiya A6M2b

JNordgren42

Sr Member
And so the second chapter begins. My Tamiya Zero arrived today, and I have to say, I am exceedingly impressed with what's in the box. I thought the Academy Tomcat was finely detailed, but the little Zero just blows it out of the water. The panel lines are so fine that it's hard to get a good picture of them. And this thing is TINY compared to the Tomcat. It must have been incredible (and sometimes butt-puckering) to be in the air at the same time during filming. I can't wait to get started.

Although I may need to get some stronger magnifying glasses.

Nice box art.
PXL_20230508_222001228.jpg


The F-14 just dwarfs it.
PXL_20230508_223303190.jpg


The canopy parts are just breathtaking.
PXL_20230508_222612883.jpg


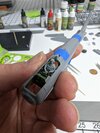
The engine cowl is about the diameter of a nickel.
PXL_20230508_222543193.MP.jpg


Fine panel lines and details on the wings.
PXL_20230508_222355171.jpg


The cockpit parts are just ridiculously crisp.
PXL_20230508_222315304.jpg


Engine as well. Again this is about the size of a nickel.
PXL_20230508_222331249.jpg
 
I've started trimming and test fitting and this little kit is sublime. Even with only a little masking tape, there is hardly a gap to be seen. And what little there is will probably disappear with a touch of glue. Also the size difference side by side is astonishing.

I can't wait to finish and get them together for good.
PXL_20230509_011810096.jpg


The little Zero is hardly bigger than the nose of the Tomcat.
PXL_20230509_012341077.jpg


The underside fits like butter.
PXL_20230509_011534568.jpg


PXL_20230509_011459432.jpg
 
Tamiya generally makes great kits and they fit like a dream

As far as the size difference WWII fighters are quite small compared to some modern jets, end even then, the F-14 is one of the larger ones of modern jets when compared to things like an F-16
 
I sprayed the first two batches of parts. Interior green on the cockpit bits and dark grey on the engine. Once they cure it's time to break out the itty-bitty brushes and start detail painting. One little inexplicable pet peeve, they only included instrument dial decals for the two main gauge clusters and not a thing for the auxiliary clusters. I'm baffled by the omission, adding a few tiny decals wouldn't have affected the cost of the kit one bit.

PXL_20230510_024131474.jpg


PXL_20230510_024232389.MP.jpg


PXL_20230510_024300363.jpg


PXL_20230510_024339138.jpg


PXL_20230510_024449413.jpg


PXL_20230510_024403690.jpg
 
I'm making good progress on the interior, it's almost done except for the main instrument panel, I need to spray some gloss on it so I can put the gauge decals on. I also plan to try to put at least some rudimentary markings on the other gauges by hand. I've also finished up the beautifully detailed little Sakai engine. Unfortunately almost all of this will be mostly hidden, but I'll know it's there.

The cockpit is mostly assembled, sans instrument panel and machine guns.
PXL_20230513_044144539.jpg


PXL_20230513_044044788.MOTION-01.COVER.jpg


I decided to drill out the lightening holes on the seat, the pattern in the molded dimples was odd, I need to go back and see if I can find reference on if it's how they actually were made, or if I need to drill some more.
PXL_20230513_044127324.jpg

Left fuselage half with canopy lock and throttle quadrant.
PXL_20230513_044334606.jpg


Right half.
PXL_20230513_044433415.MP.jpg


Sakai engine.
PXL_20230511_140958586.jpg


Another test fit. Penny for scale.
PXL_20230513_043847919.jpg


It's good ng to be awfully hard to see any of those beautiful details, especially with a pilot.
PXL_20230513_043948688.jpg


The engine is even more obscured.
PXL_20230513_044818984.jpg
 
I finished up the cockpit, I used the kit decals for the main gauges and painted the rest by hand. I sprayed it all with a mix of flat and semi-gloss clear and then picked out the dial faces with gloss. I also lost one of the machine guns to the carpet monster, so I had to scratch build a replacement. It doesn't have the charging handle, but otherwise it's pretty damn close. My pilot set should arrive Tuesday and I'll be able to button up the fuselage once I'm done painting the figure.

PXL_20230514_031439573.jpg


PXL_20230514_031424876.jpg


PXL_20230514_031454691.jpg


I'm really happy with how the gloss on the instrument faces came out.
PXL_20230514_031344517.jpg


PXL_20230514_031412756.jpg
 
My Hasegawa aircrew set came in the mail today. There were some minor flash issues, but nothing bad and I was able to put together a pilot in a pretty decent pose. I'm not entirely happy with the left arm, I was hoping to get the hand on the throttle quadrant, but it's a bit too tight of a fit. I had to do some surgery on that side of the figure even to get the arm tucked in where it is. There are some minor seams to deal with at the joints, but it should be easy to fix. I also test fit the canopy and I have to say it's by far the thinnest and crispest clear injection molded part I've ever come across. The moving section is only 12 thousandths of an inch thick (yes,I measured ). I'm definitely going to need to pick up a precut mask for this one.

He fits in there pretty snugly.
PXL_20230516_034022905.jpg


You can still see a decent amount of detail in there with the canopy cracked.
PXL_20230516_034038801.jpg


Not bad at all for an injection molded figure.
PXL_20230516_034843604.jpg


PXL_20230516_034854808.MP.jpg


The canopy is unbelievably well molded. Penny and TOOTHPICK for scale!
PXL_20230516_035014130.jpg


One of four identical sprues in the Hasegawa set. Enough parts for 16 complete figures and everything is mix and match.
PXL_20230516_035146127.jpg
 

Attachments

  • PXL_20230516_033113716.jpg
    PXL_20230516_033113716.jpg
    2.2 MB · Views: 59
A little more progress. After lots of test fitting, I'm confident I can get the pilot in and out of the cockpit with it all put together, so I'm moving forward and have the fuselage glued up and I'm working on getting the landing gear doors fitted (as is often the case, there are no provisions for a gear up display in the box). The trickiest bit so far has been the centerline doors. On a real Zero there are small triangular sections that fold outward when opened to allow clearance for the drop tank. These are molded as one piece with the rest of the door, so I had to carefully cut partially through from the inside and then bend them (relatively) straight. A little glue on the inside to help strengthen the joint and a little sanding to smooth out the bump and they look pretty good. I may try to very lightly scribe the hinge line as well (I need to get a much thinner scribing chisel for this though). I also added some blocking to the insides of the main gear doors for strength and to minimize any gaps. Finally, I'll need to scratch the small outboard sections of the doors as they're not wide enough. The main gear doors are molded as one piece and are the correct length for the compressed state of the gear. It should be pretty easy to make them up since they're just plain squares without any detail on the outside surface. I also got the seams on the pilot filled, primer sprayed, and I'm starting on painting with the face. I mixed a custom skin tone and wash and I like the color.

Fuselage glued up and landing gear doors mostly done.
PXL_20230517_051050499.jpg


I added some very small evergreen chips to the inside for strength and to help with the seams.
PXL_20230517_051113889.jpg


The centerline doors were tough. I had to bend out the small triangular sections on the aft portions. On the real aircraft these are small hinged flaps that fold inward for clearance of the drop tank.
PXL_20230517_051058890.jpg


Centerline doors on a real Zero:
a6m2_05.jpg


Primer sprayed on the pilot and ready to start painting.
PXL_20230517_030832558.jpg


Skin tone and wash on the face. Ignore the impressionistic effect of the picture, the Pixel 7 Pro really overprocesses macro shots, especially with the 5X camera.
PXL_20230517_051302163.jpg
 
I'm getting very close to being able to start the exterior paint. I finished up the pilot and I'm really happy with how he came out. I'm also trying an experiment and if it works, I'll have found another use for Bandai stickers besides masking (since they're certainly not good for finishing a model). I put the kit supplied waterslide decal on a spare panel sticker from my Millennium Falcon, and with any luck I'll have a result that is reasonably close to scale thickness, flexible, and self-adhesive. I'm waiting for the decal to dry thoroughly and keeping my fingers crossed that it works. I also have the landing gear doors closed up on the wings and the top halves glued on. And I gave everything yet another test fit (you can never test fit too much! :cool:). I'm probably going to have to get some decal paper to custom print the tail code since no in-print decal sheet that I've been able to find uses the AI-113 that was used on the first film "Zero".

Pilot done (I may put some gloss or semi-gloss on the boots and gloves, I haven't decided yet. I think I will name him Hikaru...
PXL_20230518_223606338.jpg
PXL_20230518_223638589.jpg


My sticker experiment. Hopefully it works.
PXL_20230518_225311303.MP.jpg


Test fit in the cockpit, I'm really happy with how he fits in there. Despite a little awkwardness with the left arm.
PXL_20230518_225435202.jpg
PXL_20230518_225504007.jpg


And another test with the wings, fuselage, and canopy.
PXL_20230518_225733068.jpg
PXL_20230518_225752269.jpg


Landing gear doors all buttoned up, including scratch built outboard panels.
PXL_20230518_055412500.jpg
 
Last edited:
Well, Plan A for the seatbelt didn't work out. I was able to trim the decals & sticker nearly perfectly, but the decals didn't adhere and came off when I started handling it. So I came up with Plan B and cut out some strips of tan sticker I had left and pieced a simplified version together. I used some tiny chips Evergreen to approximate the buckles. They're crude, but mostly buried and look decent when everything is buried.

The cockpit is all ready to put in the fuselage once I finish getting it prepped.
PXL_20230519_040334621.jpg


PXL_20230519_040322053.jpg


Trimmed seatbelt before the decal came off.
PXL_20230519_030530538.jpg


TINY little belt buckles.
PXL_20230519_034727633.jpg
 
I finished prepping the fuselage to install the cockpit and got it permanently installed and glued the wings on. I prepped everything for paint and got the first coat of primer on. As usual it shows a few places that need a little work, but it's surprisingly good for the first pass.

The cockpit, pilot, and wings are glued in.
PXL_20230520_222920265.MP.jpg


PXL_20230520_222931315.jpg


Prist coat of primer. The top looks really good.
PXL_20230521_003448792.jpg


PXL_20230521_003456537.jpg


I have a small seam to deal with at the wing join. Not bad at all though.
PXL_20230521_003526813.jpg


The cowling looks great with a little paint.
PXL_20230521_003645501.jpg


Most of the other small bits.
PXL_20230521_003747198.jpg
 
A little sanding, another coat of primer, some pre-shading, and the first pass at the base color. I'm shooting for somewhere between the tan/olive grey color of a real Zero (it's apparently been a subject of some debate) and the white/very light grey used in the film. I think I've got a touch more tan than I would prefer, so I may give it a white filter coat (and I may want to cut back the shading a little). I'm going to let it dry thoroughly and see how I feel.

PXL_20230521_184333968.MP.jpg


PXL_20230521_184339378.jpg


PXL_20230521_190447625.MP.jpg


PXL_20230521_190457954.jpg
 

Your message may be considered spam for the following reasons:

If you wish to reply despite these issues, check the box below before replying.
Be aware that malicious compliance may result in more severe penalties.
Back
Top