SD Studios
Well-Known Member
Great job! Another awesome (and under-appreciated) SW prop!
I missed that darn triangular detail on the back! I thought my replica was done. Now I have to go make that. How did I miss that detail?? :facepalm Thanks!
I painted my lenses gray AND I painted the Seagul and B&H knob interior gray as well. My interpretation is that they were painted gray. Opinions vary...
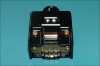
Here is a pic of mine, with my interpretation of the "mystery side box". I hope someone figures that out soon. I also gutted and installed a cheapie video camera that I received as a "free gift" for buying from Staples.
Again, GREAT work! One of my favorite props!
View attachment 142579
I missed that darn triangular detail on the back! I thought my replica was done. Now I have to go make that. How did I miss that detail?? :facepalm Thanks!
I painted my lenses gray AND I painted the Seagul and B&H knob interior gray as well. My interpretation is that they were painted gray. Opinions vary...
Here is a pic of mine, with my interpretation of the "mystery side box". I hope someone figures that out soon. I also gutted and installed a cheapie video camera that I received as a "free gift" for buying from Staples.
Again, GREAT work! One of my favorite props!
View attachment 142579