Just picking up where
CopperRevan left off with his custom blaster, after he let it go in the Junkyard. My plan was just to clean up and refine what he had already established.
I am also of the opinion that it's more interesting with its original finish - and as a pistol - so there will definitely be no paintwork or shoulder stock attachment.
However, I have to disagree that it's some sort of "rare and unique flash gun accessory." The more logical explanation is that it's simply a flare gun, which a flash tube just happens to fit into. Just like the tube of an MPP flash fitting into a Webley flare gun for Fett's ESB EE-3 blaster.
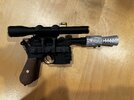
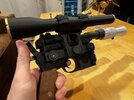
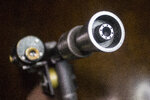
So, speaking of MPPs... I picked up a replica MPP flash tube from Roman - I wanted to go with the MPP tube because it has far less text engraved on it than a Heiland. I also thought a smaller diameter inner barrel would be good, making the MPP tube more of a shroud - for this I picked up a 12-inch length of 7/8" diameter aluminum tubing from McMaster Carr, which I then trimmed down. I didn't want to keep the shiny chrome finish of the MPP, so I started out by sandblasting it and then gave it a bit of a brushed finish with a couple different grits of 3M sanding sponges and a Scotchbrite pad. While I was at it, I also sanded the surface of the smaller aluminum tube. I then made two rings out of 1/4 inch thick MDF, to center and attach the aluminum tube inside the MPP - I painted the front ring black, so when you look down the muzzle you won't see raw MDF.
View attachment 1782025
View attachment 1782026
View attachment 1782027
View attachment 1782028
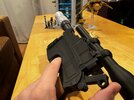
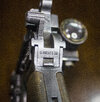
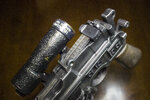
I disassembled the Graflex clamp and gave some of the parts a bit of a clean-up with a piece of Scotchbrite pad. While I had it apart, I cut a strip of aluminum tape to cover up the lettering. I then made a piece that both the Graflex and the smaller Yacht mini flash could clamp onto - basically the same thing that CopperRevan had, just lower in profile (I wanted the mini flash clamp closer to the Graflex clamp). For this, I used some pieces of brass strip that fit each of the clamps and which are attached to each other with another piece of narrow brass as a spacer in between - they're all sandwiched together with a couple 2-56 screws + nuts.
View attachment 1782029
View attachment 1782030
I removed the reflector bracket from the mini flash and turned the flash around so the black-rimmed socket will be facing towards the back.
View attachment 1782031
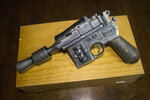
As for the flare gun, it needed some black schmutz cleaned off of the left side, and while I was at it I went over the whole thing with superfine steel wool to spruce it up a bit. I didn't really care for the Bakelite brown color of the plastic grip, so I removed it and cleaned it up with an isopropyl alcohol bath and an old toothbrush (for the checkering). Then it got a light sanding all over (except for the checkering). I then sprayed it with a couple coats of black Plasti Dip rubber coating before I stuck it back on.
Finally, I liked the concept and general shape of the barrel undercarriage, but I wanted something that would fit better - so I drew up a plan (by hand, with pencil and paper... because I'm a dinosaur

). I made the plan for a friend in the mechanical fabrication department at work, with the idea that he would machine it up for me out of a scrap of aluminum. Unfortunately, he's short a man in his shop for the next couple months or so, so he's a bit swamped at the moment, trying to pick up the slack - he simply doesn't have time for my nonsense right now. So this means that the blaster will have to go on the back burner for a bit...
View attachment 1782032
View attachment 1782033