Hello friends! My name is Ruslan. I live in Russia and I know very little English. I am sorry. I have to use Google translator to communicate with you.
I have long dreamed of making a spacemarine suit. This forum inspired me. In the topics I saw how other people do it. I am grateful to users of Hasenbrau and Sylgian and jFcustom for ideas and materials. And for the knowledge necessary for work.
Earlier, I and my girlfriend, did costumes on World of Warcraft. You can see them in the photo.


But now I want to give all the time to creating a dream suit. At the moment, I made the helmet base with Pepakura. I used Eva Foam 4mm thick (70A). Also, I did not understand the dimensions (935 and 850) and made a 935 size shell. He does not fit my height (167 centimeters) and I will redo it.
Now I'm busy preparing patterns for size 850. I want to create an ordinary spacemarine. Then decorate it for chaos.
A few pictures =)
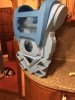
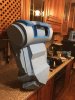
The basis of the helmet:


Patterns and ... How to say it in English? Shell?


My small workplace =)

Since I was mistaken with the size, I decided to make my legs. Start from the size of your legs.
Thank you for attention. And again I apologize for my English..)
I have long dreamed of making a spacemarine suit. This forum inspired me. In the topics I saw how other people do it. I am grateful to users of Hasenbrau and Sylgian and jFcustom for ideas and materials. And for the knowledge necessary for work.
Earlier, I and my girlfriend, did costumes on World of Warcraft. You can see them in the photo.
But now I want to give all the time to creating a dream suit. At the moment, I made the helmet base with Pepakura. I used Eva Foam 4mm thick (70A). Also, I did not understand the dimensions (935 and 850) and made a 935 size shell. He does not fit my height (167 centimeters) and I will redo it.
Now I'm busy preparing patterns for size 850. I want to create an ordinary spacemarine. Then decorate it for chaos.
A few pictures =)
The basis of the helmet:
Patterns and ... How to say it in English? Shell?
My small workplace =)
Since I was mistaken with the size, I decided to make my legs. Start from the size of your legs.
Thank you for attention. And again I apologize for my English..)