Will do another once I have the labels on and dirty it up some more
You are using an out of date browser. It may not display this or other websites correctly.
You should upgrade or use an alternative browser.
You should upgrade or use an alternative browser.
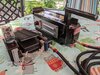
Walmart ghost trap and pedal build finished
- Thread starter propmainiac
- Start date
man that is cool. loved the video! ")
Thanks! Once I get the pedal done I'll make another video
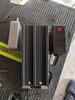
So ive been building the pedal now. The pedal itself was made from an aluminum plate. I coverd it with peices of a auto serpentine belt. The pedal base is plywood. I have the two hammond project boxes. Hoping to have it completed by the endvof this week.
Attachments
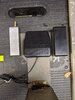
Also incorporating the pedal that came with the trap.
Hi all
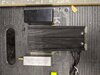
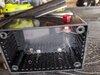
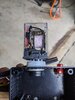
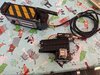
More work on the pedal...attached the hoses tonight. Ran the wires for the walmart pedal thru the hoses. Used a peice of steel key material to make the nycoil part. Drilled it out so the hose fit in then drilled out the underside so I could pass the wire thru. Also attached the d sub fitting and part of the ribbon cable.
More work on the pedal...attached the hoses tonight. Ran the wires for the walmart pedal thru the hoses. Used a peice of steel key material to make the nycoil part. Drilled it out so the hose fit in then drilled out the underside so I could pass the wire thru. Also attached the d sub fitting and part of the ribbon cable.
Attachments
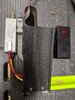

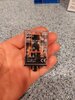
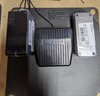
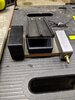
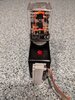
So installed the relay to the hammond box. To secure the relay i drilled into the main post on the bottom, then drilled a hole in the hammond box. To simulate a socket i used a water bottle cap that i drilled out till it fit snug against the contacts on the bottom of the relay. I screwed it to the top of the box using a washer and a couple of rubber washers .
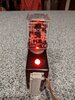
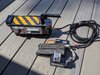
Using a battery and holder i scavenged from an old desktop i wired this to the red led and led cover from a broken switch. The red led lights up with a toggle switch. Not the way its supposed to light up but its easier than opening up the trap itself and running wires again.
Using a battery and holder i scavenged from an old desktop i wired this to the red led and led cover from a broken switch. The red led lights up with a toggle switch. Not the way its supposed to light up but its easier than opening up the trap itself and running wires again.
Attachments

Any comments or suggestions?
VID..EO... VID..EO... VID..EO!! looks great!!
I will do a video soon i promise
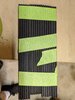
Ok heres a video. Keep in mind i wasn't trying for screen accurate. Just wanted it to look close. The nycoil connector was scratch built as well as the pedal itself. I also hid the original pedal wires in the red and yellow tubing. The pedal that came with the trap i placed under my scratch built pedal.
Attachments
Thanks! Really like how it came out. Adding the frosted plexi and the purple lights really made the difference
Similar threads
- Replies
- 1
- Views
- 1,005