Yah John said not to sue him in regards but told him the setup and he shot me off the actual sheet they use for their orders.. Should have them maybe tomorrow so i'll know in a few if no good or not.. Sure as heck hope they fit, was $110 up in smoke if not lol
Haven't finished the seat pan yet.. that's on my list of things to do this weekend.. I still want to incorporated the stock seat keeper in there to make the bag easily accessible, picked up some cool brass chain and this little brass skull to use as a dongle or pull cord for it..

Did get some cool LED blinkers ordered today from Revival Cycles that I should have by Friday and grabbed some LED's from radio shack that had built in resistors for the 'mini' console... I'm planning on taking a piece of the stainless punch screen to put indicators, probably just three lamps.. amber, green, and red for turn/neutral/engine oil.. haven't ironed out the details as yet.. But hopefully this weekend.. Plan on butchering the harness this weekend as well!
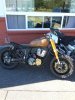
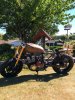
Here are the blinkers.. they are the size of a quarter and bright as hell.. $100 bucks for 4 of them with the modulator thingy.. I'm not using running lights I want just blinkers.. Once I get them i'll figure out if I'm mounting them on the flat spot by the shock mounts (probably for cleaner look) or making a bracket for them.. I think they are simple or utilitarian enough for the bike.. The front ones will probably go on a small bracket right at each hand control kinda tucked up under there as close as I can to the bars.


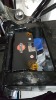
Here are the little Led's for the panel on the bars.. I was looking at various stainless pieces to make something kinda cool for it to hold them.. They were at radio shack and have a resistor already incorporated, only bummer was they didn't have a blue one for high but i'll figure I'll get the one finger salute if I leave them on lol

Worth mentioning that I noticed this material while at ACE, its some sort of brass gasket material, figured it would be good to put behind the brass mesh on the tail pipe section, I was wondering whether or not the heat would turn it colors or not but will probably get some of it anyways to see how it looks!

The guys at Revival said they get requests all the time for this bike but haven't entertained the notion yet, said my bike will be easy to sell when its done if I choose too lol


 20160716_154020.jpg160.6 KB · Views: 204
 20160716_154020.jpg160.6 KB · Views: 237
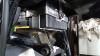 20160716_154034.jpg158.9 KB · Views: 259
 20160716_154034.jpg158.9 KB · Views: 261
 1468697885533.jpg50.4 KB · Views: 225
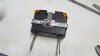 20160716_154120.jpg126.3 KB · Views: 253
 20160716_154120.jpg126.3 KB · Views: 208
 1468697885533.jpg50.4 KB · Views: 217
")