63SSRagtop
Jr Member
Yeah, was gonna mention that one.. It's best to mount to master cylinder and run the line where you need it. A rag around the crimp and a pair of pliers to hold it, then put a screwdriver in the banjo and orient it where you need it... don't do it excessively though.. once!
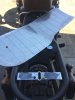
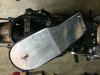
Grill is looking good.. I spent the weekend working on the rear rack and setting it up! Used stainless for every thing except the station posts.. cold rolled 3/8" so that I could use the regular old small paint rollers on the three smaller ones.... on the big fatty I used the handlebar foam that came with the bars.. had to wrap some duct table (kinda wrinkled it up on itself as I wrapped it to add bulk) around the 3/8 stud for the big one.. used the tape and got some RIT brown liquid dye for the color.. just brushed it directly on.. i'll touch it up some to give it some more realistic color but pleased with the results!
Will be dropping the seat off in the a.m sometime to get it wrapped up, guy that's doing it assures me i'll have it back in a day, will see about that! lol
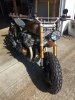
Still haven't made the baffles for the exhaust but hopefully tomorrow before work!


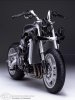
I'm looking around for another bike to start on.. like the cleanliness of this BMW engine setup, of course strip it down to parade rest but would be interesting bike! Or the concours below it.. yes, there is something wrong with me! lol
Look at the lines on stripping down the bmw, can see all kinds of possibility with a cool set of wheels!


And the Concours look swicked naked as well!
Grill is looking good.. I spent the weekend working on the rear rack and setting it up! Used stainless for every thing except the station posts.. cold rolled 3/8" so that I could use the regular old small paint rollers on the three smaller ones.... on the big fatty I used the handlebar foam that came with the bars.. had to wrap some duct table (kinda wrinkled it up on itself as I wrapped it to add bulk) around the 3/8 stud for the big one.. used the tape and got some RIT brown liquid dye for the color.. just brushed it directly on.. i'll touch it up some to give it some more realistic color but pleased with the results!
Will be dropping the seat off in the a.m sometime to get it wrapped up, guy that's doing it assures me i'll have it back in a day, will see about that! lol
Still haven't made the baffles for the exhaust but hopefully tomorrow before work!
I'm looking around for another bike to start on.. like the cleanliness of this BMW engine setup, of course strip it down to parade rest but would be interesting bike! Or the concours below it.. yes, there is something wrong with me! lol
Look at the lines on stripping down the bmw, can see all kinds of possibility with a cool set of wheels!
And the Concours look swicked naked as well!
Attachments
Last edited: