Re: Uncharted 2 Shoulder Holster WIP - My first replica prop project
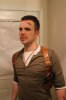
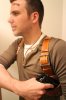
Now that the buckles came in, I was able to continue making progress on the leather bits. I went down to Tandy and spent a bunch of money to get all of the supplies I thought I might need. I decided to just cut the straps as straight pieces of leather. I thought maybe they would need to be slightly curved in order to get a proper fit, but it doesn't seem that way now. The only one that might do better as a curved piece is the bottom right strap. It just has to bend in a way that makes the strap parallel to the floor right next to my side. It's not the most comfortable thing, though I think it does match what the holster looks like in game most of the time. Of course the game is not real life and doesn't have to conform to the laws of physics")
Sorry for the poor quality of these photos. I had terrible lighting and I only had my phone camera. Also, the wood table/floor background makes it difficult for my camera to auto focus. I was just working with what I had at the time.
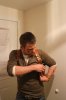
I decided to use Chicago screws (screw posts) to put the whole thing together. I'm guessing Leatherworker actually used rivets for his replica, but I wanted to be able to take mine apart. I'm considering making a second back plate that has my own initials. That way I can have a more accurate version with NDI stamped in (still haven't stamped yet) and another with my initials for the fun of it. I considered going with snaps but I couldn't find any snaps with posts long enough to go through this many layers of leather. Chicago screws seem to work well though. I had to carefully measure the holes and then I used a rotating punch to make the holes.


Next I cut the top straps. Then I measured and punched holes for them.


You can see the top right strap is made less wide at the end. That's because the buckle is only wide enough for a one inch strap. This is how the game designers made the holster for some reason. It was the reason I couldn't find any buckles that matched properly. Oh well! Moving along.

 More plain straps


All four main straps.


And the final fifth strap. This strap attaches to the holster. The other end with be sewn onto the buckle. I decided to use Chicago screws for this as well, rather than sew it together. That way I can more easily replace the holster later if I want. I figure if I can replace the holster piece, I can use this same holster to carry many different firearm models if I want and I'll only have to replace one piece of leather instead of all the straps. I think sewing may have looked a bit nicer... but I don't think this will look bad either and it will make my life easier later.

Now I have all the straps cut. The next step will be to start fitting it together. Most of these straps are probably a bit too long. I did this on purpose so I could more easily cut it down to size later. Once I get them cut down to the exact right size, I'll create the grooved outline like I did on the other pieces months ago. Then I'll bevel the edges. I also need to cut a few smaller pieces of leather. Two attach to the back plate and one attaches to the holster. Difficult to describe in words, but you can see them in the reference images. Then I'll move on to staining, finishing, and sewing!
Now that the buckles came in, I was able to continue making progress on the leather bits. I went down to Tandy and spent a bunch of money to get all of the supplies I thought I might need. I decided to just cut the straps as straight pieces of leather. I thought maybe they would need to be slightly curved in order to get a proper fit, but it doesn't seem that way now. The only one that might do better as a curved piece is the bottom right strap. It just has to bend in a way that makes the strap parallel to the floor right next to my side. It's not the most comfortable thing, though I think it does match what the holster looks like in game most of the time. Of course the game is not real life and doesn't have to conform to the laws of physics
Sorry for the poor quality of these photos. I had terrible lighting and I only had my phone camera. Also, the wood table/floor background makes it difficult for my camera to auto focus. I was just working with what I had at the time.
I decided to use Chicago screws (screw posts) to put the whole thing together. I'm guessing Leatherworker actually used rivets for his replica, but I wanted to be able to take mine apart. I'm considering making a second back plate that has my own initials. That way I can have a more accurate version with NDI stamped in (still haven't stamped yet) and another with my initials for the fun of it. I considered going with snaps but I couldn't find any snaps with posts long enough to go through this many layers of leather. Chicago screws seem to work well though. I had to carefully measure the holes and then I used a rotating punch to make the holes.
Next I cut the top straps. Then I measured and punched holes for them.
You can see the top right strap is made less wide at the end. That's because the buckle is only wide enough for a one inch strap. This is how the game designers made the holster for some reason. It was the reason I couldn't find any buckles that matched properly. Oh well! Moving along.
More plain strapsAll four main straps.
And the final fifth strap. This strap attaches to the holster. The other end with be sewn onto the buckle. I decided to use Chicago screws for this as well, rather than sew it together. That way I can more easily replace the holster later if I want. I figure if I can replace the holster piece, I can use this same holster to carry many different firearm models if I want and I'll only have to replace one piece of leather instead of all the straps. I think sewing may have looked a bit nicer... but I don't think this will look bad either and it will make my life easier later.
Now I have all the straps cut. The next step will be to start fitting it together. Most of these straps are probably a bit too long. I did this on purpose so I could more easily cut it down to size later. Once I get them cut down to the exact right size, I'll create the grooved outline like I did on the other pieces months ago. Then I'll bevel the edges. I also need to cut a few smaller pieces of leather. Two attach to the back plate and one attaches to the holster. Difficult to describe in words, but you can see them in the reference images. Then I'll move on to staining, finishing, and sewing!