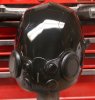
Tron: Legacy Black Guard helmet build

Note on polishing:

Here is a quick run through of my process for getting a mirror finish on my Tron helmets.
-3 coats of clear (gloss or semi gloss work just fine). Wait at least 24 hrs before sanding.
-400 grit wet sand
-800 grit wet sand
-12-1600 grit wet sanding is optional (might reduce time needed with the next steps)
-Meguiars rubbing compound with microfiber cloth
-Meguiars carnuba wax with microfiber cloth

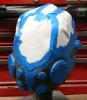
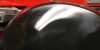
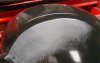
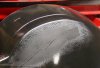
The pics below were taken after each of these steps. I probably spent about 10 minutes on this area. I got some pretty big drip marks, but the 400 grit knocks it down just fine.

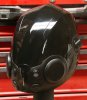
The goal with the 400 grit is to work the area until you even out the 'orange peel' from the spray paint. You'll know you're done when all of the dark spots - which are essentially valleys where the clear paint hasn't been touched yet - are gone. If when you're re-wetting your sand paper, you see black in your dish, you've removed all the clear and are sanding into the black paint. You'll need to stop and reapply clear. If you're careful not to sand too deep, 3 coats of clear should be sufficient to avoid this.

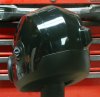
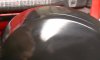
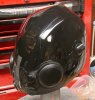
The goal of the remaining steps is to eliminate the swirl marks of the previous steps. You don't really see these marks until you start using the rubbing compound. The more you use the rubbing compound the more mirror-like it gets.

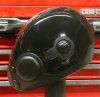
The carnuba wax doesn't really do anything for removing marks, rather it just deepens the shine. I didn't get to that step in these pictures.
 

Attachments

  • BG-53.JPG
    BG-53.JPG
    148.3 KB · Views: 202
  • BG-52.JPG
    BG-52.JPG
    154.9 KB · Views: 164
  • BG-51.JPG
    BG-51.JPG
    140.3 KB · Views: 187
  • BG-50.JPG
    BG-50.JPG
    220.3 KB · Views: 172
  • BG-49.JPG
    BG-49.JPG
    230.2 KB · Views: 198
  • BG-48.JPG
    BG-48.JPG
    188.1 KB · Views: 193
Well, the polishing is taking me a long time to get right. Almost there. I've had to go back and add clear coat in a couple spots that I sanded down too far.

Sprayed the large and medium sized respirator disks in a matte gloss per reference photos. Last but not least is the plasti-dip on the areas behind the disks, breather tube, and antenna tip.

I will be using a section of fat soldering wire for the chrome piece down by the mouth. It is about the right size, it's shiny, and easy to curve. I just shoved one in the sculpt to test fit.
 

Attachments

  • BG-54.jpg
    BG-54.jpg
    308 KB · Views: 215
  • BG-55.jpg
    BG-55.jpg
    349.8 KB · Views: 232
Thanks guys! I've had a lot of fun working on this one.

Here's the latest. Was able to mask the glossy parts, then do a light 220 grit sanding on the rest to prep for the paint. Then applied 3 coats of plasti-dip spray. The texture really starts to come alive after the 3rd coat.

I also like to remove my masking tape immediately after spraying the 3rd coat, while the paint is still wet. I have had problems in the past from peeling the masking off after the plasti-dip dries. What happens sometimes is that when I'm peeling up the tape, the plasti-dip peels off with the tape. Then, because it's dry, it doesn't lay back down and stick to the surface. As long as I'm careful when pulling up the tape while its wet, this problem doesn't happen.

The end is in sight! Now I'll just carefully polish up the gloss one last time and clean up any marks made by the blue masking tape.

Then, time to make the mold!
 

Attachments

  • BG-56.jpg
    BG-56.jpg
    350.5 KB · Views: 185
  • Black Guard - Finished sculpt 2.jpg
    Black Guard - Finished sculpt 2.jpg
    359 KB · Views: 177
  • Black Guard - Finished sculpt 1.jpg
    Black Guard - Finished sculpt 1.jpg
    342.6 KB · Views: 192
  • Black Guard - Finished sculpt 3.jpg
    Black Guard - Finished sculpt 3.jpg
    286.4 KB · Views: 173
  • Black Guard - Finished sculpt 4.jpg
    Black Guard - Finished sculpt 4.jpg
    296.9 KB · Views: 180
Last edited:
Crimson, your Clu helmet is currently my favorite one that I own. I like Artfunk's Rinzler helmet, but I can't afford it :' ( I've got Electronic Lids Tron Helmet, but I need to redo it.
I saw your project run for Quorra and the helmet looks nice, but this is the one I am still waiting for...
 
Thanks for the kind words!

I am planning to do the silicon mold for the Black Guard helmet tomorrow. I'll try to keep updating on progress as I try to finish the first cast with lights. If all goes well, there will be a project run for this too!
 
Silicon mold is done. So many things could've gone wrong. Lots of places for the silicon to trap air or simply not go...I'll be crossing fingers till I get the mother mold done and can pull this off!
 
Hard shell done and mold was pulled from sculpt last night. I'm plesantly surprised that i captured as many features as I did! A few areas will need some minor clean up, but shouldn't be too bad! I'll try to get a cast in the next few days and see how it all looks.
 
crimson ... you really need to make a limited amount of these to sell dude . i need one for my Rinzler UD jacket .

and this is FRAKKIN amazing
 
Thanks guys. It means a lot. And jaganar - consider yourself on the list. =)

Poured the cast last night, and this mold is really putting me to the test. There's a lot more to pay attention to on this vs the Quorra or CLU helmets. Gotta be on my toes when trying to fill all of the little details and undercuts. I think I've captured all the details without serious air entrapment, but I did notice that the heavily textured areas are causing a lot of tiny air bubbles to form. Not sure if this can be helped with a slower 'slush'. Essentially, the rate at which the resin flows over the mold for the 1st time can have an impact on the presence or absence of small air bubbles.

I think I need to do a special thread on slush casting with clear resin. There's so much I've failed at, that it seems like it would be beneficial to someone...
 
For tricky moulds like that I use a paintbrush to make sure the resin gets into to all the nooks and crannies, then carry on as normal.

What sort of working time do you have with the resin your using?
 
Ok, it's settled then. And it sounds like it'll be a good place for others (like you Canobi), to share your tips as well!

i know if I used a brush, I would definitely introduce air bubbles, but I can see how it would help cover the small stuff.

My my working time is 5-15 tops. I used to use stuff that was 15-30 min, but it took me way too long to cast helmets.
 
That was my initial worry about using a brush too. However, I found that you just need enough resin to wet the mould skin and to get into the details, then pour in the remainder and carry on as normal. A fine coating of talk prior to wetting goes a long way too, even with clear resins.


Are you rotating the casts by hand?

I'll knock up a build schematic for a simple space saving helmet roto and post it up if your interested. After making my helmet roto, I started to figure out a better way to build one that will almost flat pack.
 
now i'm baffled - how does talc help on a clear and glossy surface? I've heard it is used in blowmolding to help keep the inner walls of the drape from sticking to each other, but it doesn't go on the tool-side of the plastic.

Also, I notice that (at least with the resin I use) if the resin coats the mold too thinly, it will tend to not stay there. It almost looks like it dries up or leaves the surface like when you pour water over a non-porous surface. In any event, I will try the brush method and see what happens.

Yes, I'm rotating by hand. I like the control I get to be able to move resin where it is needed. I remember you were working on a roto for your disks...getting a motor, pot, frame...did you get it working successfully?
 
I thought the same too when I first heard it mentioned. It works by absorbing the resin into the cracks n corners, it also stops surface bubbles from attaching to the mould walls. Brush it round the mould and tap out any excess as only a fine dusting is needed, something like quarter of a tea spoon is more than sufficient for a helmet mould. It disappears without trace so is fine to use with clear resins. I have noted a marked improvement in casts when I do use a brush first.

I got the motor, sorted manual speed control, started the frame, and then EL technology took a very intersting turn which totally changed the game, and the spin mould I was making suddenly became obsolete.


Making a helmet roto is a piece of cake. I used Smooth-On's shell shock as a jacket mould for a Fett helmet I did for another member, the thing weighs a ton with the silicone, and I didn't fancy rotating it by hand for even five minutes, so did a quick sketch and whipped up a table top helmet roto together (spin on one axis, tilt on the other), works a treat. :thumbsup

I'm going to use the motor I bought for a Mk2 roto now as it takes up a ruck of spaceand doesn't need to be as wide as it is, it was just made it with what I had on hand at the time.

 
This thread is more than 9 years old.

Your message may be considered spam for the following reasons:

  1. This thread hasn't been active in some time. A new post in this thread might not contribute constructively to this discussion after so long.
If you wish to reply despite these issues, check the box below before replying.
Be aware that malicious compliance may result in more severe penalties.
Back
Top