Top Gun Moto Helmet - Part 2: VIPER

Re: My First Build!! Top Gun Moto Helmet!!

Fred - I had to use the Rust-Oleum Automotive Clear ...

I didn't even know they made such a thing, but I'll be sampling it soon, seeing how well it turned out on this project. My compliments on your fine work.
 
Re: Top Gun Moto Helmet!! COMPLETED! Pics On Page 4!

Thanks guys!!

Leigh, I haven't polished it yet. It's still got a subtle 'paint' oder to it, so I'm thinking that it's still in the curing process. I don't want to polish it until it's fully cured.

Krates, here's what I used:

730745_300.jpg


It looks great and went on really nice. I suppose I'll have to do an update on how well it holds up six months from now!!

Maul - thanks a lot!! When I started this, I had no clue what I was doing but I did have a vision of where I wanted to end up. Thanks to a lot of the advice shared with me in this thread by skilled RPFers, it turned out better than I imagined!

The guys at my local motorcycle shop are dying to see it - especially after I shared the pics that I posted today!!
 
Last edited:
Re: Top Gun Moto Helmet!! COMPLETED! Pics On Page 4!

Looks awesome, Dave. I'm glad you went through the whole process with the wetsanding, and all. It really makes a difference.

Now, if you're going to polish it, wait a month or two, to allow the paint to finish gassing out. Then give it a coat of Liquid Glass auto polish. This is stuff that restorers put on their car, the day of a big show.

-Fred
 
Re: Top Gun Moto Helmet - Part 2 Goose

Hey Guys and Gals! Well after having such a great expierence with my first project, I'm ready to begin Part 2: Goose

553845706_tp.jpg


Since I learned so much the first time, I think I'm going to do things a little differently this time.

So here's the base helmet that I'm starting with:

DSC01752.JPG


DSC01754.JPG


With the exception of the front vent, this shell is smooth and should be a good shell to work with. This time though, I'll have a good bit more prep work to do to get the shell ready since it's got both graphics and a clear coat on it already.

Stay tuned!
 
Last edited:
Re: Top Gun Moto Helmet - Part 2: Goose

One little modification that I made to the Maverick helmet tonight was an adjustment to the visor clearance. I've been really concerned about the visor opening and closing due to the reduced clearance since added layers to the shell as I did the project. So tonight, I went to Home Depot and picked up some 5/16th washers, removed the visor and the mounting hardware and then placed the washers in line with where the hardware mounts to the sides of the helmet. The result is that opens up the curvature of the visor enough to give the necessary clearance while still accommodating the shape of the visor. The change isn't even noticeable unless you really REALLY look close.

Now I can wear it and not worry about the visor scratching the beautiful clear coat.

:thumbsup
 
Re: Top Gun Moto Helmet - Part 2: Goose

Been making progress on my helmet, but the THICK clear coat on my Shoei donor helmet was quite a pain to work through - literally!!

This time, rather than just scuffing the surface, I felt that it was important to work off the clear coat and the underlying graphics. This made getting out of the gate a good bit harder because my last helmet didn't have a clear coat to sand off. So here's what took me a few sessions earlier in the week to do (by hand - wax-on wax-off style):

l.jpg


Before finishing sanding though, I did manage to figure out how to carefully remove the front vent cover without breaking it:

l.jpg


This was clearly not meant to be taken off, so I was really happy that all three pieces remained intact and the mounting screws weren't broken when I removed it.

l.jpg


The other bummer with this helmet was that the inner liner wasn't removable, so there was no way for me to get to the vent from the inside. So I had to be VERY careful not to ding up the shell as I removed it.

Anway, so I got all of the sanding completed today, and applied 2 coats of primer:

l.jpg


Holy crap - deja vu!!

l.jpg


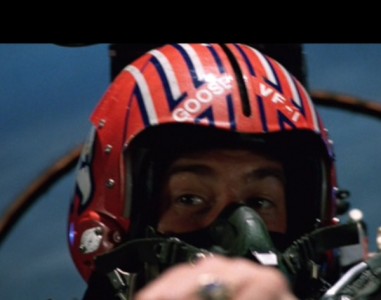
Now the one big issue that I have goes back to the front vent. It's right smack in the middle where GOOSE will go:

l.jpg


So I'm not sure what I should do. I'm afraid that if I do the GOOSE theme that all you'll see will be "GOO" on the forehead...

...and since I haven't arrived at the color stage yet, I still have time to decide what to do, but if I still want a useable vent (which I sorely need here in AZ) as opposed to filling in the holes and not re-installing the housing, I might need to make a thematic change and do either ICEMAN or VIPER.
 
Last edited:
Viper: Good morning, gentlemen, the temperature is 110 degrees.
Wolfman: Holy sh#*, it's Viper!
Goose: Viper's up here, great...oh sh#*...
Maverick: Great, he's probably saying, "Holy sh#*, it's Maverick and Goose."
Goose: Yeah, I'm sure he's saying that.


I love that dialogue!!

Alright guys and gals, after doing some soul searching about which character theme would best fit this helmet, I decided that VIPER would be a better fit.

l.jpg


Even with the VIPER wings on the forehead, it should be alright and not interfere to put them there with the ventilation housing on top - it will sit right in the middle of them (horizontally) - at the very least it won't be covering up any lettering and you'll know what you're looking at.

Here's what the side graphics will look like:

l.jpg


I'm also excited about the graphics as a whole for this helmet - I like the look. VIPER was a bad a#* too, so having both MAVERICK and VIPER will be a pretty neat combo to wear when I/we ride!

Once I decided on the character scheme, I was able to acquire the color paint that I needed and get continue where I left off yesterday. I wet sanded the primer that I sprayed yesterday evening first thing this morning and applied the tac and first color coat this evening once the wind died down. I thought the first coat went on nicely, but it's just getting started! If there's one thing I learned on the first helmet, it's that wet sanding is REALLY necessary at every coat to ensure a nice final finish. So I'll wet sand again in the morning before heading off to work.

Here's what I've got as of this evening:

l.jpg


l.jpg

(Looks like a bowling ball!)

I really like projects like this. They help me focus and relax all at the same time.

:thumbsup
 
I love watching these builds come to life....


Trully amazing work!!!!

One of my fav movie (and character) of all time...

P.S. this got me heavily into RAYBAN AVIATORS... :)
 
Thanks DJ! Doing this has really been a journey of self discovery for me. Though I like to think that I'm creative, I never thought that I'd be able to do something like this! It's a very rewarding learning process for me. Who knows, maybe one day I may turn this into more than just a passing hobby!!

Monday Update: I got the wet sanding done this morning on coat #1, cleaned it up, and hit it with coat #2.

You can already tell how much the wet sanding is helping with the sheen that the paint is taking:

l.jpg


I'm also surprised at how much better the unpolished reflection is so early on in the project:

l.jpg


I must say that from what I learned from doing the first helmet, that these coats are going on much better from the start. Hopefully that translates all the way through to the end! Now it's time to let it dry until tomorrow - the hardest part for me is to just let it sit, but there again, I learned that working with paint too soon is BAD BAD BAD!!! LOL!

Another point that I'm keenly aware of is that since I'm using black, I must do everything I can to be sure that the surface is as clean as possible and that the winds are as low as possible when I hit the helmet with color - though black may hide imperfections to some degree, I think it'll show a lot once I get to the clear coat phase. So I'm getting really good with my quick spray technique!!
 
Last edited:
Lookin good (y)thumbsup:thumbsup

White & very light colours will hide a multitude of sins but black & very dark colours will exaggerate the smallest imperfections in gloss. Even if you rub a little longer on one spot to remove a dust particle, it'll show as a slight dent or low spot in the surface. Its allways the prep that'll make or break a good paint job, Your doing just fine though from the looks of things :)
 
Thanks Leigh! I appreciate the feedback and the info. I had a feeling doing with a black color scheme would increase the difficulty somewhat - but that's what makes project work so much fun!

Weekend update:

I've been spraying, sanding, spraying, sanding, etc...and not really feeling like I have been getting the paint thick enough between sanding sessions. So today, I spent my morning tactically spraying multiple coats. Ultimately it was a game of spray and wait, spray and wait - but after all was said and done, I hit it with three progressive coats of black and think I've got the base color where I want it.

Here are some pics I just snapped (still a little wet):

l.jpg


l.jpg


I know with just evaluating pics of a black helmet isn't all that exciting, but as Leigh pointed out, it's the prep work that makes or breaks a good paint job - and like the last one I did, I want this one to turn out as beautiful as possible.

The guy who supplied me with the graphics for my Maverick helmet is doing the same for this one. Here's what the entire set looks like:

l.jpg


The neat thing about this set is that the yellow is reflective, so at night, it should really "pop" when the lights hit it.

Now, since I did progressive coats today without sanding in between, it'll be crucial that I wet sand before proceeding further. I'll let it sit for the next 24 hours before working on it again to make sure that every layer has fully dried.
 
Update - so I started working out a few imperfections that I saw in the chin bar and now have a bit of a problem....

l.jpg


After doing some otherwise extreme sanding to get back down to where a problem originated, I ended up with this unplesant sanding ring. I'm currently trying to reblend with primer and wet sanding in between to hopefully fill in the sanded area prior to repainting, but if I'm barking up the wrong tree on this, I welcome any suggestions that anyone can offer.

*the picture reflects 1 coat of primer over the sanded surface. I've got 2 additional coats on now, and though the ring appears to be diminished, I'd bet that it'll still be visible with black paint on it...

...and the last thing I want is to see this ring in the paint...

:angry
 
Last edited:
I'd say at this stage let it all dry for longer, use a guide coat & then block it down wet.
Concentrating all your sanding to a small area will create low spots which will look a little like ripples or shallow dents when a dark gloss top coat is applied. You should use a block to keep everything at a level.

Edit: You should really do all your prep with the primer, base & clear are the final stage really.
The base isnt really designed to be built up too thick. Do you have any tack rags?? once your primer is fully dryed, flatted & ready for the base use a tack rag/cloth to get any little bits of fluff.

HTH :)
 
Last edited:
Thanks Leigh! I picked up some new primer tonight (since I ran out) and worked on it. It was so hot and dry here today that as I sprayed the primer, I could actually see it dry in moments. I got 4 good coats on over the troubled area. Tomorrow I'll lightly sand it and see how it's looking.
 
I still think Goose would have been better. Especially for anyone you have on the back of your bike.

Sent from my Apple Newton
 
I still think Goose would have been better. Especially for anyone you have on the back of your bike.

Sent from my Apple Newton

I know...I agree...but the problem that I'm looking at is that I really don't think that I want to cut off the air flow in the helmet by sealing the vent holes. That's the only way that I could have the GOOSE text not be messed up.

Additionally, this helmet is a good bit older than the donor that I used for my Maverick helmet. So while wearing any helmet is certainly better than none, this one will probably be mainly relegated to the trophy wall and I'll do a 3rd helmet (probably from a new shell) that can be worn without concern for the protection lifetime of the helmet.
 
Alright, now I need some advice.

Here's the problem - I sanded pretty agressivly as seen below and have been trying to re-blend ever since.

Here's a picture from earlier in the week (exaggerated to highlight the problem):

l.jpg


And here's one I just took (again, contrast is exaggerated):

l.jpg


Obviously I'm back to working with primer and it's blending in better....but this will probably show and be an ugly mess if I hit it with paint...

How the heck to do I re-blend this to a smooth finish?? I've lost count of the number of times I've sprayed, wet sanded, sprayed, etc...(insert headbang on wall). I'd guess this somewhere along the lines of 8 coats of primer.

Everything else is on hold until I can smooth this out. :angry
 
Back
Top