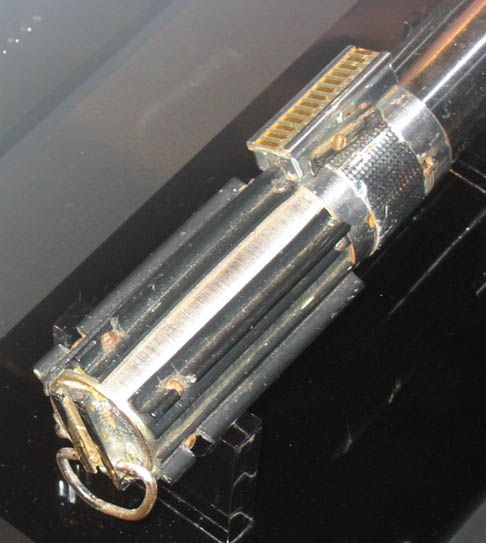
Tom's Skywalker Ranch Saber

thd9791

Master Member
RPF PREMIUM MEMBER
My favorite lightsaber is now becoming real! I found a 3 cell included in a massive large format kit. (Some of which will become @NeoRutty s graflex claymore..trying to sell the rest and make up the difference...

anyways, it's a beautiful, gunky flash unit, perfect for a (basically) Dagobah saber. I collected screws from beige TI calculators and slotted screws from that electronic connecting kit (see ESB screw thread) Omni-grips. The card is from an Otis board, and the track is Gino's!

textured tape came from John at Blast-Tech, we started with that. I used the squares to measure and cut the tape with an X Acto. I also had this idea of keeping the screw/rectangular nut attached, so I added a pinhole and sandwiched the tape between them. As so.
image.jpgimage.jpg
Then my dad and I pried off the beer tab, and just ground off its remnants. The raised knob looks cool, and this is a crap saber anyway :D

image.jpgimage.jpgimage.jpg
So tep, red button went where it belongs, based on the "rare" archives photos. Next was the grips...we HAD an exacto razor saw and mitre box but rigging up a 92mm rig was more confusing than I thought. Also, we didn't have quite the right grinding wheel to cut the notches. We made do, and my dad went to town cutting up the grips haha
image.jpgimage.jpgimage.jpg
And onto the notches...messy and subject to human measuring error...
image.jpgimage.jpg
But that's what a weathered saber is all about, so I did the same thing as my Vader saber....superglue before drilling and screws! (Just glue tonight)
image.jpgimage.jpg
 
Last edited:
*edit* the painters tape didn't protect as much as I'd wished, hence the scratch marks. I DID wipe them down with pledge and it darkened the scratches. They're much less noticeable now. (though the original prop definitely has them) LFA_LukeESBbs.jpg ....and I think the threaded rod is still IN the clamp. minus the lever.
 
Yeah I'm just waiting to drill some holes and I too will have a weathered ESB.

I don't know what it is... for my ANH I wanted pristine, off the assembly line... but ESB I wanted beat up.

Yours looks exactly as it should in my opinion. :thumbsup
 
i love all the pictures, thats a real cool picture of your dad. is he a fan as well? or is he like my father when i ask him a tool and technique question he asks " what damn toy are you building now?!" lol

that is a real nice jig you made up! where did u find that piece of aluminum channel?
 
Looks great, congrats!

It's funny, my pops has gotten involved in some of my builds and he's always laughing at what we're working on, but I can tell he's into it because he keeps coming back to the shop to see how it's coming along and offering suggestions on technique.

Star Wars- bringing families together.:)
 
i have a few of them, but they are much larger :( i wonder where i can find that low profile miter box?


I don't think it's as low as it looks in the pictures, I look those from above. It's the standard X-Acto mitre box.

And my dad, ironically, thinks this is the coolest thing ever and really is only sad that he's not around to do a lot of the work. It takes that obsessiveness to track some of these things down or spend hours in front of a drill press - he luckily doesn't have that :lol
 
Some more updates everyone! A family friend that had a stroke gave me a ton of his old tools (he bought out a couple hardware stores shutting down...swiped some stuff from construction sites, you know..normal stuff) so we have a coiled wrap thing of drill bits numbered 25 to 50. They get tiny, so we did a small to large trial and error to find the correct size for the TI screws and the flat heads. We found one for each, and a higher speed ate through the brass like butter. The only thing is my JC Penny drill press had a loose chuck so some are off center. I had to take a break when one of the slotted screws was too far in and I had to cut away T Track to make it fit..it's still stuck but barely noticeable. That ruffled my feathers so I'm having some scotch and gettin back to it later. 4 more screws to go!

image.jpgimage.jpgimage.jpg
 
If you want to go all the way with that saber I think I still have the brass screws needed for the clamp, the broken lever, and possibly the dring if you want them.
 
did i miss what little black screws you used for the top of the ttrack? its coming together real nice!!

im new to the " brass screw" where can i go learn about that?
 
Haha thanks! I found little tarnished machine screws in a box of old physics equipment. It was a very old box with a kit titled "Omni-Grips" that consisted of a small bracket, spring and screw to bolt it upright. And components were stuck in the spring.

There are brass screws in the kobold clip and one screwing the loose lever to the clamp on the SRS saber. There's no pin but something holds the clamp together. Don't know how rough I want to be on my build haha

boththese things can be read on in that ESB saber thread. Maybe even the ESB screws thread - they're the most popular threads on the topic in the past few years.
 
I suppose I could add pictures, especially because this thread will come up in skywalker ranch saber searches
 

Attachments

  • image.jpg
    image.jpg
    804.6 KB · Views: 142
  • image.jpg
    image.jpg
    921.5 KB · Views: 133
  • image.jpg
    image.jpg
    899.4 KB · Views: 156
So, I sincerely ****ed up. Drilling in the holes for the top screws SOMETHING shifted. A loose chuck, the jig I had set up, something, and it blew out the side of the track. Three times in a row. :angry I'm livid. I can get new track and cut it up again, but what the hell do I do about these holes in the flash tube now!? I was thinking of filling them with putty and drilling through maybe....They're too big and just slightly off course so I don't think I can just shift the track a mm....and the bottom screws are already in and set so if I shift the track those have to move too....unless someone has another 3 cell bottom I'm freaking out
 

Attachments

  • image.jpg
    image.jpg
    898.8 KB · Views: 109
  • image.jpg
    image.jpg
    825.3 KB · Views: 161
  • image.jpg
    image.jpg
    817.3 KB · Views: 138
Last edited:
Will the holes be covered by the t track? If so, cut the heads off the screws and glue them in place instead of drilling the tube again. This is something I do so that I don't have to alter a tube in any way that isn't reversible.
 
This thread is more than 6 years old.

Your message may be considered spam for the following reasons:

  1. This thread hasn't been active in some time. A new post in this thread might not contribute constructively to this discussion after so long.
If you wish to reply despite these issues, check the box below before replying.
Be aware that malicious compliance may result in more severe penalties.
Back
Top