Tom's MGC DL44

Weird... there's at least 4 variants of barrels then. Lol... The hardened rods in them SUCK to cut for REAL. hahaha

BTW I have an extra AS flash hider if you need.

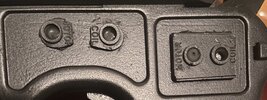
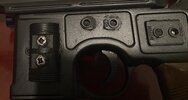
oh man, what are the others? The real one looks like it has a messy plug in the end.

Also, you're so right. I was slicing through the zinc like "oh this isn't so bad" and then this high pitched noise came and my progress slooowwed. I swore a lot.

Also, is it the non-bead blasted one? My dad is making one of these too, he'll want it, we could just buff my old one down and end up with two fresh ones....
 
There's the one you have, then a full barrel plug that is much larger... then a sort of flat that takes up only one side with a hollow barrel (for plug fire?), and then I've even seen one with no hardened rod.

this FH is satin finished... not the turned finish.
 
So, today was the bracket day. It took about 4 hours to do 2. Making stuff by hand always goes ways you didn’t expect, and with just a drill press, jigsaw and hand tools, I knew my 2 were going to be a little different. I tried to capture the rough unevenness of the real mount scope platform and the specific radius and acute angle of the face. The big part is square, just like the real one too
3E499556-5DB8-40A7-9AB2-CD56622CEFD5.jpeg

A7731564-7C8A-452C-A913-BAB7B50F65C9.jpeg

It was rough and messy, the areas were too tight for a hand jigsaw, but the metal was thick enough that a hacksaw was a pain in the ass. Then there was filing it and smoothing it out, which changed the feet a little.

So this is a test fit,
6F6D5B3A-3BDC-41ED-8184-2AF0919671F7.jpeg
BA18C072-3818-49E3-9E26-B6D725C02FBA.jpeg
BC134AF5-A008-4454-B325-03DBC51E45A9.jpeg


yea my spacer slid out of place
9146FFDE-9BC1-4393-9406-A447684353E1.jpeg

78A87A81-817D-49AD-952B-8D9AF5AAA341.jpeg
70D073A3-1DC0-4AA1-8DD4-8F8639E1AAA0.jpeg
 
I did some geometry today, planning for the screws

this is my haphazard asavage way of measuring with a fine sharpie. I just took calipers to the screw head, made boxes around the Dia. and connected the corners to get a drill spot. I misaligned the steel disc as I think the real prop is misaligned too. Mostly eyeballed and used my thumb as a guide haha


CF5C13D7-3D49-42FF-AA59-C98FE57BA0C0.jpeg
61E19E94-654E-41A1-8049-D3254861DC8C.jpeg
94F6CB99-1349-4DBA-8B71-3163EF9F504B.jpeg

Given that there are lots of exposed screw heads on this blaster... I can’t assume they put the side ones into the gun and cut the heads off of only those two. That means this is the tail of the screw and the heads are probably in the spacer
 
So, these pictures are going to be backwards - I managed to get the spacer installed. It is not. As simple. As it looks.

I mean, if the nuts are the tail ends of the screws, you just need 2 sized drill bits to embed them in the spacer. Crucible Custom Props did a project like this and that’s where my help and design came from

So a drill press is cool and all but the magazine is tapered. So I tried to properly do each of the 4 holes carefully one by one... and with everything straight it sat flat... not at an angle like the magazine well!

So I sort of sculpted the holes in the spacer and the holes in the gun by making them a hair bigger and running the drill bits through at angles, making room for them to move and sit at angles.

its hard to describe, but it worked. M3 screws that were long enough to be sliced by a dremel

I found little M3 zinc plated nuts in my salvaged parts bins that sufficed by the way

next will be tapping 3 screws into the spacer to hold the bracket and disc on
E84568DD-E741-420C-92BD-E3F828C167A3.jpeg7BB8293A-9E45-475A-983F-6D928B674409.jpeg5B2D956E-CD7A-4A43-8984-DDB319EC3758.jpeg
C5CBBB43-A512-43DC-8CEF-BAA04E245DF1.jpeg

9D4B1ABB-36D2-4854-A79A-C5A16EEA1409.jpegB52BAEAD-5E04-4985-8B2D-A3B1BCAB116A.jpeg75281A1B-AABB-4CA7-8FB5-049EA094798E.jpeg
And with one of my First slightly collapsed Resin casts

2922FD5D-C7D0-412D-A695-F08643460722.jpeg
 

Attachments

  • 475D3983-C6E8-4A83-9E1A-A959559FE30C.jpeg
    475D3983-C6E8-4A83-9E1A-A959559FE30C.jpeg
    3.6 MB · Views: 94
I did 2 spacers and just taped them together to do the second.

1/8 or a bit larger for the screw and then I bored a third depth with 2 or 3 drill bits in the large side of my dewalt bits for the head

20200709_133304.jpg
20200709_201756.jpg
 
I got it attached but had to drift the holes to get it to line up... so I made a new bracket and disc and misaligned less of it, so now it’s rock solid... for some reason it’s very hard to transfer this pattern. Maybe it’s because I did it by hand first, so I can’t rotate the pattern it’s not perfectly triangular

anyway, for hand made.. not half bad - pictured with my microscope scope

DE326E49-770F-42E2-BBC6-597CFD531B86.jpegEA7B3177-F9E8-44D5-A5BD-A233CD8D8BB5.jpeg

3008A3FC-789E-4981-B3A3-B5E3FC209110.jpeg
2A7AA90F-5F99-4577-8C16-9C4E40E711B8.jpeg

Bracket is drilled for the big m19 scope bolt shoulder too - exactly 5/16 holes I think

I even drilled mine a hair too close together, just like they did! I didn’t jam the front bolt in crooked, just made the hole into a slight oval to fit correctly, I was only <1mm off
 
Soooo... since that time I used up a gallon of mineral resin trying to learn casting skills. I saved some for this project. This is them.. trimmed with a dremel and e6000 holds them in place! My nuts were a little off so I chose to cover them with the same coverage as the prop instead of centering the pistons
20210113_185153.jpg
20210113_185114.jpg
20210113_185050.jpg


I also threw a FM flash hider in the drill press and messed up the shoulder on purpose, trying to mimic the 2 step bevel on the real prop. Of course its crooked because I dont have a lathe but most of Star wars is crooked. It swoops lower on the other side
20210113_185017.jpg
 
here are better shots.. the flash hider, tried to mimic my AS one on the left with a metal file and a drill press

fullsizeoutput_23ff.jpeg


fullsizeoutput_2400.jpegfullsizeoutput_2402.jpegfullsizeoutput_2403.jpeg

I made all these casts!!!

and the phillips screws that I think they used

fullsizeoutput_2401.jpeg
 
Little update: i sprayed the flash hider with:

1) BBQ Black
2) Rustoleum 2x aluminum or silver whatever

And then I added the Sharpie. Had to get a sharpie that had good flowing ink and had a few bad ones at first that stained and messed with the paint layers. Hopefully I covered that up.

I tried to get the lines thicker than the fine point, all mostly straight, and I started at the back, left space and did row #2, running out of room for the front row, crushing rows 2 and 3 together like we see on the prop.
20210123_222939.jpg

Ill dust black over everything to finish the look. Some of the worn away spots on the Flash Hider seem to have layers at the edge, which is why I'm doing it this way
 
I've got some updates!
fullsizeoutput_2452.jpegfullsizeoutput_2455.jpeg
I gave it a good coat of Satin Black Rustoleum. I actually steel-wooled the upper frame to give it a different shade ala the painted lower theory. And used those phillips screws with the "x" on them. It came out really nice.
fullsizeoutput_2458.jpeg

The back of the bracket is bare, like the original

fullsizeoutput_245d.jpeg

fullsizeoutput_245c.jpegfullsizeoutput_245b.jpeg

I may do a yellow wash to mimic the glue on the bracket?

fullsizeoutput_245a.jpeg
fullsizeoutput_2459.jpeg

and I dusted the flash hider with satin black, going from the back to skip the "shoulder"

The original prop has a light shoulder and darker cone on screen
fullsizeoutput_246b.jpegfullsizeoutput_246c.jpeg
 

Attachments

  • fullsizeoutput_2459.jpeg
    fullsizeoutput_2459.jpeg
    1.2 MB · Views: 73
  • fullsizeoutput_245a.jpeg
    fullsizeoutput_245a.jpeg
    1.4 MB · Views: 66
Back
Top