Tom's Consolidated Stunt Lightsaber project reference thread

thd9791

Master Member
RPF PREMIUM MEMBER
At the request of a couple people, im going to post up my stunt lightsaber projects with a few photos each and link to the build threads to maybe make it easier to navigate all the research. I'll continue to update this, so there will be captions to describe how far I am.

Blades... it's a long story. Follow it here?
Converting an OT Blade

My first stunt saber:
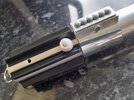
A Canon B (II ?) Flash.
Tractor bushing - steel - JB Welded into the body. PVC Pipe glued into the bushing, covered in Reflexite. Older, cast metal? cracked MPP replica shroud restored... Heiland bracket and Todds Costumes asymmetrical T Track affixed with VHB Tape.
LINK:
First attempt at a tang
Close Enough

20210713_123156.jpg
20210713_120531.jpg
Second:
Zeiss Ikon Flash
Graphite golf club shaft glued into a Kobold flash bulb adaptor. Unidentified camera clamp, replica bubble strip, hand cut aluminum grips, vintage screws embedded. Green Reflexite
20210713_120423.jpg20210713_123258.jpg20210713_123242.jpg20210713_123211.jpg
 
Last edited:
The first cores:

ESB Graflex
Worked over a few times, and I want to do a second with more accurate bolt and screw placement, and a smaller core. I got pretty darned close though, even though this uses a threaded rod and the real ones most likely used a steel tang. 3/8 tang size
LINK:
The Core

20210713_120610.jpg20210713_120618.jpg20210713_120628.jpg20210713_120735.jpg20210713_120806.jpg

Pipe stunt
Ive made 4 so far, screwing up multiple times and finally found an accurate bolt size. Pretty simple compared to the ESB Graflex. Steel tang, core and tube sculpted by hand. 3/8 tang size
LINK:
Rehearsal Pipe Stunt
Double Pipes
IMG_5126.jpg
IMG_5136.jpg

IMG_5137.jpg
IMG_5127.jpg


20210713_120107.jpg20210713_120026.jpg
Jy1YQwImSsi0TgkSQvxH8w.jpg9ERu2HM6TtiQWhDYs732Bg.jpg
 
Last edited:
Luke sabers

Yuma machined by Noah McCloud, a fraction off from the CAD modeled replica by Dave P. I had to bore the nipple hole deeper, had help tapping a tiny set screw that we are pretty sure was blanked on the real thing, fiberglass rod with hand made steel tang and adaptor. I think the real blade is a little thicker, my adaptor looks a bit chunky.
LINK:
Yuma Stunt

20210713_123334.jpg20210713_123347.jpg

Luke Hero
I do have a steel tang in my hero saber by Dave P. After cutting Delrin buttons I realized this had a blade on it so when that day comes.. ill be ready. LINK:
20210712_135113.jpg20210707_211743.jpg
 
Last edited:
Special Motorized Sabers

Designed by Vadermania and LOM, these are a couple crown jewels in my collection. I made the blades and probably have altered them since posting

Obi Wan Stunt
3D modelled from an authentic blank metal cast from production, this chunky saber has a motor set up inside. I cut the wires and installed a toggle switch like the V2 in the booster area. Great paint job got scuffed up when I tried to install a Graflex clamp (turns out you have to bore out the Graflex bar and I used too steep of a countersink, but it works). I plan on making a better Graflex bar and re painting this once we nail down colors in the research department. 8mm tang
20210713_121059.jpg20210713_121138.jpg20210713_123023.jpg20210713_123039.jpg20210713_123054.jpg20210713_121650.jpg
Barbican/ANH Vader stunt
This is a machined and modeled replica, with specific space designed for the motor, drive shaft and batteries. The shroud threads on which is great.. the original had useless set screws or something. Replica parts too, not sure, might be Wanna Wanga T track. 8mm tang

I have yet to decorate the blade. You'll notice the bottoms look different with the same tang. Obi Wans blade was shorter and that means the bottom diameter was smaller

20210713_121542.jpg20210713_121628.jpg20210713_121633.jpg20210713_121641.jpg20210713_122857.jpg20210713_122940.jpg20210713_123000.jpg
 
Beater Stunts

This was designed, cast and machined by Poopapapapalps. It only has a dusting of BBQ black as Im posting this, we nave yet to nail down colors in the research department. I kid you not, this almost exactly matches the Vadermania CAD model. These cast stunts were used through all 3 films (rehearsals in ESB) and things like that are holy grail type props to me. Long blade, rough reflective tape in an fx pattern from ANH. A shaft collar or two hold the blade in the booster. Major PITA to take the blade off and put it back on... im guessing an external set screw was used. 5/16 Tang - 7.93 mm so I can put the motorized blades on this, but not this one on the motorized ones, hah!
LINK: P3 Saber Projects
20210713_123549.jpg20210713_123601.jpg20210713_115404.jpg20210713_115421.jpg

UPDATE
I found the external set screw and switched to that. Painted to mimic the warehouse saber, wired cast, early ANH photos, etc.
P1010328.JPG
P1010336.JPG
7CCAE7EE-1B2D-41A7-A3F8-EA557E558DDE_1_201_a.jpeg
 
Last edited:
I've had a go at the hilt from the "Luke/Vader shared stunt" (I think it is). D ring is a bit of artistic license as I think the originals just had a "penny" washer bolted on the end. All made for about £25. The clamp is plastic pipe covered in mirror film with a 3D printed bubble strip that I had spare from something else. The grips were modern T-Track from the UK, the D ring was an old one from TCSS and the red button was made from the screw-on part of an old Cine camera wrist strap with some red plasticard heated and moulded to a button shape.
 

Attachments

  • 20220222_124349.jpg
    20220222_124349.jpg
    971.1 KB · Views: 116
  • 20220222_124334.jpg
    20220222_124334.jpg
    1.1 MB · Views: 108
  • 20220222_124254.jpg
    20220222_124254.jpg
    2.3 MB · Views: 103
  • 20220222_124248.jpg
    20220222_124248.jpg
    2.2 MB · Views: 96
  • 20220222_124306.jpg
    20220222_124306.jpg
    1 MB · Views: 111
  • 20220222_124316.jpg
    20220222_124316.jpg
    2.6 MB · Views: 98
  • 20220224_143519.jpg
    20220224_143519.jpg
    2.2 MB · Views: 92
  • 20220224_143527.jpg
    20220224_143527.jpg
    2.3 MB · Views: 89
  • 20220224_143539.jpg
    20220224_143539.jpg
    2.2 MB · Views: 86
  • 20220224_143606.jpg
    20220224_143606.jpg
    2.3 MB · Views: 99
  • 20220224_143622.jpg
    20220224_143622.jpg
    2.3 MB · Views: 108
Last edited:


Just a wild 2022 update. My ESB graflex is with a family friend in New England and I’ll be building a more accurate one soon. This is where I stand today, with a new Yuma blade. (Tomorrow morning it’s getting a better paint job) but I think this blade is exactly what I see in reference.
61395B76-36B5-4C2C-BE49-557FD0B6AED6.jpeg23956583-D04D-485E-9672-314B21100031.jpeg0F65042B-B7D4-41E3-8F67-2D10C2CA1202.jpeg53B5C6BE-3039-4965-AD9E-37E4D3B33197.jpeg1EC3A669-491D-4C6D-98F4-C7B08E647240.jpeg8C79F946-9528-4967-A6AB-68312D9411D3.jpeg0B3CBE0C-C95B-4DD4-A637-4EB90DC602A4.jpeg2BC925DF-1C3A-44F4-AA43-574CE12CDE38.jpeg6DCB554E-F3A1-409E-A058-16DE94A9B1DF.jpeg
Also fun things


Now just imagine running an M4 set screw and that’s the blade thing I do.
 
And yes, I know, some of these are crooked as ****

My drill press can shift when pressed down... and I've also managed to have drill bits drift as I drill into solid stock. cutting oil and always sharp drill bits are helping
 
I spent hours in tech college learning to grind drill bits and other cutting tools. Properly sharp implements will save time ten fold in ruined or reworked projects. Tom, you’ve done remarkable work with minimal materials. From one machinist to another, good job.
I started this hobby with only a Dremel and a multi tool, I can only imagine what you could come up with in a fully tooled up shop.
This is the most meaningful compliment I’ve read all year, thank you! Very much!

Coincidentally I picked up a “hand” countersunk at an estate sale this week. Plastic handle, regular fluted countersunk glued to it, I plan on just using it on little wood and resin things, but I went googling to see if it could be sharpened like a twist bit. I was reading that each flute is angled and it’s not a cone!!!

There also was another “aha” moment when I cut this random piece of antenna and held it at the same angle as those Yuma barge shots. It’s like a regular tube but tapered ever so slightly
 
So, I suppose this would be prudent to add here. I now have a way of making modern antennas similar to the old ones.

It seems, at least HMP, older antennas were filled with a dark substance to isolate the element. Today they just wrap the element in a little foam… like packing material springy sheet foam. This means when you pull it out, you’re left with only the radome, or the fiberglass shell. They are very robust and perfectly fine for our replica needs - the only place there’s stress is where the screws are, and the metal bushings take care of this.

I’m a bit of a monster, so I went looking for a way to duplicate the support - and landed on Loctite crack filler. Expanding foam insulation, but the stuff meant for cracks not windows. It has less gas in the substance, and only expands so much.

For those unfamiliar, this stuff is as sticky as glue and comes out like toothpaste after you spray 3-4 seconds of spray into the blade. Be prepared to sit there with a putty knife and cut it off to prevent it getting all over the outside of the blade. I use both ends and do them one at a time and hang it like it’s pooping too sometimes

Anyway Loctite seems to be more predictable and harder than the cheaper brand at the hardware store.

I do my tangs at 8mm or 5/16 (7.8 or 7.9 mm) and run a drill bit through the tang hole after the foam hardens. AFTER if you care about the bit… really, the wet stuff destroys bits. Also Diabolo 5/16 spade bits are not 5/16, they’re closer to 3/8 so don’t bother using that to clear the perfectly measured tang hole.

It’s common to have a tang longer than your inner bushing sometimes and you’ll hear it rattle against the inside of the blade. Not after the foam. Though, drill a little deeper than you need.. this easily created a vacuum seal around your tang! Can be hard to remove or install the blade
 
It’s so hard to take pictures of small things in low light! I have one blade cleaned and the other is waiting to be drilled out

4D773569-7172-4DAD-B055-2ADE374211AC.jpeg
F70D432D-E7CD-4A95-A22B-48259A65AFC6.jpeg

The foam was a few mm shy of the tip but to avoid spillage I’ll take it!

A072C022-AF47-4CFB-A965-37D64498D8B6.jpeg
B0587BEC-3EB5-4DE8-851A-6E52C4A0A07C.jpeg

Yet to be drilled

My ESB tangs
089E2ED6-608B-49B4-AFEC-85894FCC27E4.jpeg

Tangs are the same size, I’m holding one closer to the camera. I cut them both from the same 5/16 stock!
 
Back
Top