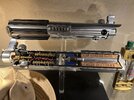
Does anyone remember who made the original lightsaber mode for the visual dictionary? I DEFINITELY talked to him on here and can’t find or remember it.
Anyway, inspired by his work, I started my own. I don’t know how he made the “boxes” or the black sections but I’ve collected random parts for the better part of a decade… and have always wanted to make these. I used his setup for the general “parts” of a saber.
I did not cut up a graflex, don’t worry. I had a failed attempt at a Luke motorized stunt lying around. This meant the red button and glass eye holes were already there. I reshaped the top, cut it in half and sectioned a little bit for the top section of a graflex socket to sit comfortably with some glue.
I started by going to my local fossil and mineral store for crystals. I bought a Fluorite Pyramid and a piece of quartz, and sat with a HUGE pile of parts just fitting things together. I went through a few variations… I ended up using an old meta hair curler for the main tube… an exactra circuit board and some bread board for the center… random calculator board for the clamp (yes I cut a replica clamp) and some spacers and an old chrome car radio knob for the quartz piece. Pyramid is held in with some random piece I saved for this purpose, 4-40 thread and a hard drive bushing.
Power cell is a piece of aluminum round bar.. I did away with my first idea of using a soda syphon thing.. just didn’t “flow” design wise.
Does anyone have a broken bubble strip replica? Any broken red button replicas? I want to cut those in half too…


Recognize the V8 camshafts?! There’s also a hand telescope piece under the Fluorite… it was interesting trying to get everything to “float” in the middle of the tube. That was tricky.. I used E6000 glue for everything so far and I ended up putting extra components under the upper tube to brace it.
Milliput it curing around the power cell. I want to paint that black.. trim the bottom on a belt sander.
Do I use two red buttons and add screws to the grips? I really want to cut a replica bubble strip in half so maybe not…
Ooh I’m also proud of the 7 IC transistors I glued into the rim of the tube! I was thinking… something to run signals from the 7 bubbles to the lightsaber innards!
Anyway, inspired by his work, I started my own. I don’t know how he made the “boxes” or the black sections but I’ve collected random parts for the better part of a decade… and have always wanted to make these. I used his setup for the general “parts” of a saber.
I did not cut up a graflex, don’t worry. I had a failed attempt at a Luke motorized stunt lying around. This meant the red button and glass eye holes were already there. I reshaped the top, cut it in half and sectioned a little bit for the top section of a graflex socket to sit comfortably with some glue.
I started by going to my local fossil and mineral store for crystals. I bought a Fluorite Pyramid and a piece of quartz, and sat with a HUGE pile of parts just fitting things together. I went through a few variations… I ended up using an old meta hair curler for the main tube… an exactra circuit board and some bread board for the center… random calculator board for the clamp (yes I cut a replica clamp) and some spacers and an old chrome car radio knob for the quartz piece. Pyramid is held in with some random piece I saved for this purpose, 4-40 thread and a hard drive bushing.
Power cell is a piece of aluminum round bar.. I did away with my first idea of using a soda syphon thing.. just didn’t “flow” design wise.
Does anyone have a broken bubble strip replica? Any broken red button replicas? I want to cut those in half too…
Recognize the V8 camshafts?! There’s also a hand telescope piece under the Fluorite… it was interesting trying to get everything to “float” in the middle of the tube. That was tricky.. I used E6000 glue for everything so far and I ended up putting extra components under the upper tube to brace it.
Milliput it curing around the power cell. I want to paint that black.. trim the bottom on a belt sander.
Do I use two red buttons and add screws to the grips? I really want to cut a replica bubble strip in half so maybe not…
Ooh I’m also proud of the 7 IC transistors I glued into the rim of the tube! I was thinking… something to run signals from the 7 bubbles to the lightsaber innards!

