You are using an out of date browser. It may not display this or other websites correctly.
You should upgrade or use an alternative browser.
You should upgrade or use an alternative browser.
Tom’s cut-a-way Lightsaber Model - Graflex
- Thread starter thd9791
- Start date
4str0m3ch
Well-Known Member
[hijack] It occurs to me that the programmable sound boards could allow one to make a lightsaber that sounds like a big-block drag racer.[/hijack]
We now return you to the regular thread, already in progress.
GreyGuard38
Active Member
^ Leave it to Chopper to find that one for us! 
Darth Lars
Master Member
I once got the opportunity to ask him in person. He told me he laser-cut acrylic (supposedly the black parts) and he machined rods on a lathe. I don't remember any more detail, as this was >10 years ago. (sorry for the late reply)Made originally by Don Bies, artoo77 for the Star Wars Visual dictionary.
I vaguely recall that artoo77 mentioned something similar here on the RPF, as I’ve never met the man but was aware of the exact same information. It might have been in an Episode III Vader reveal thread, because a similar mention of laser-cut acrylic was present in that topic as well. I also recall that asavage worked with laser-cut acrylic a bunch during his time at ILM. Maybe one of those fine gentlemen will chime in to give a story or two.I once got the opportunity to ask him in person. He told me he laser-cut acrylic (supposedly the black parts) and he machined rods on a lathe. I don't remember any more detail, as this was >10 years ago. (sorry for the late reply)
Btw, I think the blue rectangles flanking the crystal, labeled “energy gate” in teecrooz’s pic, are cut acrylic as well.
thd9791 your recent changes to this are great, keep it up.
Last edited:
Okay… so the comment above about the all thread stuck with me. Not in a bad way, but I realized I was unhappy with that crystal retaining design too! So.. back to the drawing board. Back to the piles of parts.
Thankfully I have a tube of E6000 that is destroyed, cap all gunked up and running low, so the glue cures really quickly. This makes it easier to dab some on tiny parts and drop them in with a little rod to manipulate it into place.
I cut and bent some skinny rod that I got from a model airplane builder.. and one of my orders of aircraft pins came with orange ones…

Above it I just stacked some pocketwatch plates, spun to make a cool pattern. This is another hard drive platter washer it’s on, a smoother one.
Then up top I snapped some ****** calculator board (the calc was in a ruler) and glue it in behind the emitter.

Now, the main crystal I didn’t like either, it was too sloppy.. so I ripped that out and used an entire small pocketwatch movement and a nasty colored bushing to hold the quartz


Glue, thankfully, holds this in mid-air inside the saber. I may squeeze some putty underneath for support but I don’t think I’ll need it.
The glue is curing and I’ll clean this up another day…


Oh and I have these extra parts I love but don’t know if they have a place

Thankfully I have a tube of E6000 that is destroyed, cap all gunked up and running low, so the glue cures really quickly. This makes it easier to dab some on tiny parts and drop them in with a little rod to manipulate it into place.
I cut and bent some skinny rod that I got from a model airplane builder.. and one of my orders of aircraft pins came with orange ones…
Above it I just stacked some pocketwatch plates, spun to make a cool pattern. This is another hard drive platter washer it’s on, a smoother one.
Then up top I snapped some ****** calculator board (the calc was in a ruler) and glue it in behind the emitter.
Now, the main crystal I didn’t like either, it was too sloppy.. so I ripped that out and used an entire small pocketwatch movement and a nasty colored bushing to hold the quartz
Glue, thankfully, holds this in mid-air inside the saber. I may squeeze some putty underneath for support but I don’t think I’ll need it.
The glue is curing and I’ll clean this up another day…
Oh and I have these extra parts I love but don’t know if they have a place
Thank you! Okay I did some more today.. glue cleanup, greeblie working, etc. needs paint still.
I believe these are sapphires, frictionless surface for watch gears


And the new chamber…

The upper crystal


Other parts


Some larger shots


Yeah, cleaning up the tube slice clocked it greater than 180…some stuff might not be in the “center”… I think the pocketwatch parts look really good.
The fluorite pyramid is held in with the wire at the corners and glue.
I tried to mimic the original mirrored chamber with foil tape, it got pretty wrinkled so I’m still trying to find items to press in there to smooth it out!
I believe these are sapphires, frictionless surface for watch gears
And the new chamber…
The upper crystal
Other parts
Some larger shots
Yeah, cleaning up the tube slice clocked it greater than 180…some stuff might not be in the “center”… I think the pocketwatch parts look really good.
The fluorite pyramid is held in with the wire at the corners and glue.
I tried to mimic the original mirrored chamber with foil tape, it got pretty wrinkled so I’m still trying to find items to press in there to smooth it out!
Best method for smoothing out foil tape I found came from BTS of Mandalorian with Adam Savage: popsicle sticks/tongue depressers. They used them to press down and smooth out wrinkles for Djin's ship, and earlier, the chrome elements on the models for the Naboo starfighter and cruiser in Phantom Menace.
From my own experience, I found foil tape polishes pretty well, too.
From my own experience, I found foil tape polishes pretty well, too.
Last edited:
I decided to take an old bed bath and beyond box and make a display for this thing. (I need to re-paint some of it) but in using my router…. The plywood split in multiple places! So I cut the breaks into geometric cuts that reveal different angles of the saber!
Initial pictures… I’m using leftover piano felt and fish glue with a sharp pair of scissors to soften the surfaces. I cut and glued pieces of scrap wood in the negative space to support the model. Also… tiny holes will have wire to hold it back against the display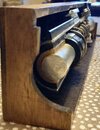
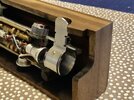
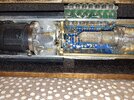
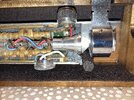
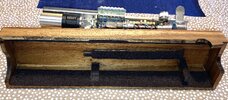
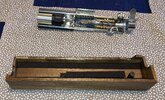
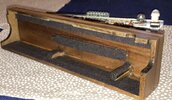
Initial pictures… I’m using leftover piano felt and fish glue with a sharp pair of scissors to soften the surfaces. I cut and glued pieces of scrap wood in the negative space to support the model. Also… tiny holes will have wire to hold it back against the display


Here we go! I used some ace antique gold, black acrylic lacquer and tiny model brushes to fix up the model. I also added some solder to electrics contacts and stuff.. I quite like it.
A single wire seems sufficient to keeping this in place. I glued some vintage brass washers on each side of the holes to take some stress off the wood!


A single wire seems sufficient to keeping this in place. I glued some vintage brass washers on each side of the holes to take some stress off the wood!
Ridire Firean
Sr Member
Similar threads
- Replies
- 7
- Views
- 1,129
- Replies
- 14
- Views
- 736
