Tomorrowland

I'll take a couple of the plugs when you get them. I'll pay shipping if you want.

Erick

- - - Updated - - -

Anyone have any other leads on the other parts used? I love her packs but didn't really think about making this one till seeing this thread.
Thanks for the push guys!

Erick
 
The plugs don't fit in the button hole. They piece they fit onto looks custom. It is similar to the electrolux button holder or handle mount but it is a custom piece.
 
I'm with you guys, I am trying to use as many found parts to put it together, If I can get that cool look I'll be Happy, So here are a few things that I've done to try to get things to look correct, Concentrating on the tanks, the tops I found to get them close to their look it took me 4 Vacuums, I had to cut the spines off of one just to make one thick spine coming off the side. I am using real Fire Extinguishers, (not planning on wearing it just displaying), To get the vintage extinguishers to fit I needed to cut part of the back out and squeeze them together they are just a bit to wide, and of course cutting them down to about 9 1/2 inches. So I'll post some pictures for you to check out, the Jet Exhaust nozzle is in the mold right now should be out tomorrow night, then I'll pour a couple and post some pics for you guys, and if you like them I'll make some for every one, we'll figure a far price.
Here are a few pictures.
4.JPG5.JPG10.JPG9.JPG11.JPG15.JPGE 1.JPG
 
Here a few more, I milled down the Extinguisher handles and cut a hole in them so the Exhaust nozzles will fit inside, I'm going to do a magnet type attachment so they can be take off.
And the Exhaust ports?, Nozzles? what should we call these things, Exhaust ports sounds pretty good........... In my daughters hand.
Red Tanks 1.JPGEnd on Tank.JPGExhaust nozzle B.jpgExhaust Nozzle A.JPGGlass res..jpgRed Tanks 2.JPGBottoms.JPG
 
You are the Man!!!!!!!!!!! Just ordered one , I'll probably mold this as well, I can't tell you how cool this is!!!!!!! You win this weeks prize!!!!!!
AL
 
Hey so , I went to that sight and purchased the Blue background one, that I will strip or mold, but then I made an offer on this wheel on Ebay and it was accepted right away so now I have two!!!!Pretty funny!! These are them....
Planet button 1.jpgPlanet button 2.JPGplanet button 3.JPG
 
I think my new thing is just finding stuff (ID'ing parts for RPF'rs)- beat having to buy it stuff.

BTW the fuel filter is easily found under "GM glass fuel filter sediment bowl" the ebay or google image search.

I think the parts behind the horn button are similar to a V-Twins carb intake parts.
 
Abelugo you are awesome keep it coming!!!! The mold of the Exhaust Nozzle came out great, I just need to do a Pour of the interior so I can make the Nozzles hollow, I poured a solid one just for fun.Here are a few pics and I reworked my glass fuel filter!!!!
Mold 1.JPGMold 2.JPGForst pour 1.JPGFirst pour 2.JPGglass tres..JPG
 
This is killer, I love this movie.......obviously.............cant wait to see the finished product!!
 
Last edited:
Great Job Abelugo, can't tell you how much time I spend searching combinations of "vintage sphere plastic planet saturn stars"

What a big find.

thanks
 
so have you guys ID'd the other mechanical parts?
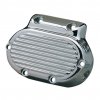
The piece right under the saturn emblem/horn button, seems to look like a miniature version of a harley davidson transmission end, the part with the ribbing.
11070130.jpg09abbdc7c06bccfea6ad30392d5939a5.jpg
but I know this part about 5-6 inch by about another 4 tall. But the shape look very similar,
I actually have one I can measure for you guys, I just think it may be much bigger. It is the part the actuates the clutch via the handcontrol on a harley.
The scale may have changed over the years, but this part is something from a 5 or 6 speed V twin Harley, it also may be on the Sportster, but I think it may only be on the models where the tranny is removeable from the engine.
 
I did think of a clutch cover , I've had a couple harleys, but its way to big started looking at other motorcycle covers, but got what sidetracked with the tanks and exhaust nozzles.
But we need all the help we can get. I mounted tops to tanks and bottoms as well as extinguisher handles to bottom, everything is screwed together so I can take it back apart.
And did a bit of weathering, I also will start to mold the nozzles so should have something to show tomorrow(land),LOL!
AL
Weathering 2.JPGWeathering 3.JPGWeathering 4.JPGWeathering 1.JPG
 
Looks great. My parts are just starting to arrive so I haven't had a chance to start building anything yet but will post pics once I get started.
Looking forward to picking up a set of your exhaust nozzles!
 
Looks great blastmaster.

For everyone else when you get your electroluxes they may be in different states of decay. I was able to use SOS pads and I got 95% of all the rust and spots off. I left a few on for character and screen accuracy. One of mine was a little worse off than the other I was able to control how much I took off to make them match better. I then used a little mothers chrome polish and they look really nice.
 
Blademaster, did you cut the extinguishers off at an angle or hollow out the electrolux cap?


I did think of a clutch cover , I've had a couple harleys, but its way to big started looking at other motorcycle covers, but got what sidetracked with the tanks and exhaust nozzles.
But we need all the help we can get. I mounted tops to tanks and bottoms as well as extinguisher handles to bottom, everything is screwed together so I can take it back apart.
And did a bit of weathering, I also will start to mold the nozzles so should have something to show tomorrow(land),LOL!
AL
View attachment 486417View attachment 486418View attachment 486419View attachment 486420
 
Blademaster, did you cut the extinguishers off at an angle or hollow out the electrolux cap?

I hollowed out the caps with a dremel, here is a picture of them, I also took that ring or lip off the body of the electrolux and trimmed it almost to the edge and JB welded it to the cap to give it that step that the real pac has.
caps 1.JPGcaps 2.JPG
 
I had taken mine apart but I wondered how you had the lip and no insides. I was thinking the lever that seals the lid to the lip was on the movie pack. Yet another issue it seems is that where the lever goes they have new piece that flows into the electrolux named side rails. The probably added in to the design before they printed it and cast it.

I noticed yours has some pipes on the top where the hose attached what did you use there.
 

Your message may be considered spam for the following reasons:

If you wish to reply despite these issues, check the box below before replying.
Be aware that malicious compliance may result in more severe penalties.
Back
Top