Tommy & Kimberly (Mighty Morphin' Power Rangers) ECCC 2015

IronJoe

Active Member
For Emerald City Comicon 2015, @JuJuBean and I will be cosplaying together as the ultimate "Power" couple... Tommy, the White Ranger and Kimberly, the Pink Ranger!

My childhood love of Power Rangers makes this one of the most exciting costumes I've ever worked on. Mighty Morphin' Power Rangers debuted when I was in grade school and it totally rocked my world. Tommy was my favorite as the Green Ranger, and even more so I loved when he came back as the White Ranger.

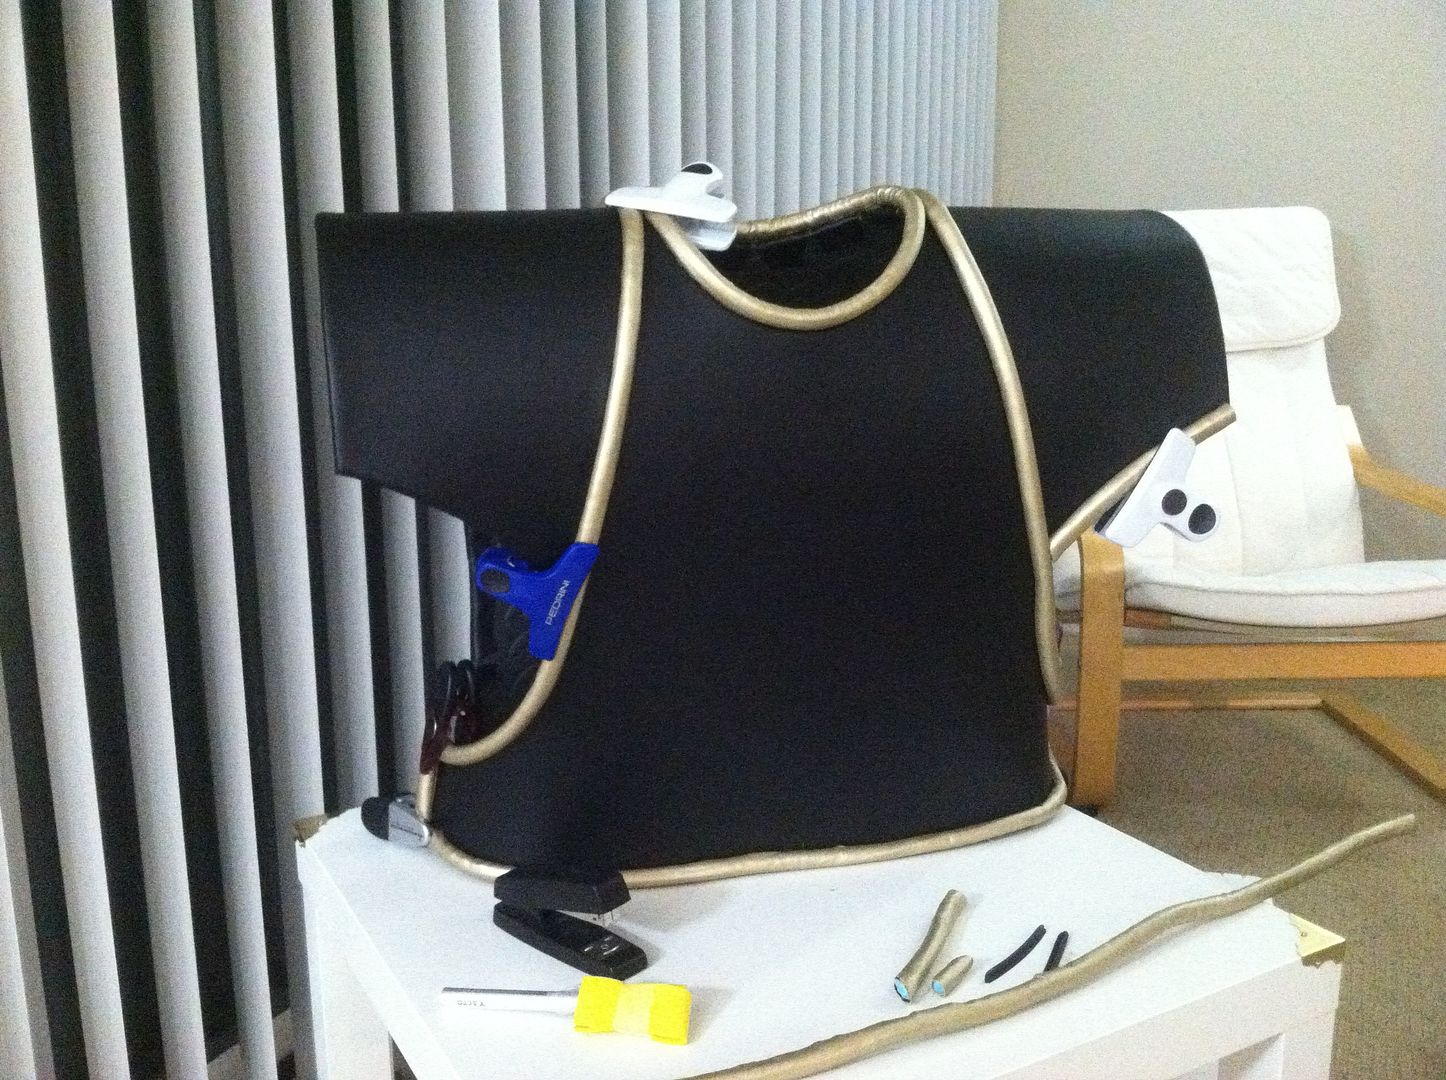
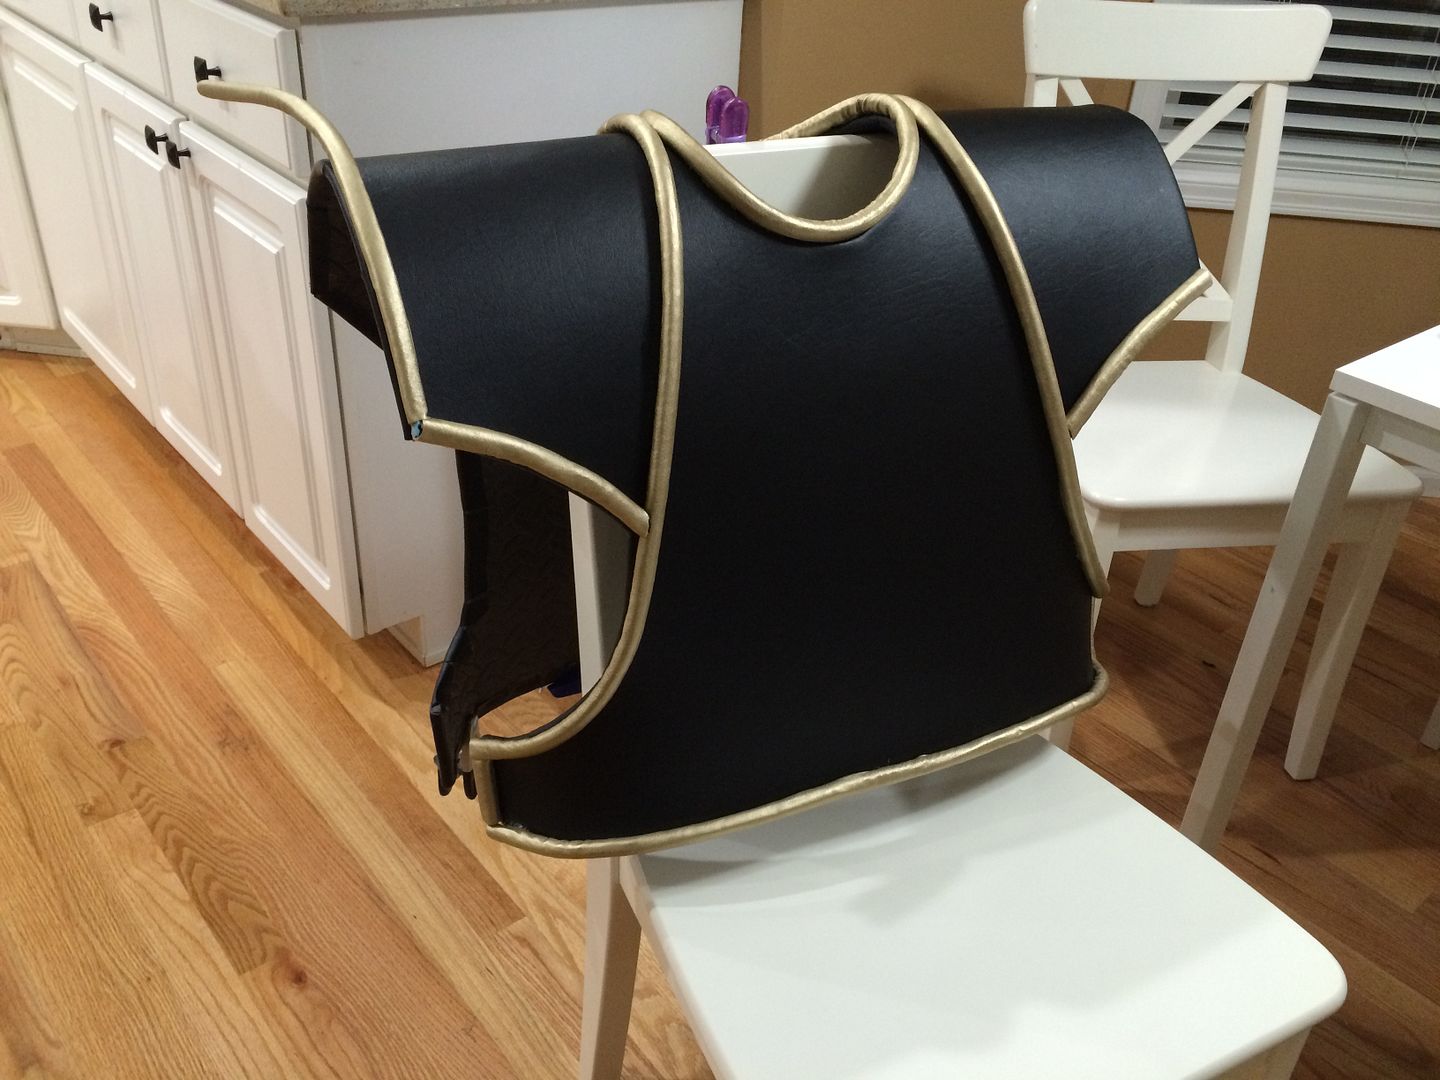
For this cosplay I am doing a mix of bought & built materials. I am not going for a screen-accurate look: often times the suits looked loose/baggy, and I am building this costume in a more "superheroic" style. This is often seen in the artwork and toys from the show - the rangers look like true superheroes in muscular form-fitting suits.

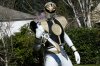
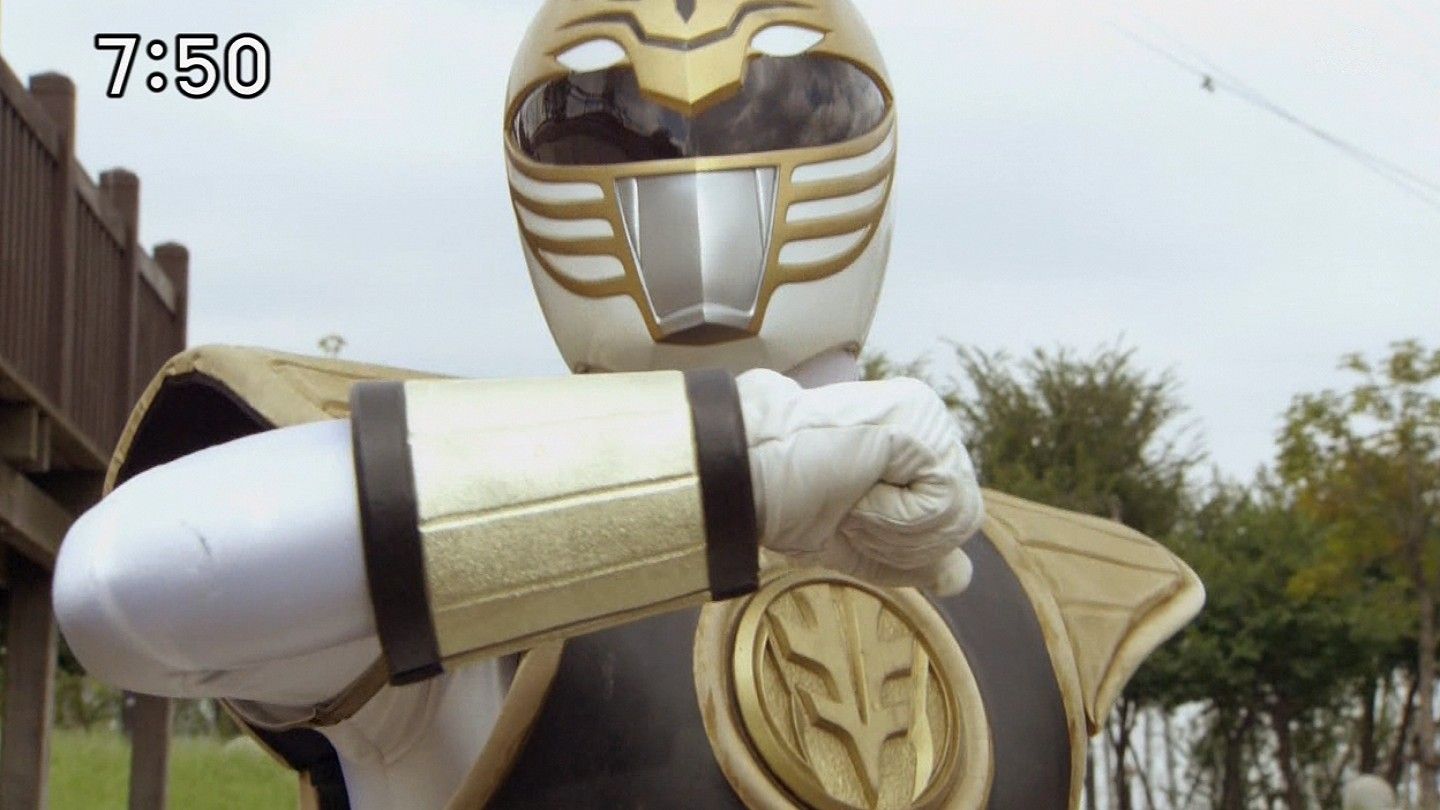
Here's the example from a screen-worn suit: note the baggy pants and loose-fitting sleeves.
whiteranger1.jpg

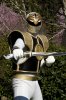
Here's the look I'm trying to achieve, from the SH Figuarts White Ranger: Every piece is tailored and form-fitted.
1270092_583100855078769_1476674952_o.jpg

And another from the companion comic book:
956365-mmpr_marvel_1_nov_1995.jpg


Helmet: I purchased a helmet which was cast from the screen-used stunt helmet. I bought this as a completed helmet but it's taken quite a bit of work to make wearable. If I were to do it again, I would have just bought the raw cast and finished it myself.

E356D6CE-3F18-44B6-8CAB-84D6E55FE9AD-3195-000004BA57D71364_zpsa30b8dc9.jpg

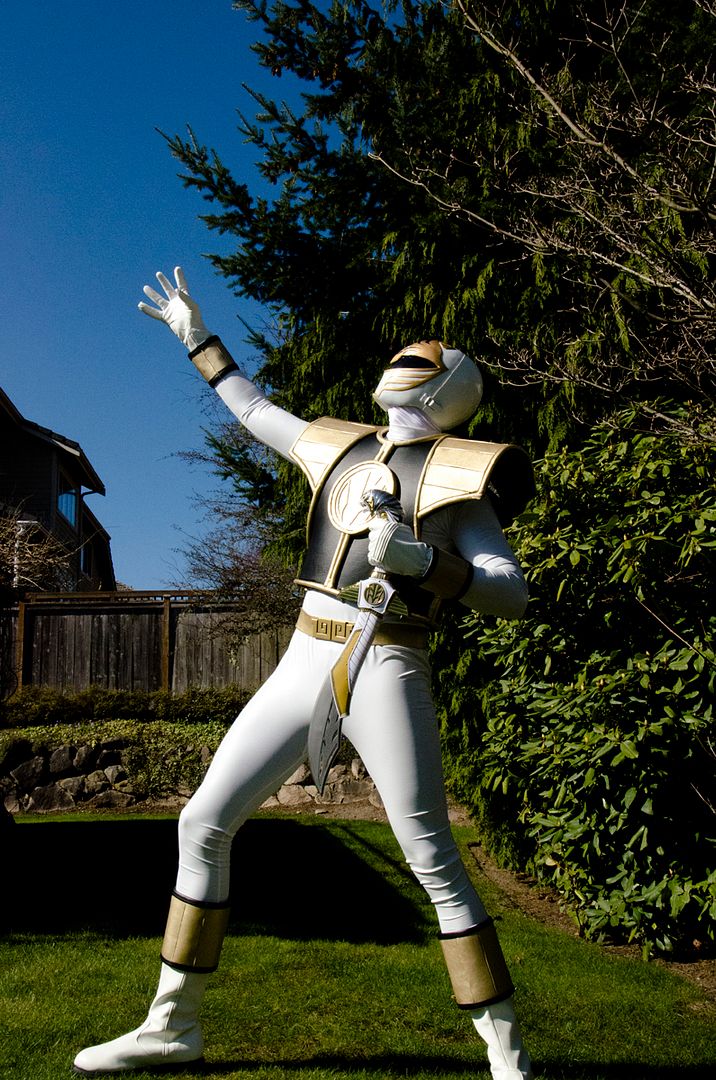
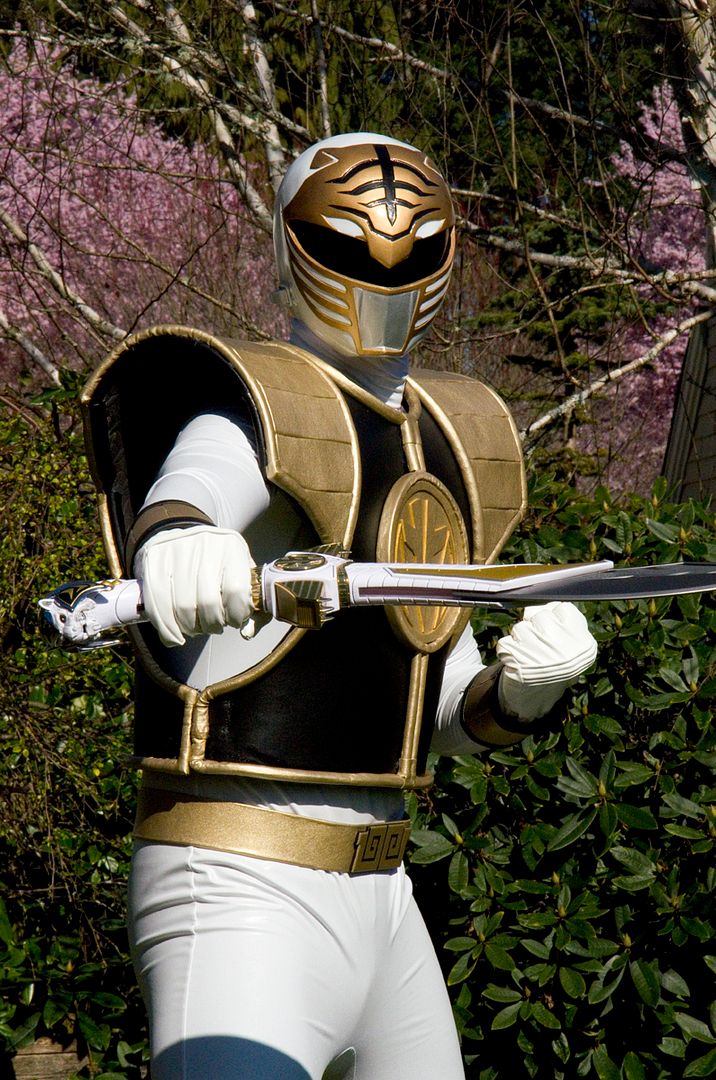
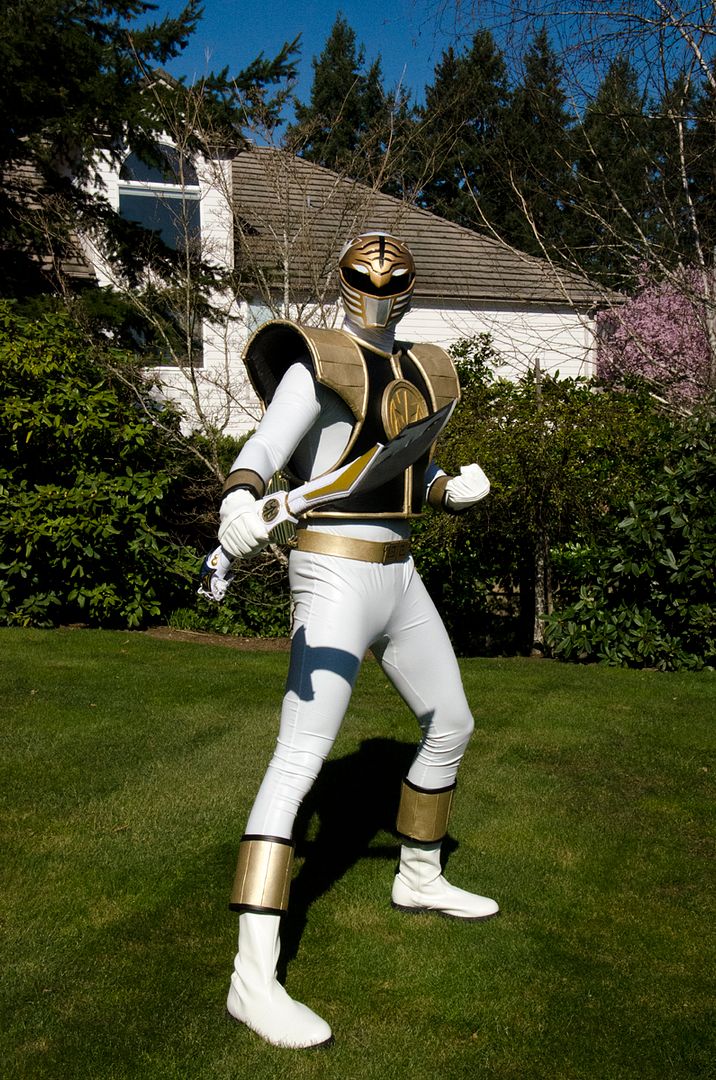
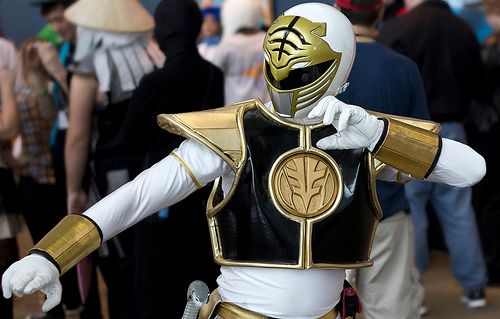
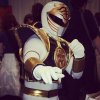
Bodysuit: I had a catsuit sewn to my measurements in a shiny metallic white. You can see the nice snug fit in this test shot:
DC9EAB09-2740-4956-BFDC-1855229A384F-3062-0000049E5C378421_zpsb9a1f0be.jpg

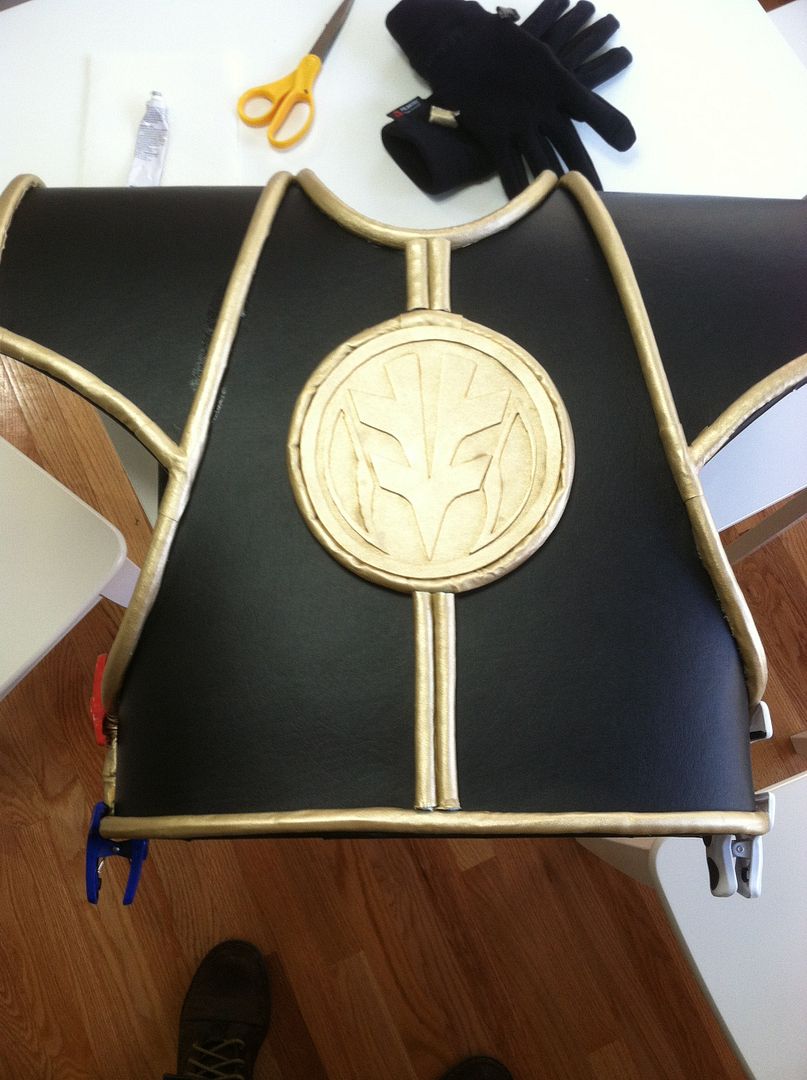
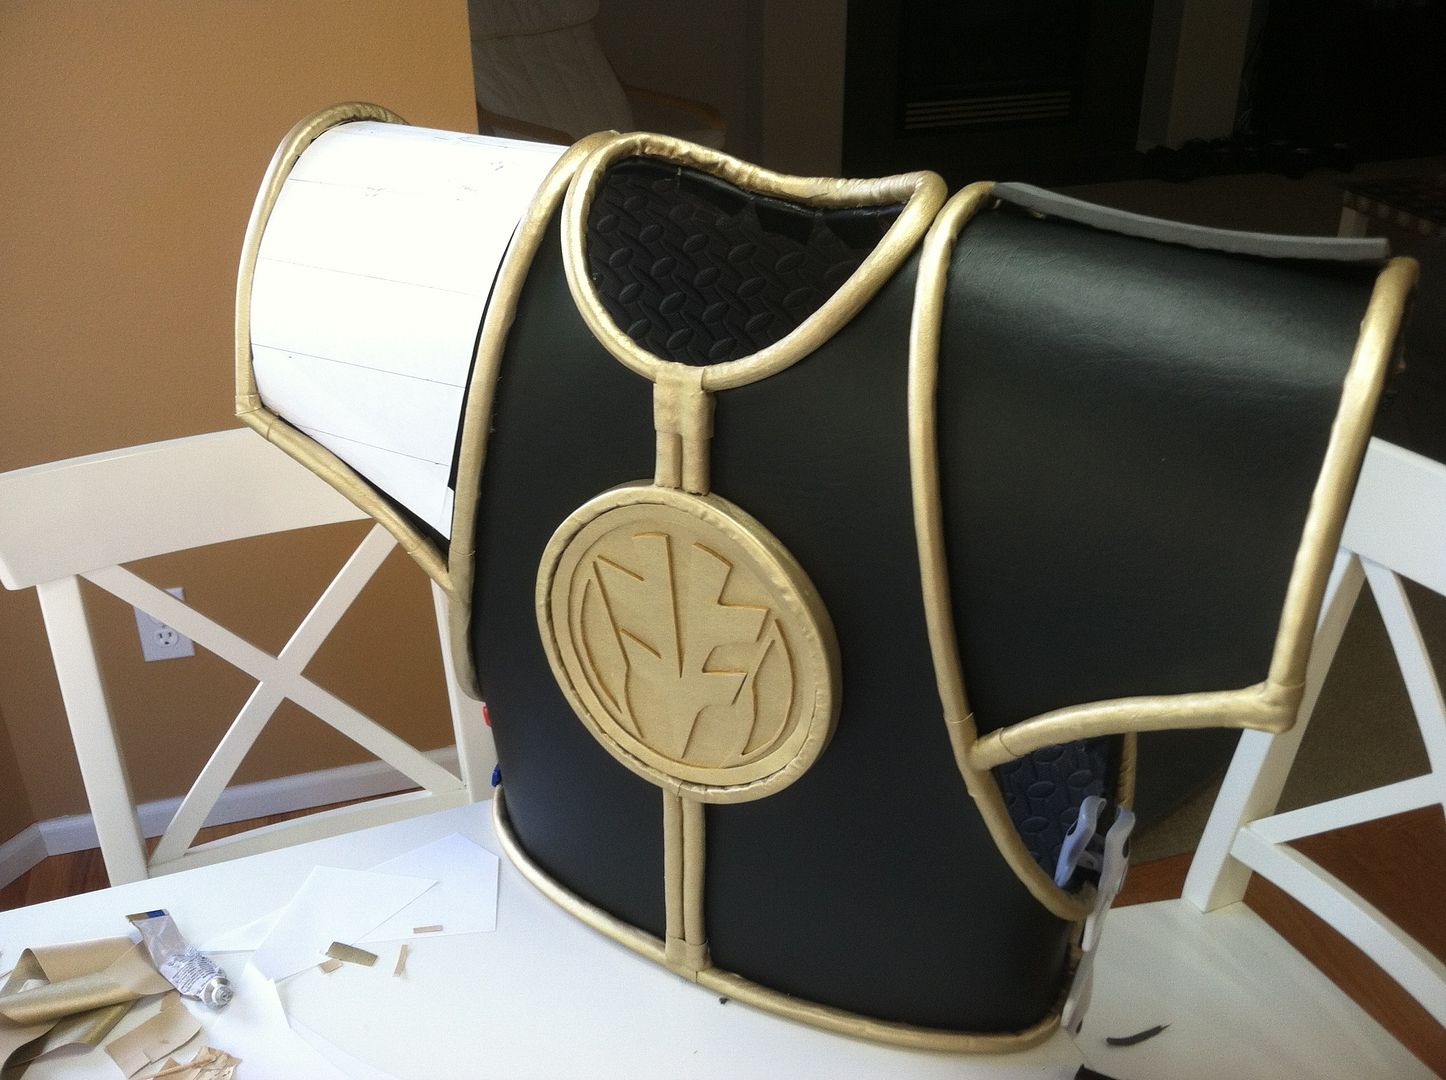
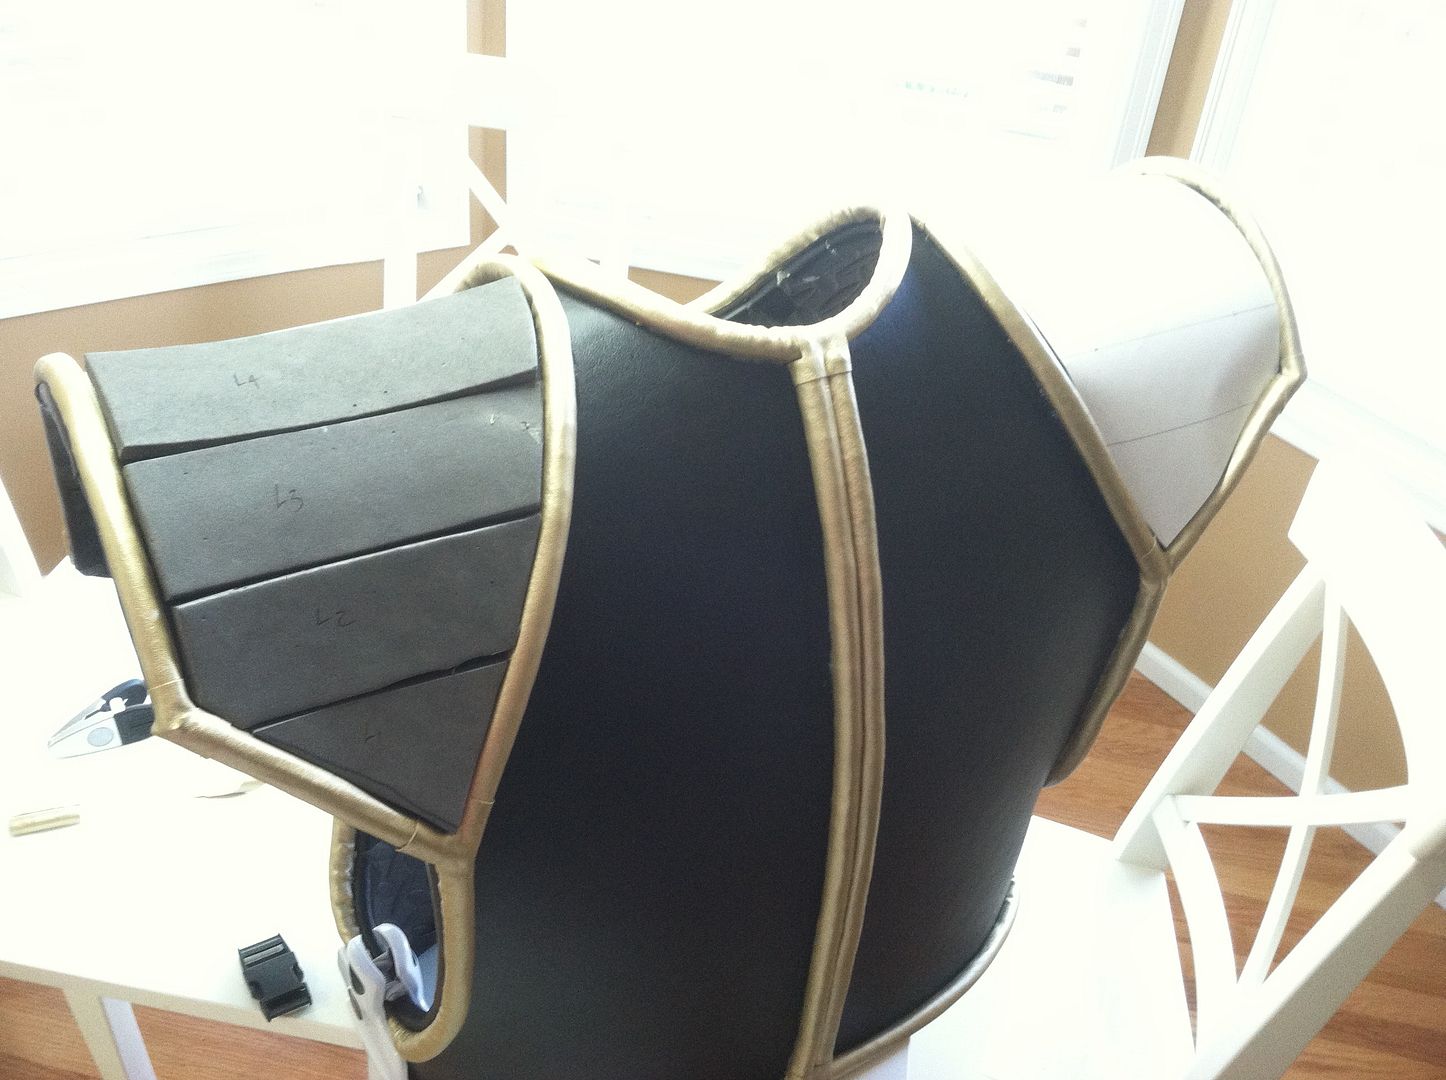
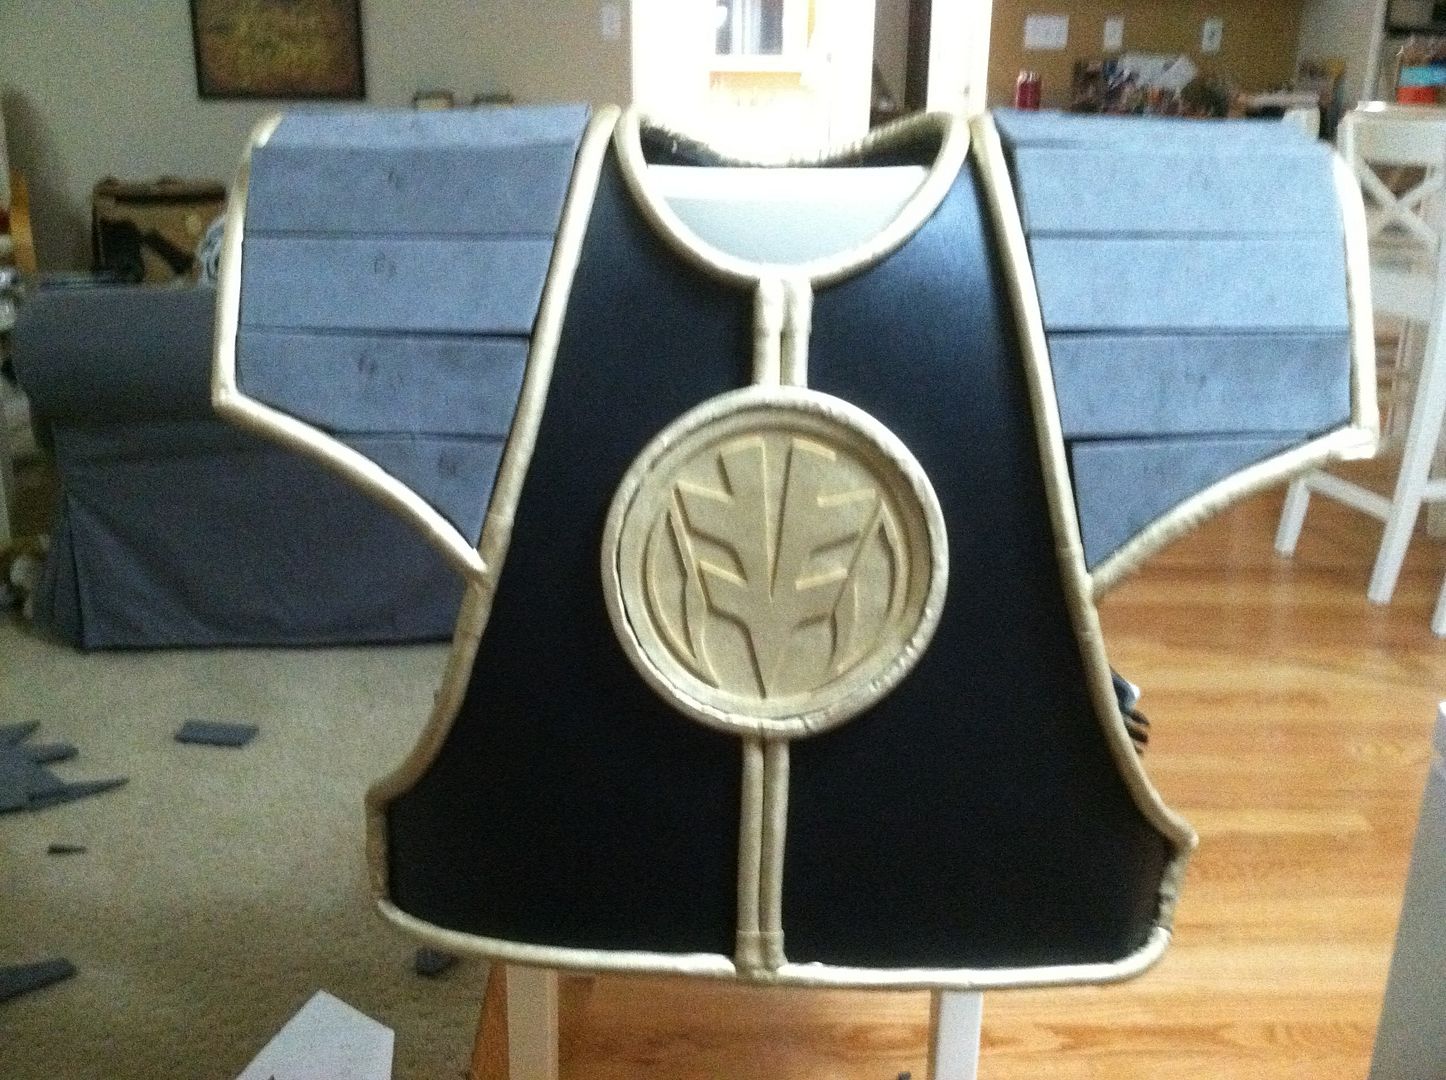
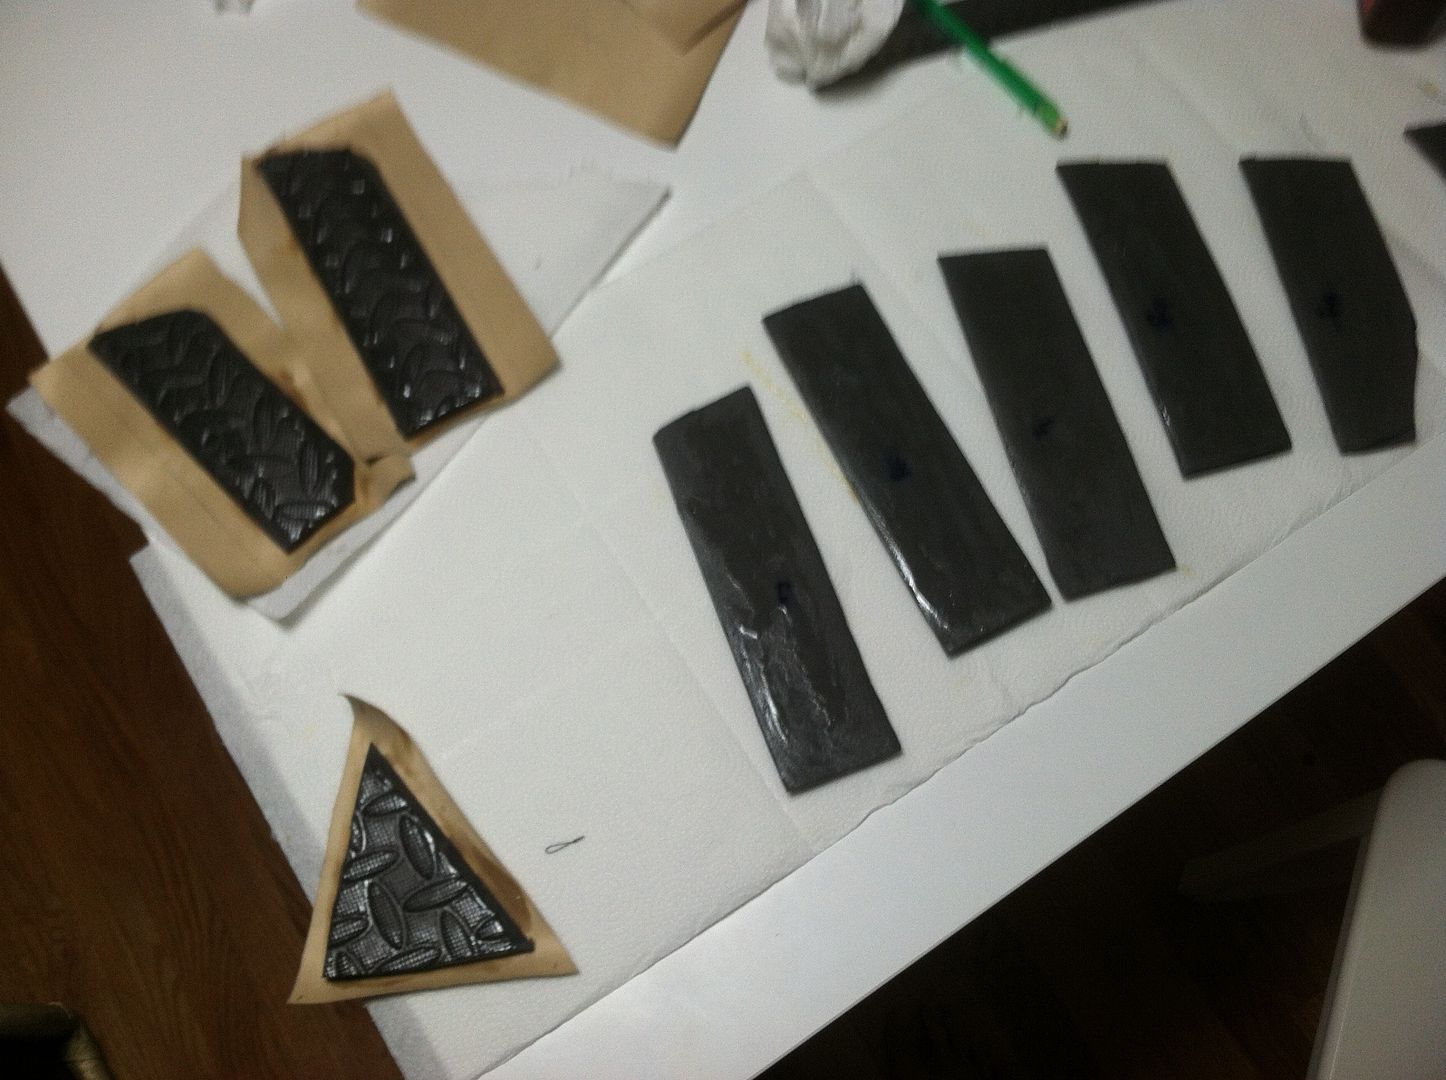
Shield: Building this myself, borrowing heavily from @alejoloaizam5 and his great looking kibaranger shield!

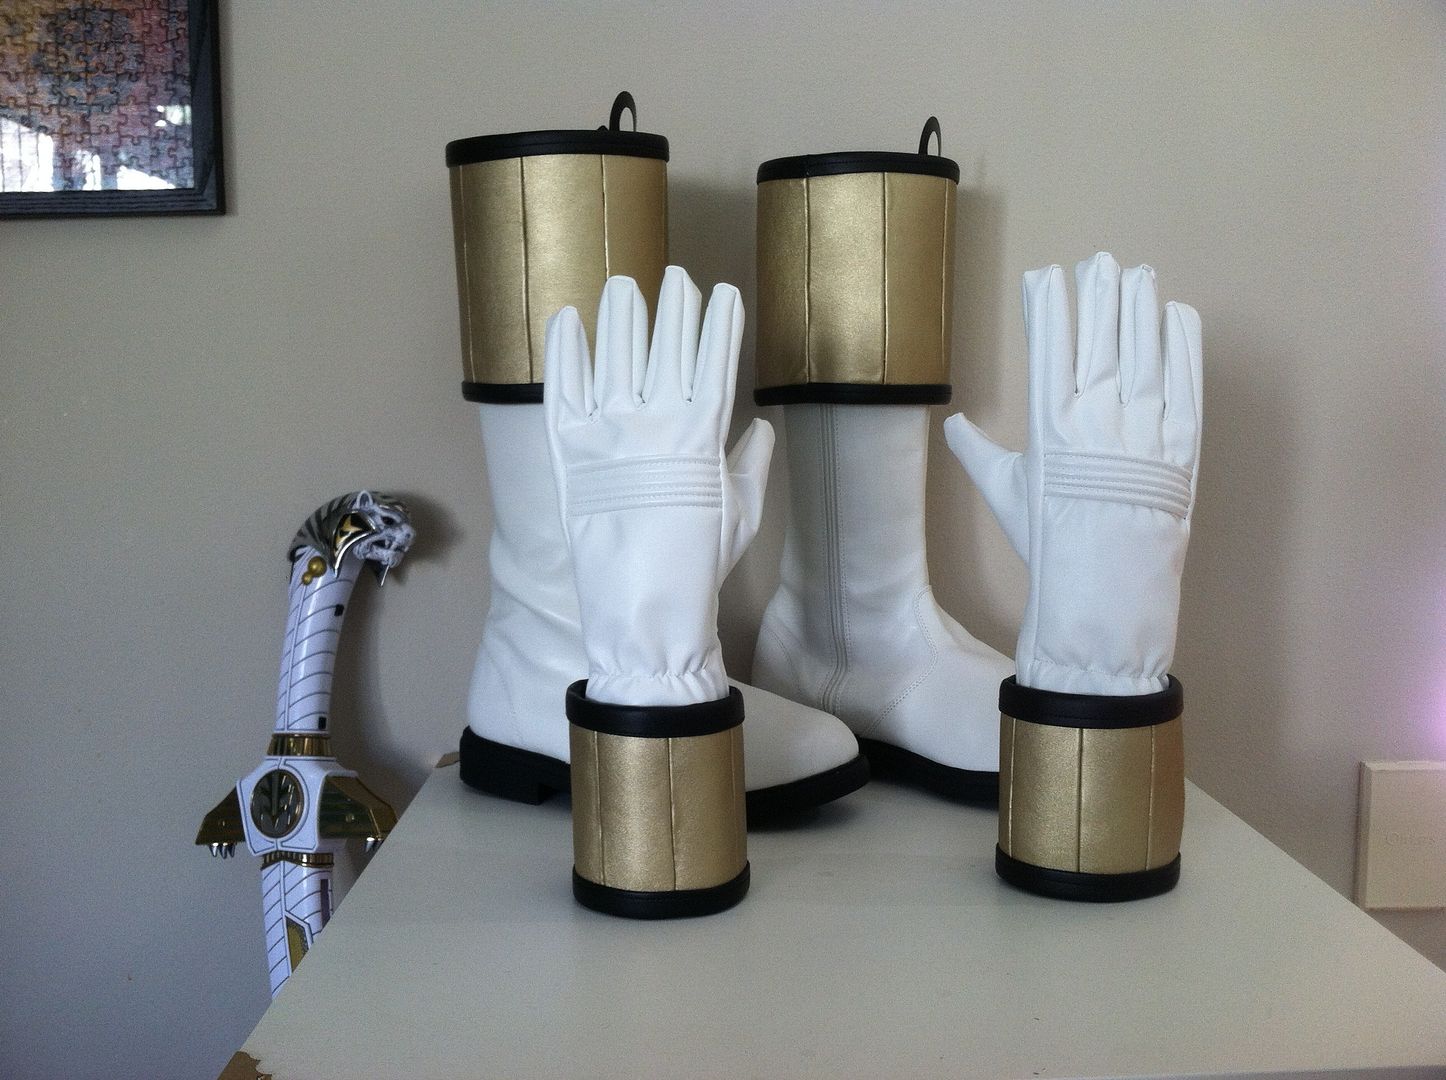
Gloves: I purchased the base gloves online and am building the cuffs myself


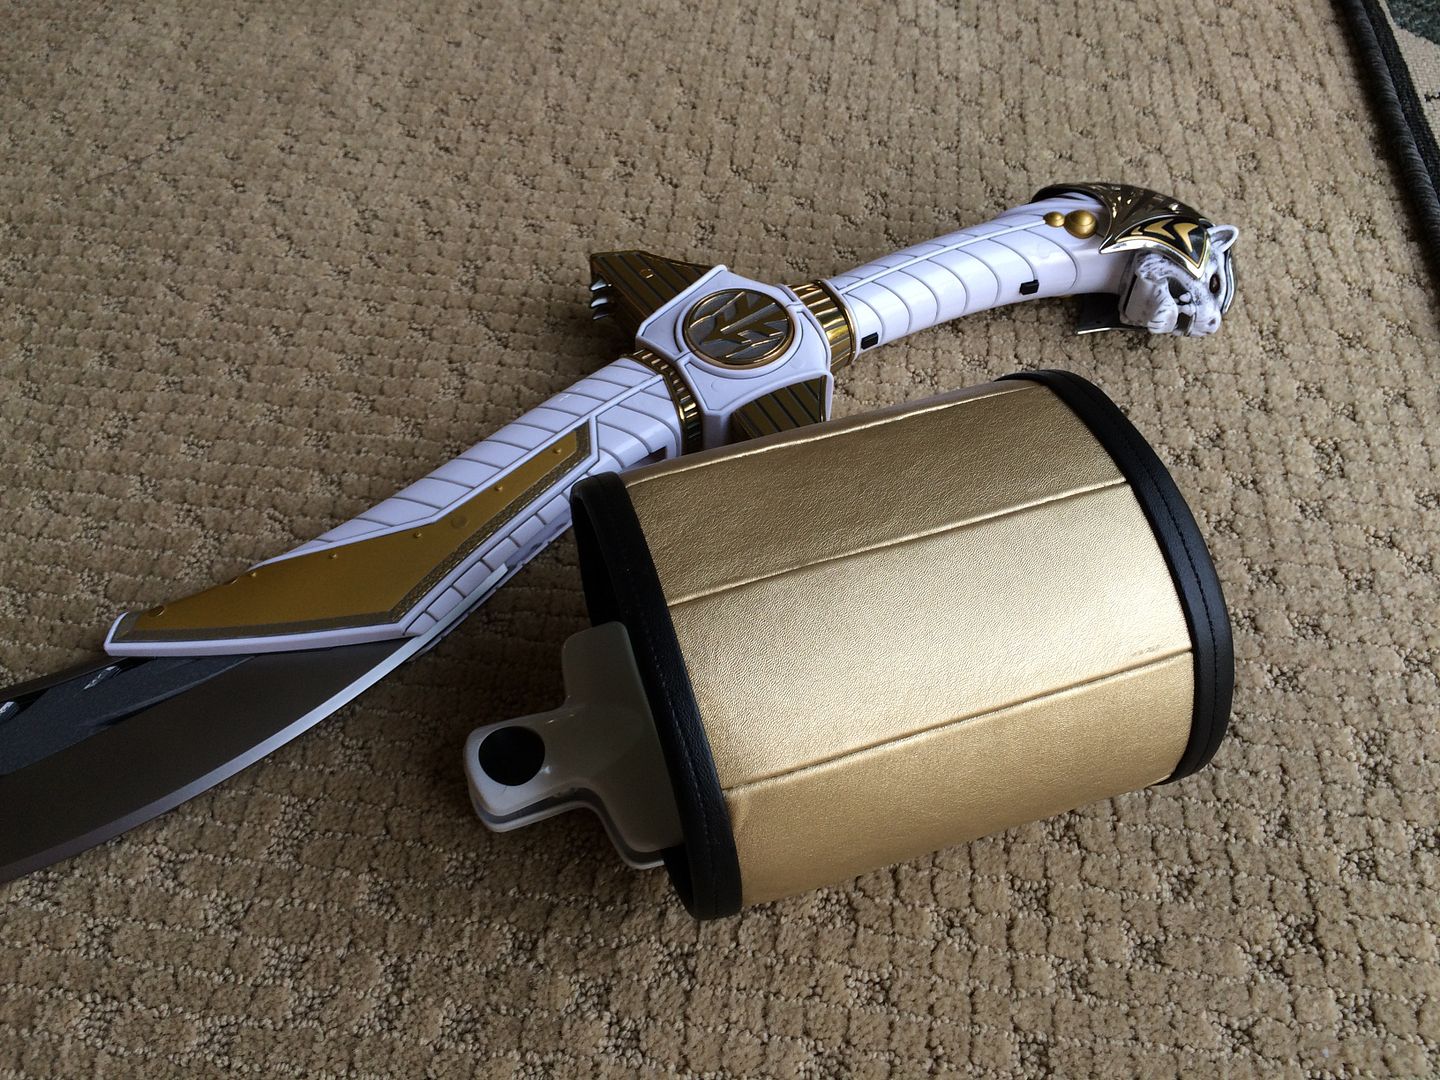
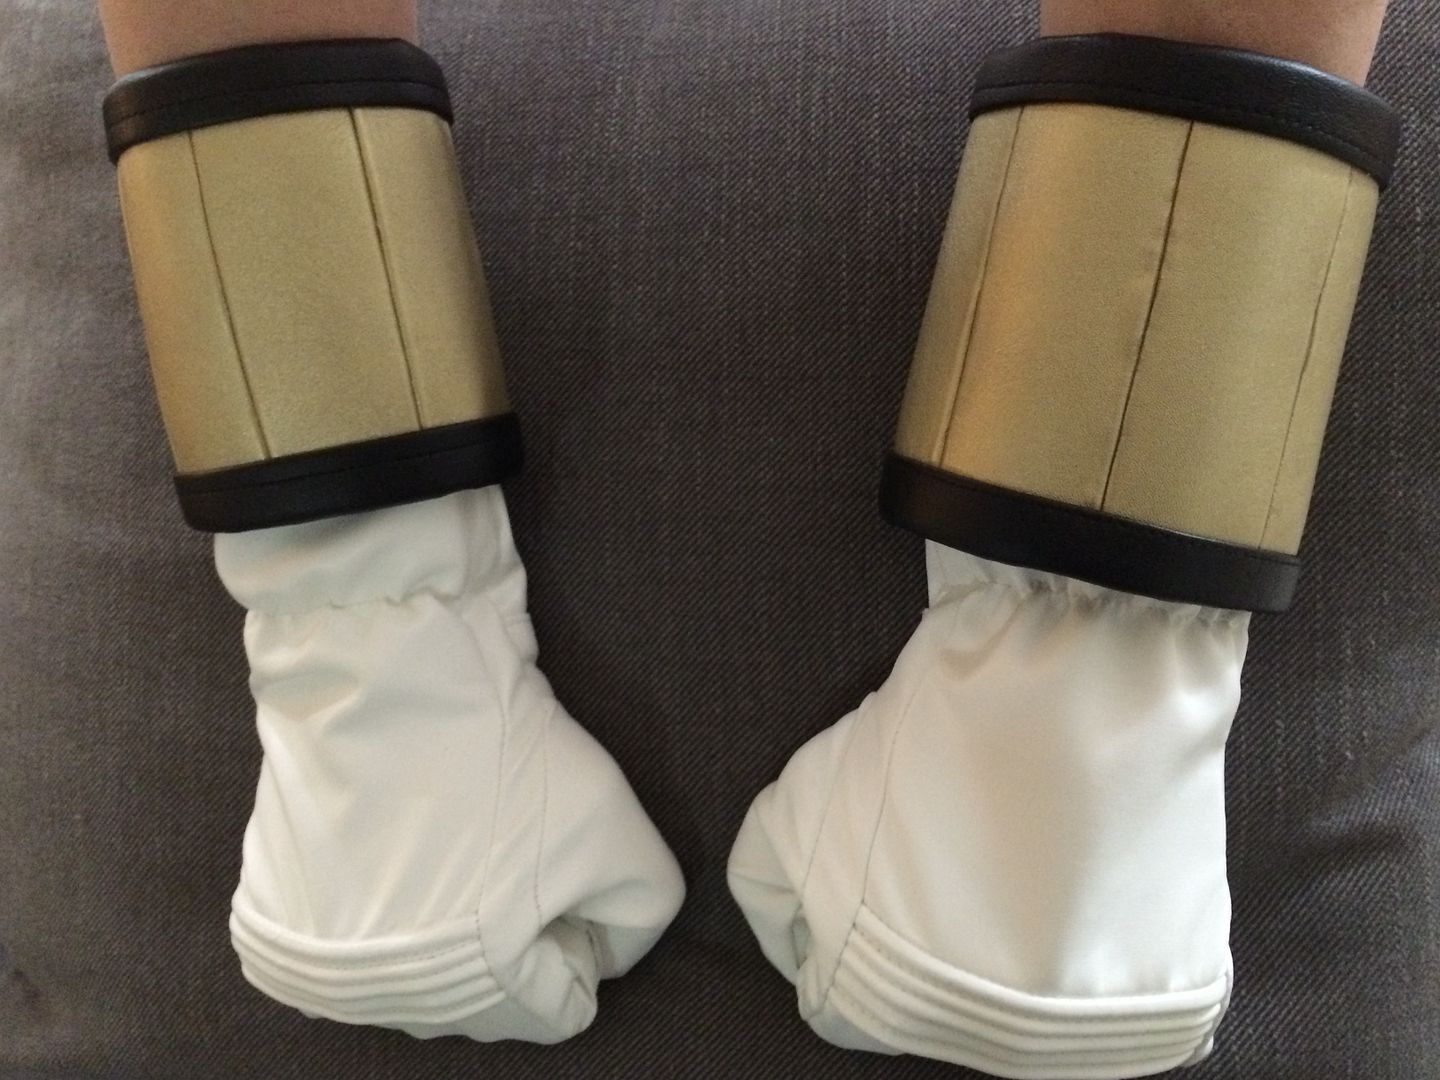
Boots: Boots are Pleaser Captain 100s which I have cut open and am tailoring to perfectly fit my calf. Also custom building the cuffs for them.
botte-plates-motard-captain-100-deguisement-retro-argent-noir-marron-blan-moins-cher-homme-femme.jpg


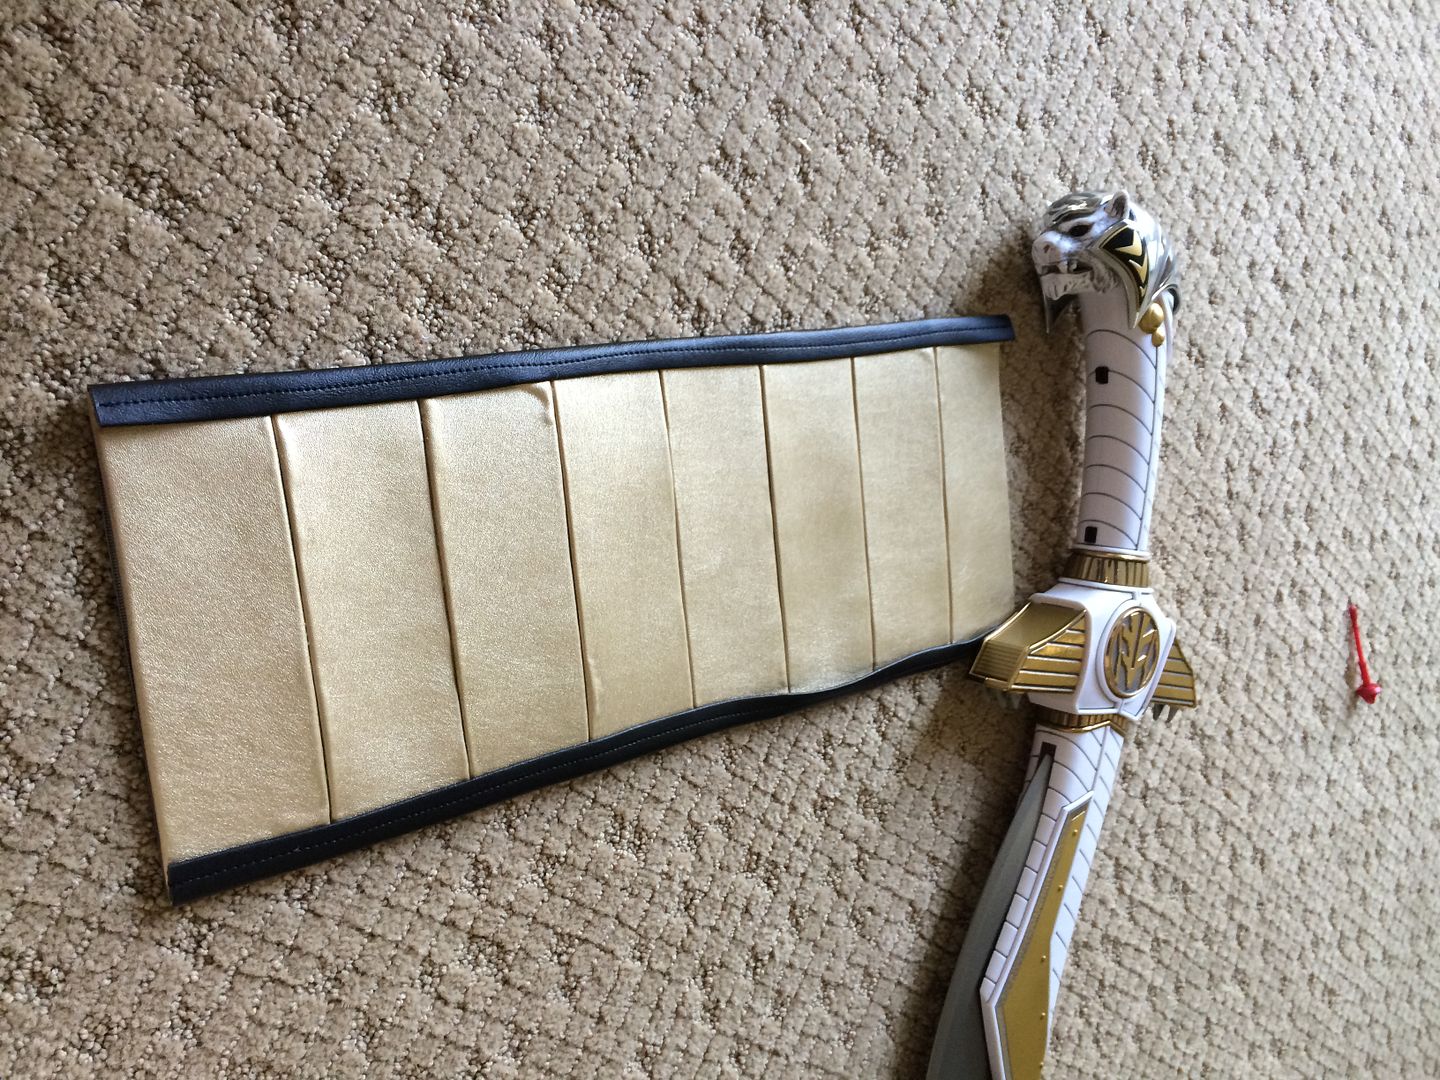
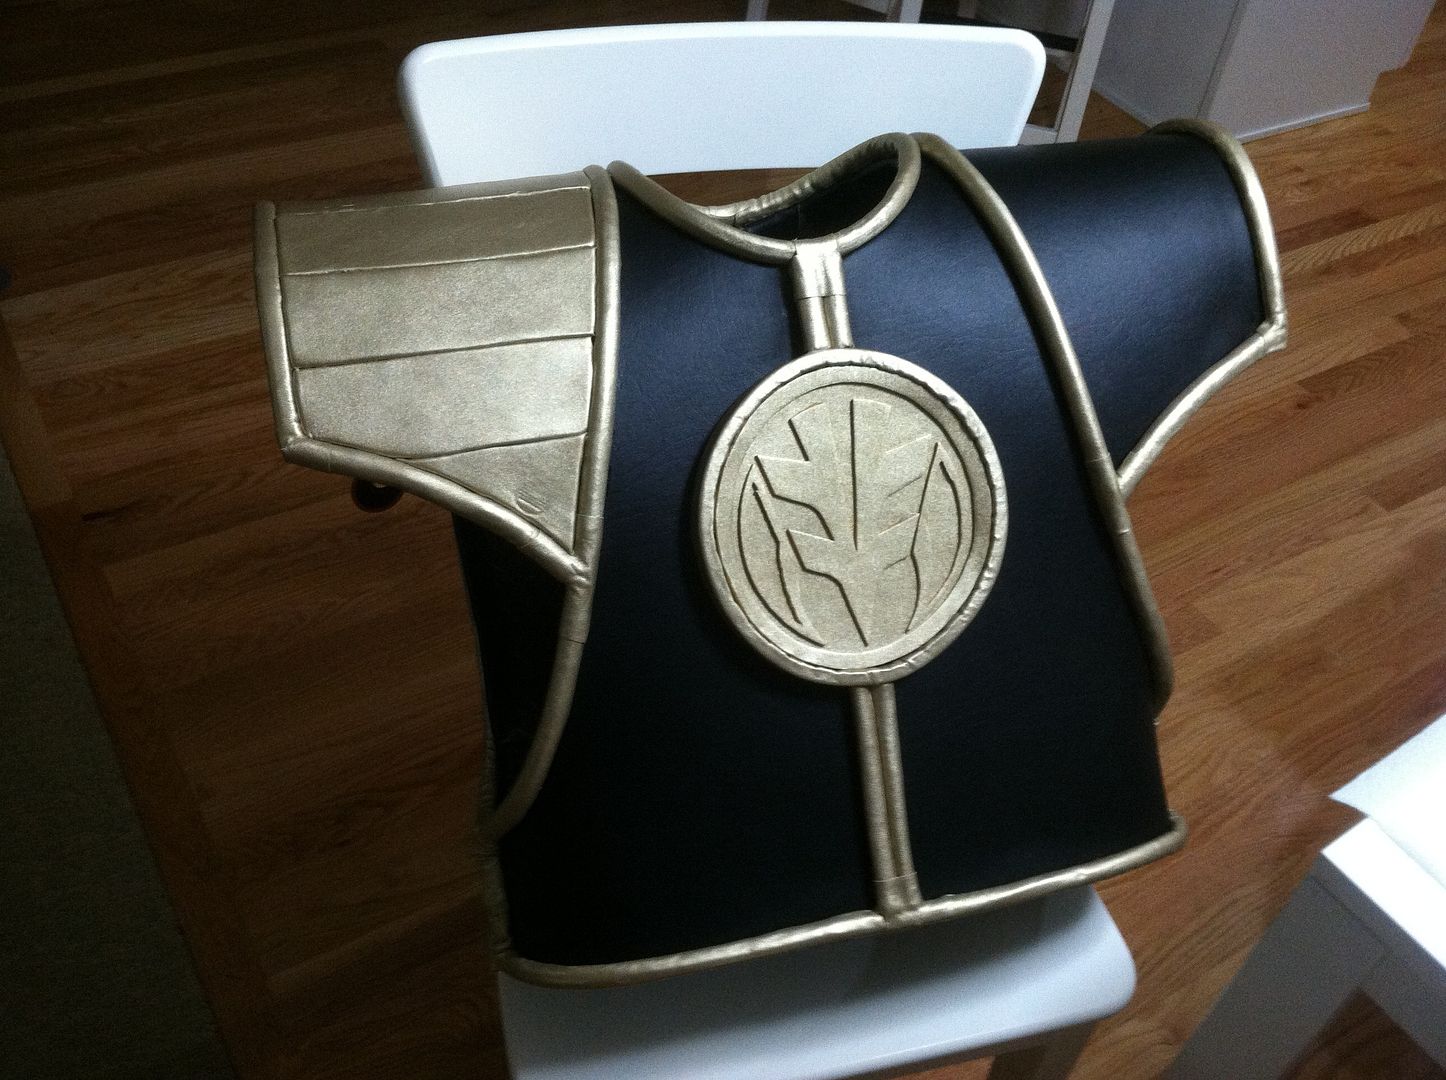
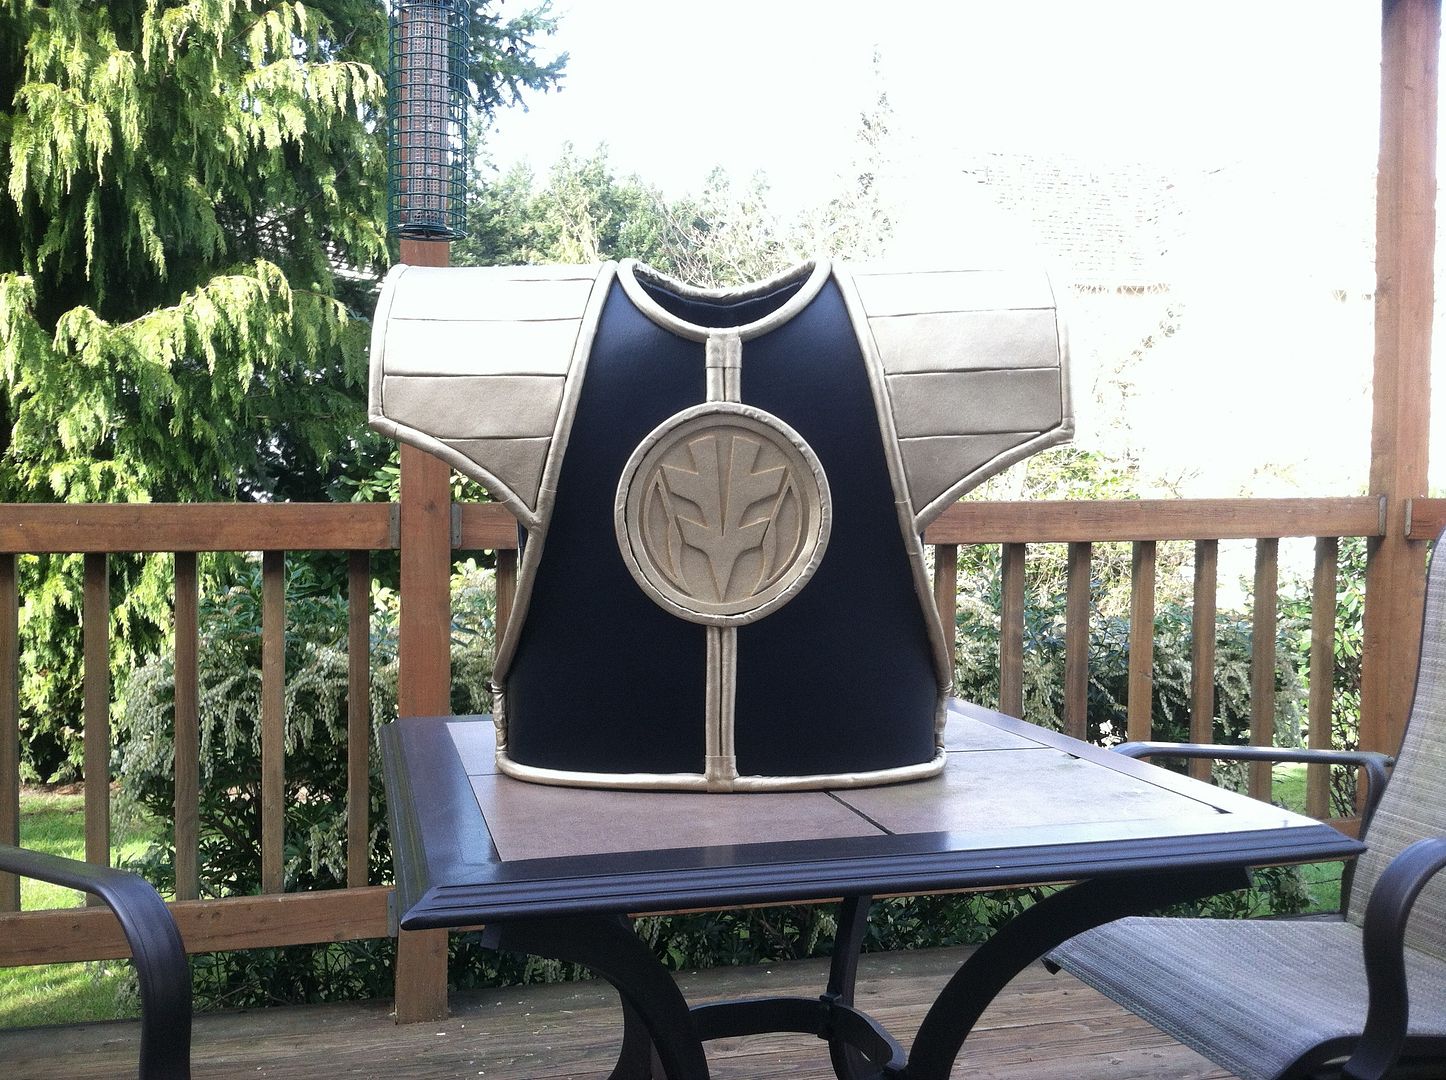
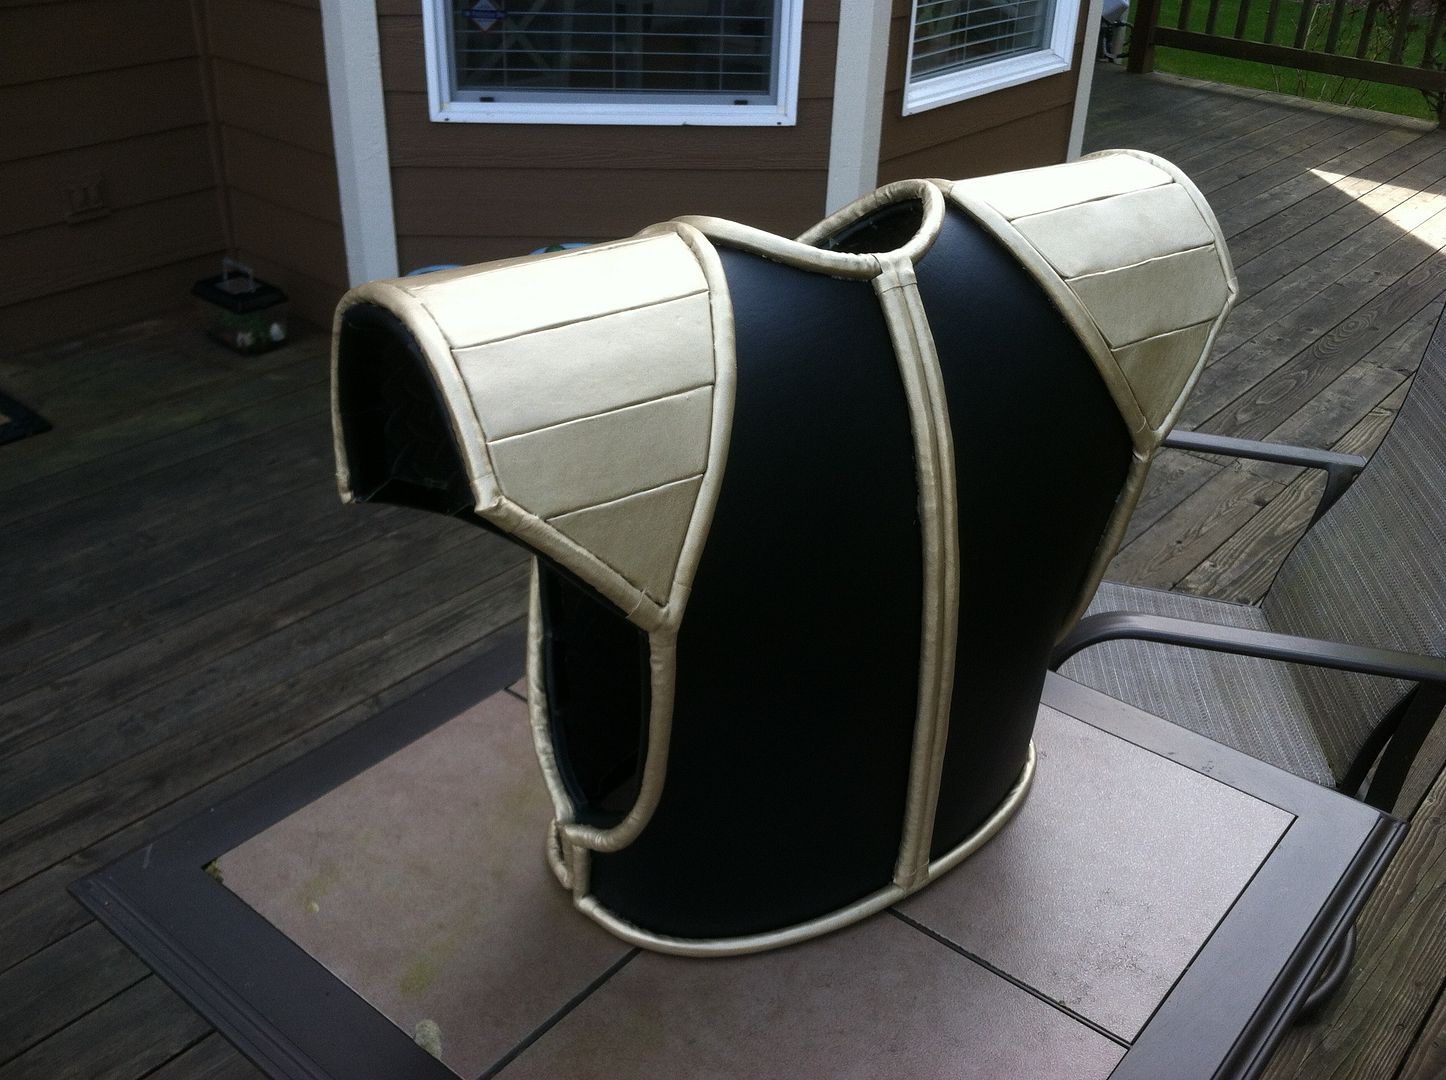
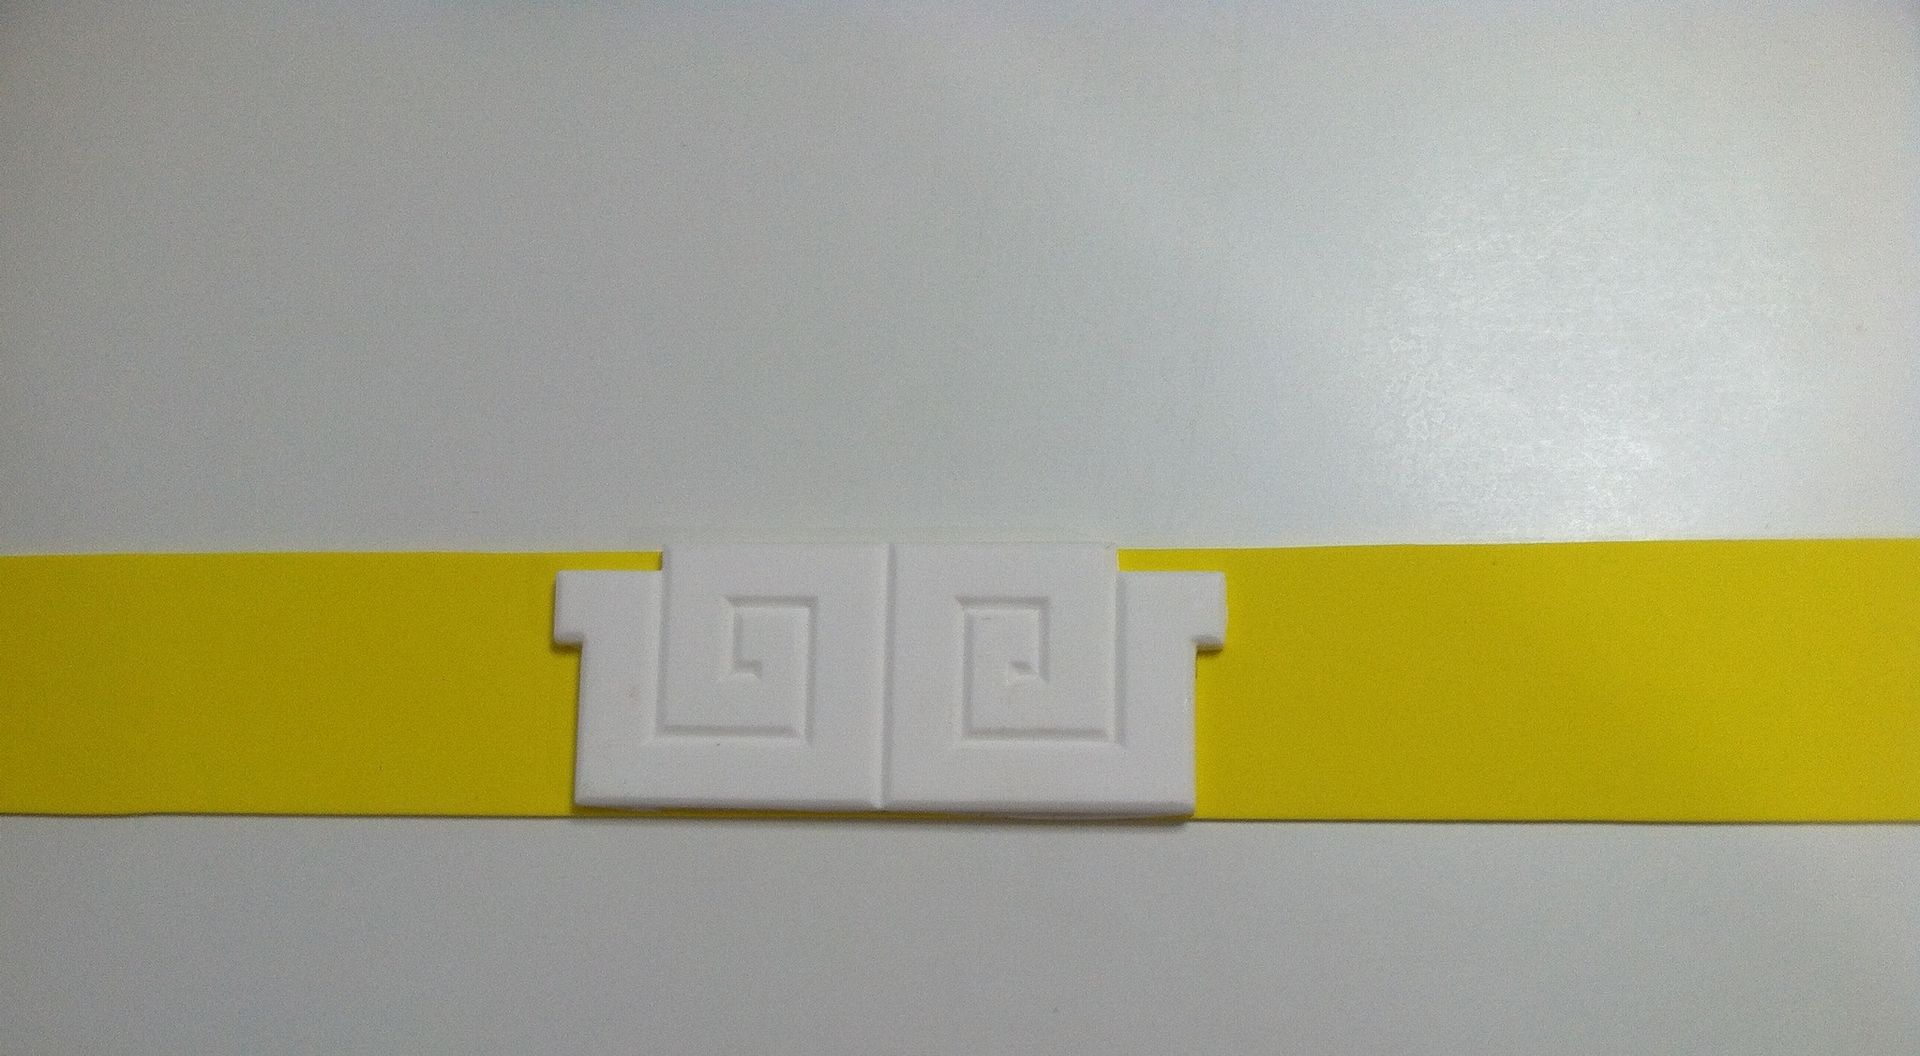
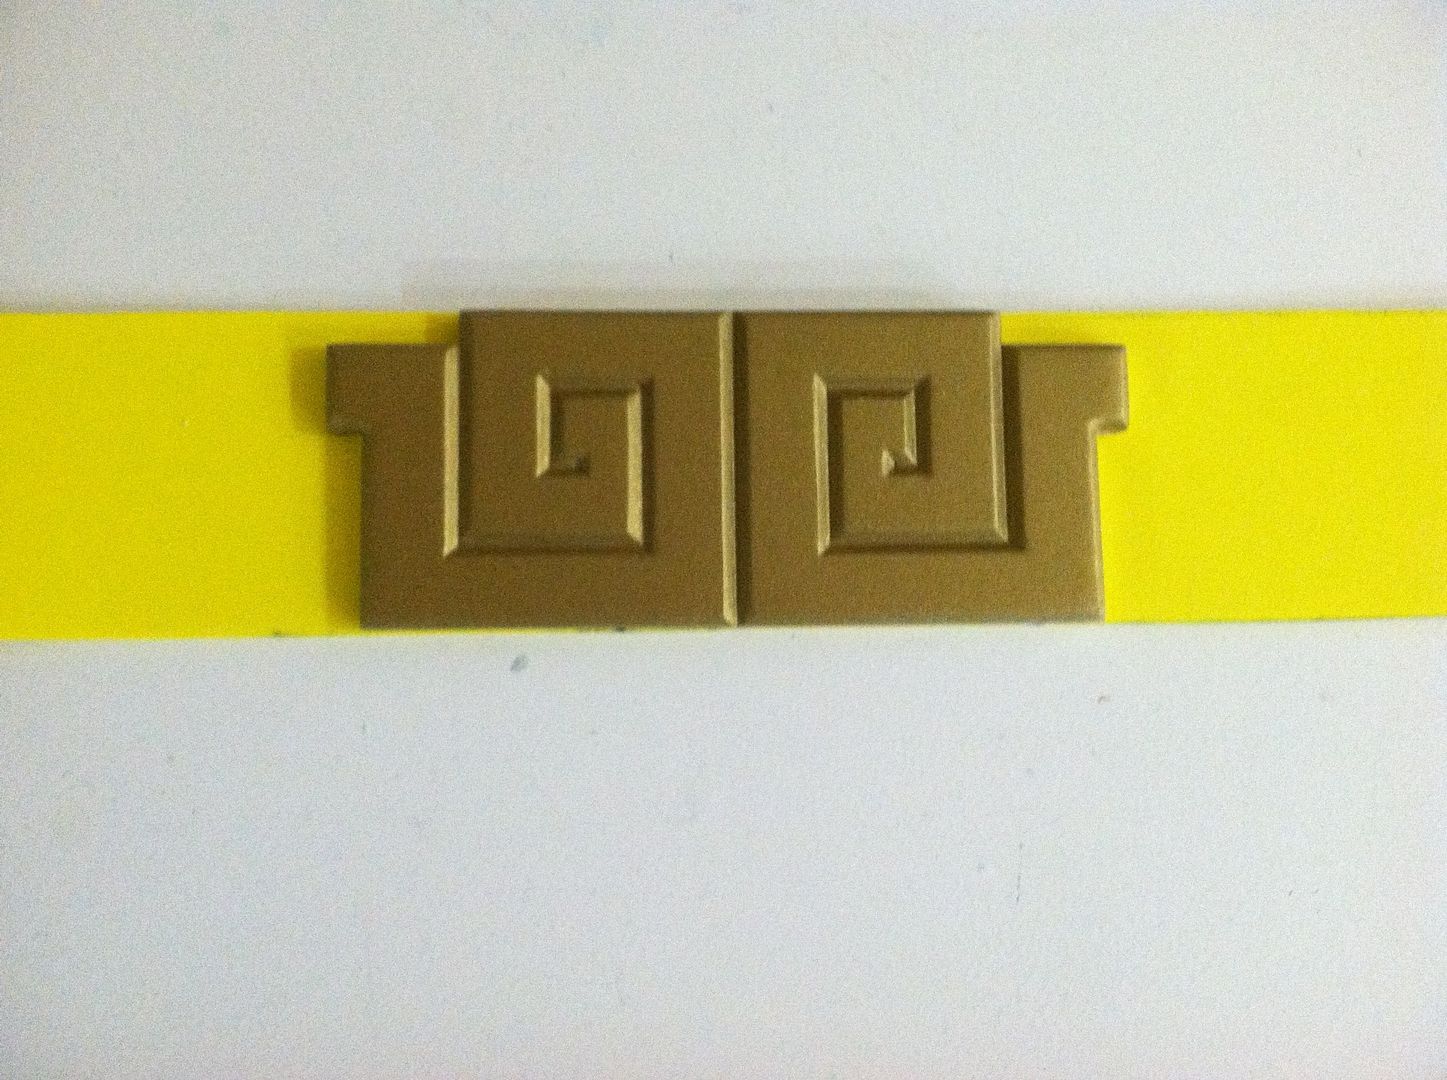
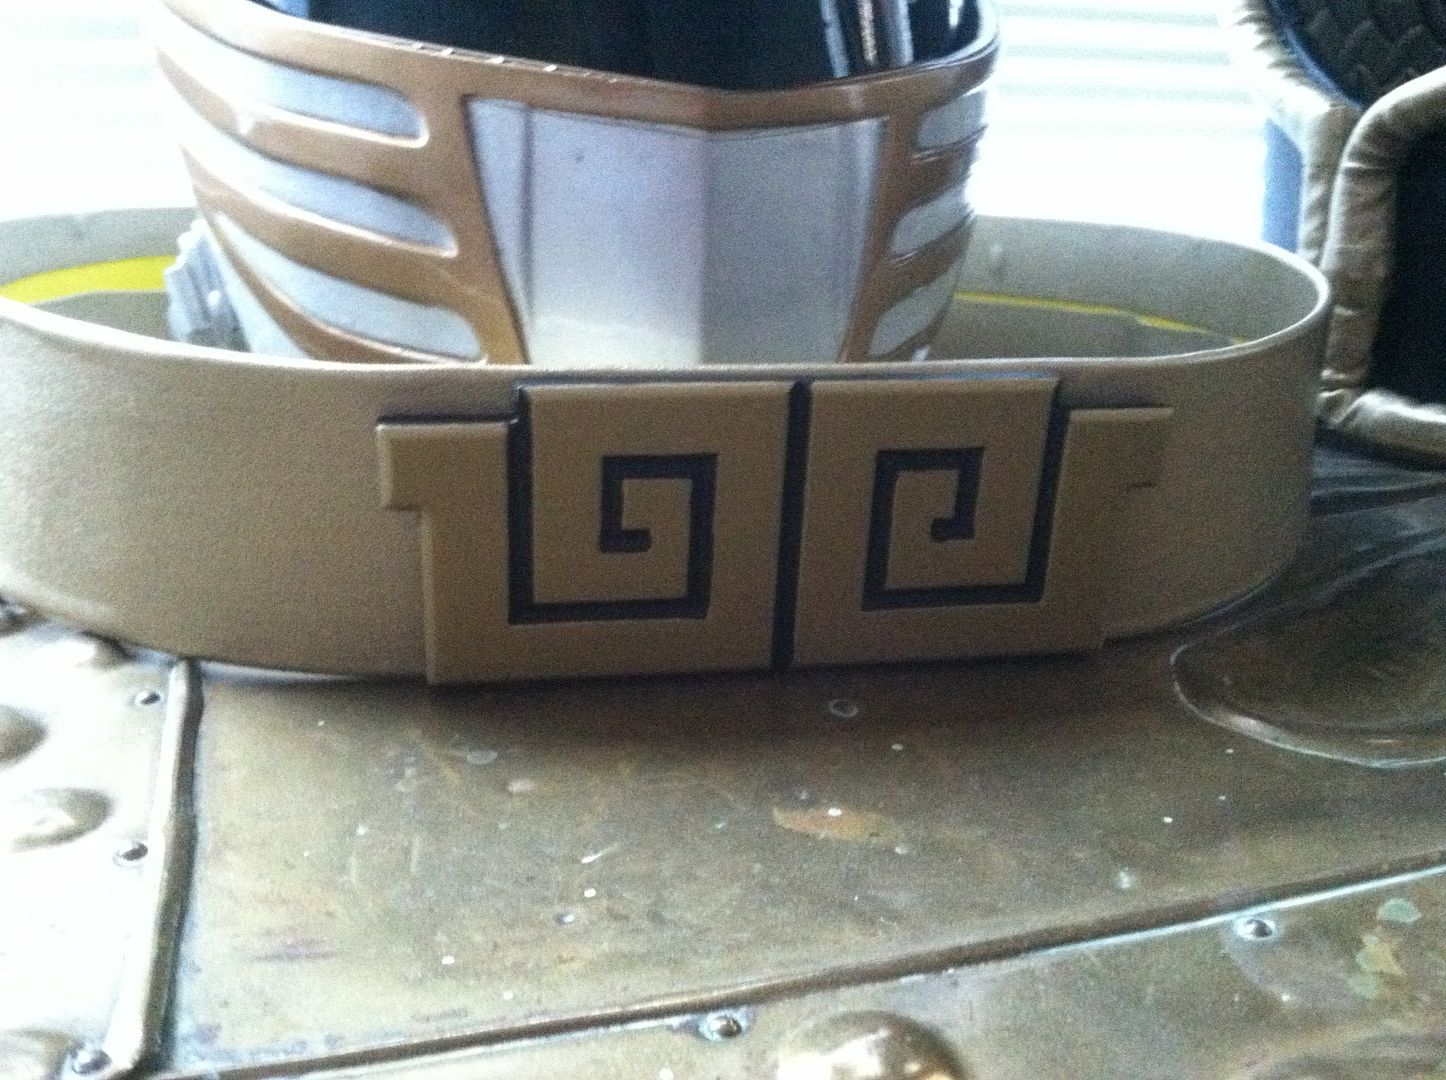
Belt: I am creating the belt myself and adding a purchased belt buckle (raw cast) that I will be painting and finishing.
$_57.JPG

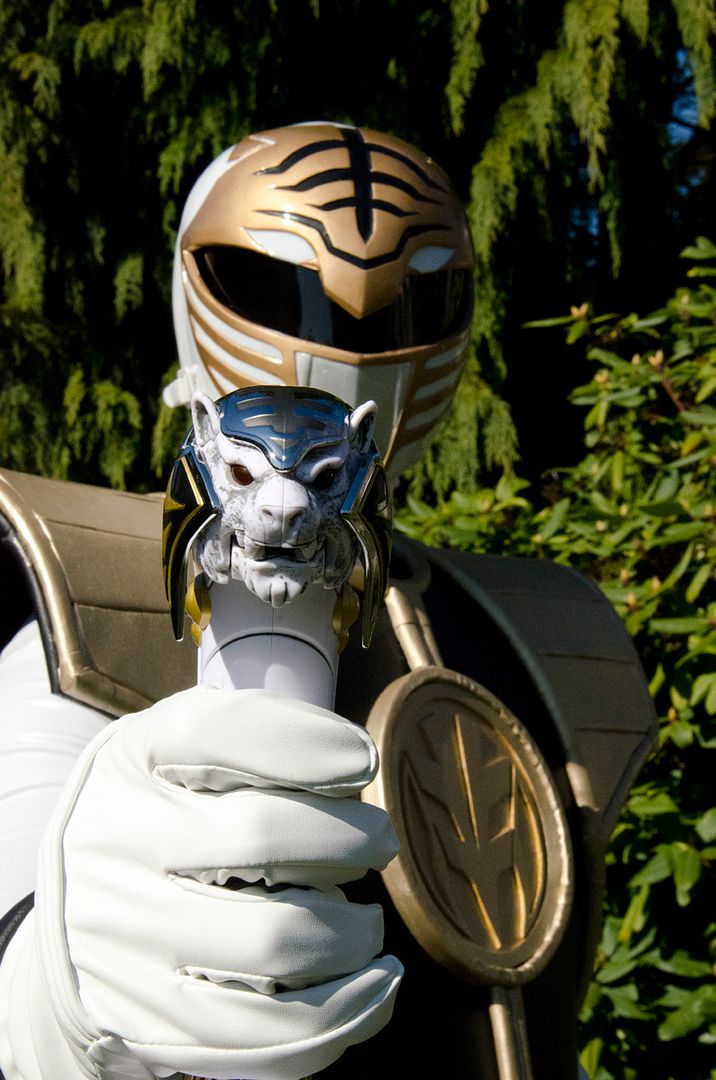
Sword: Going with the Legacy Saba - with lights, movement and voice, I just can't resist.
rangersaba-600x360.jpg
 
Last edited:
White Ranger Shield:

For this I looked up TONS of different styles and builds. My favorite build being here on the RPF which I am stealing heavily from.

I started by taking my measurements and approximating the overall size. Here are the measurements I used:
-Waist (adding a bit of room for movement)
-Overall width (shoulder to shoulder)
-Length (Kibaranger had a shorter shield that only went down mid-way to the chest, the White Ranger had a longer shield that came down to the belt)

From there I taped some paper together and freehanded a crude template.
E18FCAD3-8A1C-4A51-BFC4-6EA6D69B6C92-3195-000004C29AA7C05C_zpscdfd95e9.jpg

Then I used this picture and superimposed a front shot of the White Ranger to reshape the contours and draw the lines. Here's the result:
1CF21087-7DDA-4B8D-930E-02BEBB9763D7-3062-0000049EA0C9FC44_zps18e8e400.jpg


At this point I transferred the pattern onto 5/16th inch EVA foam. I bought it in roll form from Harbor Freight Tools so I could make the entire thing one piece:
0BE0C3B9-CF80-4B02-9B3C-587EEC0D2B6C-3195-000004C57DB2DFFE_zps2159a19a.jpg 295A0918-AB7A-41C9-BC5F-EB2AEE38B4AF-3195-000004C586BEDB8B_zps48e89809.jpg


And with some finesse:
F9D744DD-2DE0-4474-9088-4B0B27B47114-3195-000004C59739C88D_zpscb1dc45f.jpg

Test fit before continuing:
F76E0388-988B-4A7E-8D11-540A2C7D393D-3062-0000049EC12CCB50_zps2235fdfe.jpg


I then used spray adhesive to glue a layer of satin leatherette to the outside as the base layer (spray adhesive held the fabric down fairly well on the flat surface, but I had to go around and reglue all the edges with E6000);
F535DEAC-4C5E-44CB-866B-5656CAECCF2F-3062-0000049ECEFA89BA_zps3d1da468.jpg


For the symbol, I followed the lead of others on here and Rangerboard and simply printed an image of the White Tiger coin. I used a light glue stick to adhere it to some funfoam, then cut out the lines with the trusty XACTO knife.
4035EE71-68C0-435B-9B10-EF62634DFDA6-3062-0000049EC7D64358_zpsa0ff69ca.jpg
 
Hey man!
First of all, thanks for using my shield as a guide for yours!!!..That's awesome... if you have any doubt or concerns about the build, (please) don't hesitate to let me know...

second... your work is going great!!

Have a nice day, my friend!
 
Hey Thanks!! It's coming along nicely, I had a tough time choosing the gold fabric. I eventually ordered some from Amazon so we'll see how closely the color/texture matches my reference images.

Updates: I'm pretty happy with the fit of the shield at this point. I will be using snaps instead of velcro to attach it (I used velcro on my green ranger shield and I never liked it). Also I finished tailoring the boots last night - it's a small detail that I think makes a huge difference. Most of these "costume" boots are very loose/baggy and can ruin the look of an otherwise-perfect cosplay.

Here's a pic of these boots from a test shot of my Green Ranger that I never finished. As you can see, the boots are very loose around the calf (me being a size 13 shoe with a lanky build doesn't help!)
3f5be4ba-91fa-4766-8c95-e1e64f48835a_zpsccceca52.jpg

And here's the completed tailored boot:
AA828BEA-609B-4410-8A1F-935E2945959A-3683-0000055D1B625BA2_zps3614e272.jpg


I also started working on the belt. I cut a 2" strip of funfoam which I will cover with the gold vinyl fabric and stitch. My concern is that painting the buckle will not match the color properly - I got Liquitex Professional "Antique Gold" which I am hoping will match OK.
51096C3B-C2E0-4669-85CB-4E530AACE128-3683-00000522EACEC065_zps742bff75.jpg


And lastly I have been working on a method for the cuffs that I think is pretty unique compared to most of what I've seen out there... more on this later!
 
Re: Tommy & Kimberly (Mighty Morphin' Power Rangers) ECCC 2015

Would you be willing to do movie suits for comission? Or you could do one as a tutorial and I could make the rest

- - - Updated - - -

Also your white tiger ranger is top notch, looks like the one from bat in the sun
 
Oh wow. I've been searching for good ranger boots for a while. Those are perfect. How do they feel?
They feel pretty good! I typically put insoles in every pair of costume boots/shoes I use because they are made to look good, not necessarily to be comfortable :)

Would you be willing to do movie suits for comission? Or you could do one as a tutorial and I could make the rest

- - - Updated - - -

Also your white tiger ranger is top notch, looks like the one from bat in the sun
Hey thanks! I will try to add pictures & detailed explanations for everything I do, perhaps that will be helpful to others in the future? Not sure if I'd call it a tutorial. And nope, I've never built anything to sell, just a hobby.

Look forward to seeing more of your power ranger build.
Thanks, it's coming along slowly but surely!


Two minor updates: I got my gold fabric in and it's pretty much perfect. After striking out locally I took a risk and ordered online. It's listed on Amazon as "VINYL SOLID SHINY SHIMMER PU LEATHER FABRIC". It's a non-stretchy vinyl with a thin backing, so it's easy to wrap around foam, etc.

Second, I am beginning work on the Pink Ranger helmet. I bought the raw cast this time so I can finish it myself.
26363BCE-34C0-4898-8CD0-F523885D0869_zpssst8gclc.jpg
 
Okay, pretty much finished this one up. There will be some long picture posts to come detailing the process, but for now I wanted to show the (almost) completed look! With the White Ranger about finished, I've just started painting the helmet of the Pink ranger.


DSC_9183s_zpsc0bb4zhv.jpg~original


DSC_9208s_zps8kxxmz1f.jpg~original


DSC_9169s_zpszv2bsbo6.jpg~original


DSC_9186s_zpswaf42iki.jpg~original


DSC_9214s_zpstdkgsfst.jpg~original
 

Attachments

  • DSC_9214s.jpg
    DSC_9214s.jpg
    704.7 KB · Views: 151
  • DSC_9208s.jpg
    DSC_9208s.jpg
    1 MB · Views: 183
  • DSC_9186s.jpg
    DSC_9186s.jpg
    1 MB · Views: 148
  • DSC_9183s.jpg
    DSC_9183s.jpg
    1.1 MB · Views: 167
  • DSC_9169s.jpg
    DSC_9169s.jpg
    976.9 KB · Views: 171
Last edited:
Boot & Glove cuffs:

I spent a lot of time on these. After looking at quite a few White Ranger costumes online, it seems that most people focus heavily on the helmet and shield, and perhaps less thought goes into the boot and glove cuffs. I know of at least one seller that is considered to be one of the best Ranger Cosplay sources that builds the cuffs this way - It was really important for me to make cuffs that appeared to be more screen accurate.

Here's an example of a really good white ranger cosplay - as you can see, the glove cuffs are just gold panels with a piece of black material behind it. They aren't shaped particularly well and they have large gaps where they zip up. (I am in no way meaning to offend the owner here, just trying to illustrate the differences)

10691290934_361f3810e5_zps4rvsmjmy.jpg~original


Up close:
21d0ff30-56db-4105-afcc-301829e143eb_zps5lcsj0ot.jpg~original


While here's an actual screenshot from Dairanger - you can see clearly what the Kiba cuff looks like - it's as if the black material is actually "covering" the gold on the ends. It's a shorter & fatter cuff, too.

2132977-sentai2617.jpg

This is what I set out to make, and I think I did a pretty decent job of recreating the look. I began with the pretty common base: funfoam covered in gold fabric. But instead of affixing this to some black material, I instead created a rolled edge out of black vinyl and folded it over the ends of the gold pieces, achieving the "wrapped-around" look. Hard to explain, so you'll have to reference the photos.

EEE8195A-9B13-4394-B202-0B0598C6C035_zpsevqha7am.jpg~original


8BA8158E-AE35-4932-8F94-5D24C5E5D3CB_zps3lelfqoy.jpg~original


801DF0C2-001A-461F-B69D-6B890102DAA3_zpsuzgqmcnw.jpg~original


Here's what the cuff looks like before I fold over the rolled edge:
ACBAA664-C98B-4B1B-8C58-062B01C5EA61_zpshrswetqk.jpg~original


And folded over:
6D30F404-DEAF-4617-8CBB-C2D2C45E5204_zpsvudqfciq.jpg~original


And with the ends connected:
891DD992-2B1D-4E25-9EF8-8D21B1036960_zps4zaneact.jpg~original


All finished!
8951EC10-29F0-4137-A957-A1E0A8AB1F69_zpsdou2x6kg.jpg~original


As you can see, the look is much close to that of the screen-used costume:
283064C6-15A7-4EE4-9E83-A7F9F0BC28A8_zpsmm4fydy5.jpg~original


2132977-sentai2617_zpscdgtxbhv.jpg~original
 

Attachments

  • 77332072f4fcf52374e133deb3e513ec.jpg
    77332072f4fcf52374e133deb3e513ec.jpg
    57 KB · Views: 220
  • otakon_2011_white_ranger_by_pvnphoto-d45jdze.jpg
    otakon_2011_white_ranger_by_pvnphoto-d45jdze.jpg
    112.3 KB · Views: 142
The Shield:

This one was a beast, no doubt my most difficult prop I've ever built. For this one, I used the images from the original footage along with the S.H. Figuarts white ranger action figure.

I left off having just covered the entire shield in black vinyl. From there, I began covering 1/2" diameter braided rope in gold vinyl fabric. This task was pretty horrible in the beginning, but I learned a few things and improved my process. I began gluing the gold "trim" to the shield in all the correct places:
4435BD80-58F5-4E13-9313-5DEB334FDA9C_zpsvmckqmev.jpg~original


49851F2F-BA29-4856-8473-E20C26D27DFB_zpsdzfcvcou.jpg~original


Unfortunately I don't have any pictures of making the coin, but I will explain. I started with a sheet of funfoam and glued on some gold vinyl fabric. I printed the design (thanks Google Images!) and I used a glue stick to adhere my template to the other side of the foam. I cut out the foam using the template, then peeled off the paper and was left with the gold-coated funfoam shapes. From there, I hand-painted the edges of the foam with gold acrylic paint and glued the entire thing down onto a gold-coated foam circle. The result was fantastic! (My first attempt at a "circle" around the coin turned out too wrinkly. As seen in the rest of the shots, I ditched the one in this pic for a thin strip of 3/8" EVA foam coated in gold, much cleaner!)

CCF23D66-8FB8-435F-8C47-0BB919C44558_zpsulacmh3i.jpg~original


Filling in the shoulders is where it got crazy. Covering all the shapes in foam and gluing them down was really tough! I made a paper template of the areas to fill and from there, created templates for all the shapes.

F458BF1D-B396-452D-BC92-C80B3D43F980_zpsplttiwnz.jpg~original


0974BBE9-3C36-467B-9852-109F9366EDC9_zpsgttnhemd.jpg~original


ED9D9E4C-39C1-4C15-9FEF-9C96D72D549D_zpsh5nkt0ee.jpg~original


Getting them all to lay flat as they curved around the shoulders was pretty simple - I just beveled the edges of the underside of each foam piece!
IMG_9032_zpszkfq6ydo.jpg~original


One side done:
IMG_9033_zpsn4jgdrcc.jpg~original


And complete:
IMG_9041_zpszszbn4jg.jpg~original


IMG_9038_zpsyytk4a2z.jpg~original


The shield fastens on either side with two buckles per side. It slips over my head so there is no split down the back or anything like that!
 
Belt:

This was pretty straightforward, not many pics of the process. As mentioned above, I started with a cast buckle. I painted it gold:
51096C3B-C2E0-4669-85CB-4E530AACE128-3683-00000522EACEC065_zps742bff75.jpg~original


2755C41F-83E4-4239-9D9A-6E00C991C90C-3683-00000576438E6A0A_zps71bfa46d.jpg~original


Then painted the outlines with a black paint pen. I again covered the funfoam in the gold vinyl. I affixed the buckle and in the back, used an actual buckle sewn to some elastic to connect each end.

B87491D8-3945-4EBD-A673-A80723846B62_zpsmorqd6sw.jpg
 
Last edited:
Great costume and thanks for the detailed build notes. It is always helpful and inspiring to see how other makers do what they do.
Cheers!
 
Thank you Big Mike!


I've started the Pink Ranger helmet for JuJuBean, this has been pretty fun for me. It started with taking the raw casting and using Bondo filler to smooth out the imperfections. Sand, prime, bondo, repeat. I then used the dremel tool and cut the helmet in half.

From there I painted the mouth silver, then masked it off and painted the face pink. Lastly, I masked off the pink and painted the rest white.

For the back, it was pretty simple. Paint the center stripe pink, then mask off and paint the rest white.

CBBCD76F-CF62-4878-9F3F-651D597B2B68_zpsavcju5za.jpg

C4B8A67E-09DB-44B1-9935-53D088A3D9B5_zpsyuocip5q.jpg


098154F9-6376-4C87-811C-60B3ADB7100D_zpsetliodma.jpg

I still have to wet sand & clearcoat the finish, but it's looking pretty good so far!
 
Last edited by a moderator:
More progress on Kimberly...


The first shot at painting didn't go so well... I am used to auto paint which behaves differently than whatever craft paint I purchased (Painter's Touch). I should have stuck with my go-to which is the Liquitex line.

I'm not at all happy with the result so I'm planning on removing just about all of it and starting over.
451EA65B-0C37-4FD9-81B5-18ACB5526774_zpsra8agy7m.jpg


On a better note... Pink is getting an upgrade! No shoddy boy-boots for this ranger!
C9564E9B-B232-4419-89C8-79D273439264_zpst3qzzy6q.jpg
 
Very cool! Thank you for such a detailed build btw! I'm honestly kinda sad with how few of people really go into detail with their ranger builds. Other than a few on RPF, a lot just suggest buying them rather than the fun (and stress) of building one. You also just gave me a new appreciation for the cuffs aha
 
OK I officially cant talk to you any more, you make me look like I don't know what I'm doin. Your attention to detail is just Awesome. Man just cool, totally cool.......
 
OK I officially cant talk to you any more, you make me look like I don't know what I'm doin. Your attention to detail is just Awesome. Man just cool, totally cool.......

Nah man you're crazy! I'm very jealous of your Cap shield build :thumbsup


Progress report: I wasn't very happy about the paint on the Ptera helmet. I ended up sanding it all off and starting over (It looked good for ~10ft but my lines were pretty bad).

Here's the second attempt, with a few layers of clearcoat. After this, I'll attach the hinges and put the visor in and call it good.
30F90E73-4400-414A-BC61-80E592C7DA47_zpsthhpdqet.jpg

Here's the costume pretty much complete. I still have some tailoring to do on her belt, and put some fasteners in to keep the skirt down :lol After that, just need to sew her up an underhood like mine, and we're set to go!
3F91400C-246D-40D6-A7F9-A4C9E66DB7DC_zpsg0lddxrp.jpg
 
I installed the visor into the helmet, just waiting for the hinges to arrive so it can be worn properly.

82EF9E35-4C28-4712-8922-25F0A2BCAFD3_zpscu6uh2fs.jpg


7638057C-A411-4C47-8EFF-5CAC2944B905_zpsfatge691.jpg


And we did a quick costume test this evening. Lighting wasn't great so the pink didn't really photograph that well. But I think she looks amazing and I'm so excited to debut these at ECCC!

PinkRanger2lr_zpsrzzps9bd.jpg

PinkRanger3lr_zpswbn3ai1d.jpg

DSC_9241lr_zpsqrxykg0k.jpg
 
Last edited:
This thread is more than 9 years old.

Your message may be considered spam for the following reasons:

  1. This thread hasn't been active in some time. A new post in this thread might not contribute constructively to this discussion after so long.
If you wish to reply despite these issues, check the box below before replying.
Be aware that malicious compliance may result in more severe penalties.
Back
Top