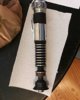
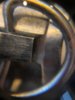
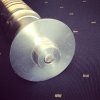
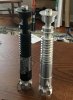
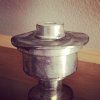
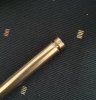
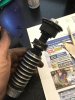
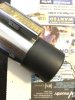
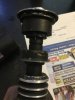
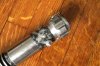
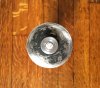
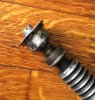
I started by purchasing 4” of 5/16 round steel bar and adding a shaft collar to the end of it. With a groove cut in the other end of the steel, the rod filled the neck of the saber and tightened the wobble. The original has a rod in the neck too, so it scratched that practical effect itch of mine!
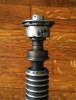
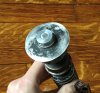
the first big step was to take a butane torch to the emitter, to soften the plate and whack at it with a rubber mallet. Like halliwax, I made sharpie marks where I wanted the big dents... measure twice hit once. Or many times haha
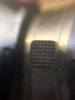
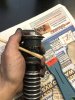
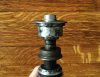
i then went over the whole thing with some aluminum black to age it with what I had on hand. I paid more attention to things like the booster and pommel cubes that would have been gripped hard. Next came paint.
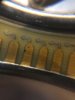
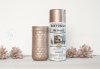
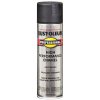
Lowes here had Rustoleum professional enamel black on clearance. Those are the big silver aerosol cans most people ignore- for three bucks I couldn’t pass it up. I also got a color for the neck. After perusing the colors I realized I wanted a brownish yellowish color. One that was soft and more dull bronze... tough right? I settled on the same brands rose gold - it’s a pretty awful excuse for rose gold - but it was brassy with some brown and orange tones to it. also rustoleum metallics are are boring and silvery brass colors, so this was a step in the right direction.
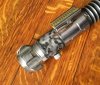
i took a page from the Hoth DL44 and dusted the rose gold on there, then dusted th black on the appropriate parts, including over the gold. This dull black enamel dries hard in less than an hour by the way. It’s so durable the chopsticks I used to weather it couldn’t weather the booster and emitter sides.
anyway, I then swiped the black and gold together (2:1 gold and black) and used a foam brush to dab that on the windvane over the black too. Looks pretty bronzy and sick!
anyways, yes, I mainly used chopsticks to scrape paint off. Unfortunately a wood chisel and screwdriver were the only things I had that would get through some of this so the metal got scratched up.
Ieft the clamp together and taped over it the whole time. I left the pommel off the whole time.
D ring I got from a women’s belt at the thrift store, cut it with snips and squished it together in there. This is a neat project - and I prefer not to use stencils. I think it’s an artist thing (my dads a cartoonist) so I prefer the unexpected hard labor results and producing th effect rather than just the shapes.
the first big step was to take a butane torch to the emitter, to soften the plate and whack at it with a rubber mallet. Like halliwax, I made sharpie marks where I wanted the big dents... measure twice hit once. Or many times haha
i then went over the whole thing with some aluminum black to age it with what I had on hand. I paid more attention to things like the booster and pommel cubes that would have been gripped hard. Next came paint.
Lowes here had Rustoleum professional enamel black on clearance. Those are the big silver aerosol cans most people ignore- for three bucks I couldn’t pass it up. I also got a color for the neck. After perusing the colors I realized I wanted a brownish yellowish color. One that was soft and more dull bronze... tough right? I settled on the same brands rose gold - it’s a pretty awful excuse for rose gold - but it was brassy with some brown and orange tones to it. also rustoleum metallics are are boring and silvery brass colors, so this was a step in the right direction.
i took a page from the Hoth DL44 and dusted the rose gold on there, then dusted th black on the appropriate parts, including over the gold. This dull black enamel dries hard in less than an hour by the way. It’s so durable the chopsticks I used to weather it couldn’t weather the booster and emitter sides.
anyway, I then swiped the black and gold together (2:1 gold and black) and used a foam brush to dab that on the windvane over the black too. Looks pretty bronzy and sick!
anyways, yes, I mainly used chopsticks to scrape paint off. Unfortunately a wood chisel and screwdriver were the only things I had that would get through some of this so the metal got scratched up.
Ieft the clamp together and taped over it the whole time. I left the pommel off the whole time.
D ring I got from a women’s belt at the thrift store, cut it with snips and squished it together in there. This is a neat project - and I prefer not to use stencils. I think it’s an artist thing (my dads a cartoonist) so I prefer the unexpected hard labor results and producing th effect rather than just the shapes.
Attachments
-
 197F2924-628C-42CB-82A0-65EA7B959DAD.jpeg276.8 KB · Views: 251
 -
 B9221233-9566-4A13-AD36-3DFC3DC5E5D6.jpeg96.1 KB · Views: 248
 -
 820D29A5-1508-471E-89FD-09A87E9B8A23.jpeg175.4 KB · Views: 278
 -
 80EBBE6F-0337-4B23-94C6-7A48B3CCE874.jpeg142.1 KB · Views: 279
 -
 0E95BA12-1FD7-443F-9C20-0BC1B1BD0BDF.jpeg324.4 KB · Views: 285
 -
 ECB84933-A2EA-48AB-B812-0D1E524B3C81.jpeg2 MB · Views: 293
")