Tips on photographing props?

Yeah...pinlight is cool to pick up highlights, but what really gives you the beauty shots is soft light. Reflector, diffusion...and sky light (not direct sunlight) also does very nicely if you can set up to use it. Doesn't have to be expensive or elaborate. Hold a piece of white foam-core up in direct light, just out of frame, to make a bounce light. You can ever wrap a t-shirt over a desk lamp to make a softer light!

Two sources better than one. One will inevitably leave shadows. Fill them in with a second light of lower intensity. Even better; three lights. I'm really fond of the look of a stronger light behind the object, picking up highlights along the edges, and then two weaker lights coming from the camera direction.

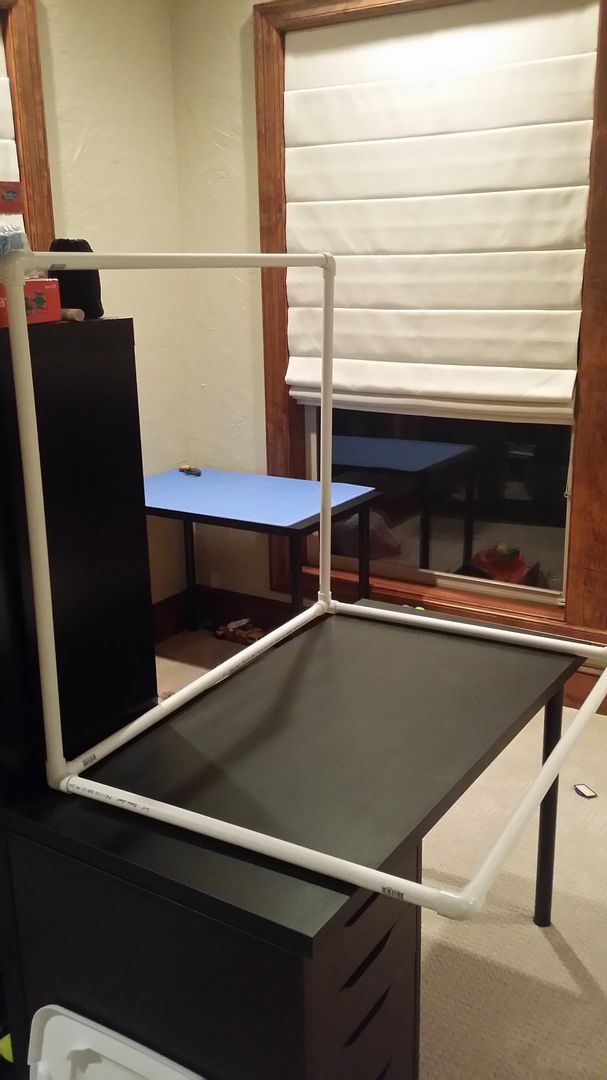
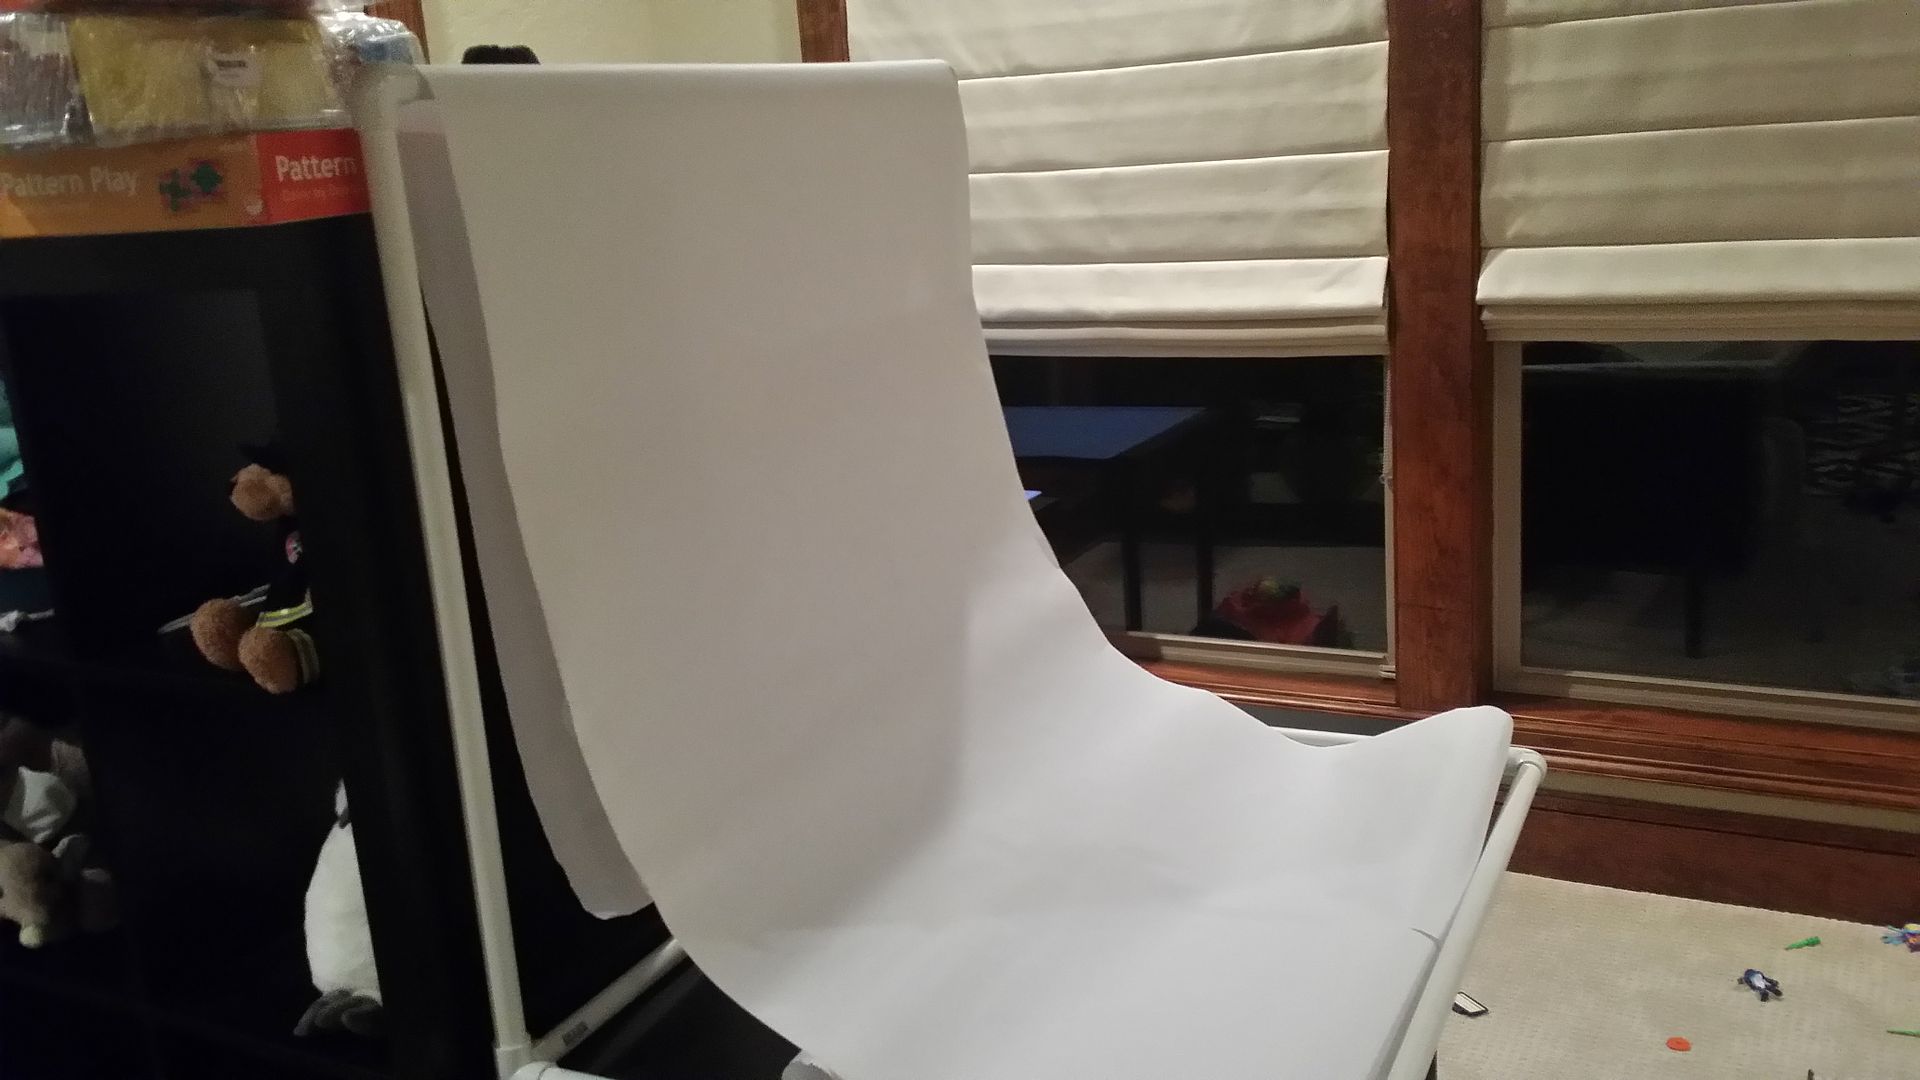
And seamless backgrounds are nice. Again, doesn't have to be elaborate. Stick a piece of posterboard behind the prop. Trick here is you don't set it on edge. You set the prop on
it, and curve it up to rest against a wall. That means there's no visible edge/horizon.

I got lots to learn myself. Look forward to hearing what other people have to contribute.


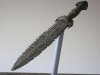
(Oh, personally? I'm from a theater background -- designed fifty-odd shows in 300-800 seat houses. So I like drama; color and chiaroscuro and hard key light and so forth. And it doesn't take a lot of gear to do. This pic was done with light from a flashlight, a holocron, and a barbecue lighter: )
 

Attachments

  • fire_lit.jpg
    fire_lit.jpg
    109.9 KB · Views: 58
Last edited:
Couple general photo tips
-The larger you light source is relative to subject, the softer the light will be. if your only light source is a single light bulb, try a thin sheet or a piece of tissue paper to make your light source bigger.
-Shadows create depth. Evenly lighting a subject can make it appear flat. If using two even light sources, you might want to move one slightly back, to creat a slight bit of shadow to show depth.
 
Lighting is (mostly) everything!

It's not uncommon for me to have ~$3k worth of gear when on a product photo shoot, however what can be accomplished with even a camera phone, window curtain, wax paper, tin foil, poster board, and white grocery bag is not to be underrated. Mind you, if you've spent hours on colour accuracy to the most minute wavelength, this is will fail to do justice, however if your alternative/usual is a point and shoot snap of your prop on the floor next to your desk (which is still awesome when not intended as final exhibition) it will be well worth it.
General guidelines:

Background - Clean/not distracting. Doesn't have to be blank, but it helps especially when using very simple lighting. As described above, seamless setups (e.g. bent posterboard) is easy and low-cost. If you've greater camera control a wide aperture and long focal length is also helpful with cleaning up the bacground by means of depth of field, blurry backgroud but that is a more complex approach, and requires even greater lighting work.

Key light - This is your main source of light, and on a simple setup, few things are easier than a window curtain diffusing daylight. With the window at your 4 o'clock, your subject below at 12 o'clock, you can avoid shadow of you/ your camera, while still having shadows for definition. Other quick&dirty key lights can be any lamp with a large diffusing shade, or I've even used a flashlight with an empty white plastic grocery bag "inflated" over the front.

Fill light - The purpose here is to soften any unpleasantly hard shadows (e.g. an amateur video interview where the far side of someones nose looks like a black hole in the middle of their face). This is easily fixed in a variety of ways (w/o additional light sources) ranging from a hard reflector such as a mirror or smooth tinfoil, to what is more often preferred to give soft light such as a poster board reflecting just enough to bring out desired detail, or even a white wall. Often placed between 8 & 10 o'clock, as well as somewhat lower than your key light. If using an actual light source, less light should fall on the subject from your fill, while the key provides the most.

small note: The key light providing the "most" light is not always brightest, because additional lights such as "rim" & "hair" lights can be brighter in providing highlights to match a certain style/aesthetic, yet they should be shaped where the key light provides the primary source of light.

as for Back, Rim, and Hair lights... at that point you're getting into complexity beyond what anyone wants to read in a single post, suffice it to say they are additional means of sculpting light to best show your subject and can be used to provide mood, enhance details, and even provide separation from the background in conjunction with other skills such as depth of field.

Perhaps the best suggestion is do an image search on "tabletop photography ideas" which will show you final images as well as overviews of the setups people use to create those images. As for the equipment, aside from colour consistency, as well as brightness needed to overpower daylight, or compensate for a really fast speed (e.g. shooting water droplets), wherever you see a flash or strobe it can probably be replaced with a normal light source, just with a lot more experimenting to shape/focus/diffuse/colour or otherwise manipulate it. But with normal lights that don't flash, (a.k.a "hot lights") turn the flash off of your camera, you can get amazing studio looking shots with even an iPhone.

Just like prop-making, play around. Use layers of wax paper to dim a light, crumpled tin foil for a more textured reflection, and even random bits to enhance the setting (crushed ice, tray of shallow water w/ mirror in the bottom, blowing fan to add dimension to fabrics...

Cheers!
 
I suppose someone has to give passing mention to color temperature, too. Simple way of putting it; incandescent bulbs (a lot of room lights, desk lamps, etc.) don't render colors well. Sure, your camera will attempt to auto-correct but the results usually are not nice; ranging from "looking sort of dull and dirty" to "why is everything all yellow?" Nor do "white light" LEDs give expected results. Strobes, some fluorescents, halogen lamps, sunlight, sky -- these match the sensitivity of most camera CCDs better, and will tend to give nicer as well as more vibrant colors.

What I do for a lot of my blog pics is turn off all my room lights, and use entirely the light coming through the blinds and bouncing off my white walls. Not even direct sunlight; just the bounce light from that blue sky.
 
Thank you all very very much. you guys are posting some fantastic tips here and have my total appreciation. as soon as I clean up some of my prop mess from being on vacation. I will dive Into this a bit deeper. any prop stand/holding devices Info out there?


You guys ROCK!:thumbsup
 
Another worthy investment is a light tent, which can be had very cheaply on ebay. Match that with a few hardware store painters' lights with natural-light bulbs and you're ready to go. The whole set up is less than $100.

For outdoors, bright overcast days are gold because the sky is like a big lightbox that provides beautiful natural light without harsh shadows.

Good luck.
 
Thanks Probe Droid.

Another very fast and crude test. I can see now what you all are saying about lighting being the key. and I see whats off. I just have to wait to get some more lighting. used the Photobucket tools to play around with It also. It will progress so just be patient with me guys I don't like using the main prop board for test. but It's the only way I can see the last result..

Pre photo bucket
attachment.php


Photo bucket
attachment.php


And Photo bucket's becoming a down right pain. unless I get there add free deal I guess. not going to happen any time soon...
 

Attachments

  • IMG_0827.JPG
    IMG_0827.JPG
    715.5 KB · Views: 149
  • download (2).png
    download (2).png
    1.5 MB · Views: 154
We use pretty much the same concept in video for sit down interviews. It gives a gorgeous clean look.

Build yourself a tabletop photo studio using PVC pipe and a roll of white butcher/craft/project paper.

Forgive the mess and wrinkled paper. Need to get a new roll!

@sean, your original post has produced some great advice all around!
 
Gimp is also pretty cool and has basic tools for cleaning up. I tend to use the "curves" command a lot to bring out detail in less-lit areas. It is free and runs on everything, but be warned -- it's rather "command line" oriented and can be scary to the uninitiated.
 
This thread is more than 8 years old.

Your message may be considered spam for the following reasons:

  1. This thread hasn't been active in some time. A new post in this thread might not contribute constructively to this discussion after so long.
If you wish to reply despite these issues, check the box below before replying.
Be aware that malicious compliance may result in more severe penalties.
Back
Top