Thundercats Sword of Omens - Full size replica - My build/upgrades step by step

ave4uevoli

Sr Member
Hi All,
I just wanted to share my take on the Sword of Omens. I figured I'd post this tutorial and build thread because I figured there would be huge Thundercats fans out there who may want to do the same.
I've always wanted a Sword of Omens, a really good one, and sadly there aren't many that meet all of my criteria. Recently there have been cheapo, "made in China" swords that have been popping up, and I thought, at least, that it would be a good base to start with and upgrading from here didn't really seem too difficult. So back when I was stuck at home during the pandemic in 2021, I began this little fun project with my kids.

I first picked up this sword -
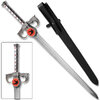
s-l1600.jpg
it's readily available on ebay and everywhere else for approximately $80! Cheap!

If you are going to do this project, please make sure you get the same one, as I can't stress, other swords out there have so many inaccuracies it's not even possible to get it looking right. Plus, I won't know if any of these upgrades will actually fit.

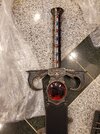
So this sword that came in, has most of the details that I wanted. It had a pretty nice/accurate sculpt. It was proportional. It was all metal. It has jewels in the hilt... all the right boxes were being checked. The most glaring problem was that the eye of Thundera was a sticker! ughhh..
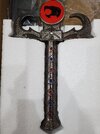
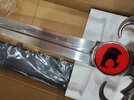
20210209_135854.jpg20210209_135950.jpg
20210209_135912.jpg
 
Last edited:
First thing to do is to peel off the sticker...20210209_200912.jpg

Then I added a bluish tint to the recesses to give the details a bit more "pop." I know the cartoons have it as a little more green sometimes, but I just like the way blue looks better
20210213_182411.jpg


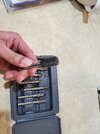
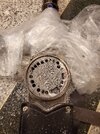
After this, I realized that the inside of the guard was hollow. So I took a chance and started drilling out the center eye.

20210213_180005.jpg20210215_090151.jpg
20210215_112627.jpg


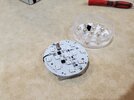
I picked up $5-$10 led puck lights. I figured I could just take the wafer thin boards and get it inside this newly, messily, hogged out hole.

20210213_171821.jpg
20210213_172237.jpg
 
Back to Back they were a bit thick. Plus this sword has a tang running down the center of it, and I did not cut through that so I had to remove the battery compartment completely off of the circuit board and I quickly tested a way to wire them with a series of batteries aligned in a vertical configuration so I could slip the batteries down the hollow metal handle of the sword.

20210215_142640.jpg


I can't believe that actually worked.... as ghetto as it looks...

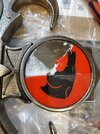
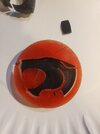
I 3d printed out some thundercats logos with my 3d printer using transparent red resin. They came out really nice. I picked a file where the actual cat on the logo was recessed, so all I had to do was slap some black paint inside. No masking required.

20210129_152931.jpg
20210130_202447.jpg


I test fit the electronics, added a diffuser that I cut out of a old diffuser from a basement fluorescent light.

20210215_191431.jpg


Here's the first test of what the eye of Thundera looked like with a light shining through!
20210215_114137.jpg
20210215_114716.jpg
 
These darn things were so cheap - I actually bought 2 - Here you can see the differences of one that wasn't altered, and the state of mine now.

I did also add more "teeth" details in the guard, as most replicas out there completely miss this detail even though it is present in all the cartoons.
I just used some styrene strips.

20210220_194340.jpg
 
Finally, I needed a wall hanger/stand to display one of the few props that I've ever altered myself...
So I had my kids help me cut out a template, and we sat there trying to figure out how to wire some LED strip lights.

20210228_113830.jpg


I made a makeshift sword holder out of random parts I had in my basement, metal bars, metal coat hangers... and like an erector set, put it all together.

20210228_113852.jpg


I picked up this AMAZING Thundercats logo someone on etsy was selling. It is made of wood, but the cat itself is filled with a black, marbled resin.
20210301_193235.jpg
 
The kids couldn't be happier.

20210301_195230.jpg


The cord running down the back is the cord for the LED lights of the emblem. The LED lights inside behind the wall plaque, and the LEDs inside the sword are both remote controlled, so you can do all sorts of lighting effects with them...

The kids found it especially fun blinding each other with the sword and making the emblem flash rapidly as if they were shooting out a laser... sigh...
 
20210302_200814.jpg


Thanks for reading all of the above - Figured I'd help out any Thundercats fans that maybe wanted a replica that would ultimately cost them less than $100...not including the wall plaque. It certainly looks the part, and I think that with a few minor upgrades, you could really make a really good display worthy replica.
 
This is great work! I've been planning to try something similar myself, thanks for tackling it first and sharing your results! It takes some of the fear out of cutting into my sword knowing what I'll find in there!

I have a couple of questions though :) How do you change the battery? Do you have to remove the eye? If so how have you attached the resin part to the hilt? Also where did you get the glove?! I've been looking all over for one to go with my sword!
 
WOW!


Big FAN of what you did here! So cool!

I just got my ThunderCat's Sword Of Omens from Factory Entertainment and couldn't be more pleased with mine! I hear they're about to sell out, so I'm happy I ordered when I did. It's officially licensed and has a nice deal of heft to it, plus it's based on the animated sword from the cartoon and I LOVE the attention to detail and accuracy. Not a fan of bootlegs from eBay myself, but to each their own. Not looking to customize mine, but like your work!
 
This is great work! I've been planning to try something similar myself, thanks for tackling it first and sharing your results! It takes some of the fear out of cutting into my sword knowing what I'll find in there!

I have a couple of questions though :) How do you change the battery? Do you have to remove the eye? If so how have you attached the resin part to the hilt? Also where did you get the glove?! I've been looking all over for one to go with my sword!

To take out the battery, in my design, you have to remove the resin emblem and pull the wafer led circuit board out, and then pull the batteries out of the handle. This thing wasn't built to hold electronics, so it's not the most friendly way to change batteries, but, I don't have this thing on all the time so I don't mind taking a bit of time changing out the batteries.

Keep in mind, I had to find AAAA batteries, (that's quadruple A batteries) because those are the only ones that fit inside the hilt. Remember there is a rod in there that is supposed to be the tang of the sword"

The 3d printed eye of Thundera was printed a few times to get it "just right." so it fit snugly into the hole. If you look at the pictures closely there is a very small lip that can actually hold the emblem just by pressure fitting it. I put a very small piece of tape on the edge of the eye to give me something to hold onto to pull it out. A small suction cup could also be used to remove the eye, but the fit is so exact that my kids swing the sword around and the emblem doesn't fall out.

Someone far better than me could probably cut a section out of the handle and add threads to provide easy access to change batteries. However, with the lack of tools I had on hand, this was beyond me.

the glove was just a miracle find on EBay. I have no idea who made it, and I unfortunately haven't seen another one. It is big, perhaps a little too big, but I think it is almost in scale with the sword (which is also big).
 
WOW!


Big FAN of what you did here! So cool!

I just got my ThunderCat's Sword Of Omens from Factory Entertainment and couldn't be more pleased with mine! I hear they're about to sell out, so I'm happy I ordered when I did. It's officially licensed and has a nice deal of heft to it, plus it's based on the animated sword from the cartoon and I LOVE the attention to detail and accuracy. Not a fan of bootlegs from eBay myself, but to each their own. Not looking to customize mine, but like your work!

Thanks - welcome to the RPF - You should post in the new members thread and introduce yourself. Always great to have new members who can contribute to the community and show off their collections and skills. Don't be afraid to customize your stuff, but so long as you're happy with what you have that's all that matters. I still think like an "old school" RPFer and I just want the most accurate representation of a prop that I can get. People on this forum have had great success modifying licensed or unlicensed props to be more accurate just for their own personal gratification.

looks awesome, thought of putting a defuser in front of the lights so it looks like one big light?
Yes, I tried a few methods. In my design the lights are almost right up against the emblem so it's hard to diffuse at that point, but I have tried frosted paper, and I did use a diffuser from a fluorescent light that I cut into a circle. I'm sure someone can find a better way to diffuse the lights so it looks more even. I just used what I had in my basement. That being said, if I were to do it over again, I would try and find a LED light that maybe only had 1 big LED light in the middle as opposed to a few small lights scattered all over the board. The light in the middle would end up being behind the black cat head, and would automatically diffuse outward. it would have looked much better if I had found something like that.
 
To take out the battery, in my design, you have to remove the resin emblem and pull the wafer led circuit board out, and then pull the batteries out of the handle. This thing wasn't built to hold electronics, so it's not the most friendly way to change batteries, but, I don't have this thing on all the time so I don't mind taking a bit of time changing out the batteries.

Keep in mind, I had to find AAAA batteries, (that's quadruple A batteries) because those are the only ones that fit inside the hilt. Remember there is a rod in there that is supposed to be the tang of the sword"

The 3d printed eye of Thundera was printed a few times to get it "just right." so it fit snugly into the hole. If you look at the pictures closely there is a very small lip that can actually hold the emblem just by pressure fitting it. I put a very small piece of tape on the edge of the eye to give me something to hold onto to pull it out. A small suction cup could also be used to remove the eye, but the fit is so exact that my kids swing the sword around and the emblem doesn't fall out.

Someone far better than me could probably cut a section out of the handle and add threads to provide easy access to change batteries. However, with the lack of tools I had on hand, this was beyond me.

the glove was just a miracle find on EBay. I have no idea who made it, and I unfortunately haven't seen another one. It is big, perhaps a little too big, but I think it is almost in scale with the sword (which is also big).
Ah I see, so it's a friction fit basically. The idea I had in mind was to use magnets to hold the eye halves onto the sword, and for lighting I've found some LED boards that run on watch batteries which should save some space! I need to test them once I have the eye printed to see if they give off enough light though
IMG_1295.jpg

WOW!


Big FAN of what you did here! So cool!

I just got my ThunderCat's Sword Of Omens from Factory Entertainment and couldn't be more pleased with mine! I hear they're about to sell out, so I'm happy I ordered when I did. It's officially licensed and has a nice deal of heft to it, plus it's based on the animated sword from the cartoon and I LOVE the attention to detail and accuracy. Not a fan of bootlegs from eBay myself, but to each their own. Not looking to customize mine, but like your work!
I looked at this and thought it was less accurate than the cheaper one which almost never happens in this hobby!
 
I'm not only a prop but also a sword guy, 15 years HEMA, and there is something important I have to tell you. As visible in one of your pictures that sword has what is known as a rattail tang and the picture shows that it hasn't been welded on that good. That is the point your sword will break. And that isn't a if it will break but a when it breaks. Please be carefull and don't make any swinging motions near your kids, I've seen it gone wrong a few times and it isn't pretty.

If you have the ability to weld the "rattail" to the sword better it will be a lot saver.


And yes, that sword is in my props wishlist.

RvA
 

Your message may be considered spam for the following reasons:

If you wish to reply despite these issues, check the box below before replying.
Be aware that malicious compliance may result in more severe penalties.
Back
Top