Thundercats Sword of Omens - Full size replica - My build/upgrades step by step

Where are you putting that long battery pack? Is the handle section hollow?
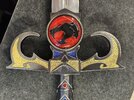
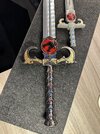
I'm putting my quadruple A (AAAA) batteries inside the handle. The handle is sort of hollow and those were the only batteries that I found that were thin enough to fit. The handle has a really thing rod that is serving as a tang to the sword. It connects all the way from the pommel to the sword. So anything that goes into the handle has to fit around that thin rod in side the handle.

Others here have used rope lights which would free up the space behind the eye of thundera - I assume it would be possible to just put batteries there
 
Did you darken the metal any?
Also I’m surprised you didn’t try to make the “arrow” part that’s missing on the blade,
You never see that part on any of them
IMG_6638.jpeg
 
ReelClones can you tell me what kind or rope light you used, and controller? how did you get it all to fit inside the hilt? Your eye of thundera looks so much better than mine. Mine still has hot spots from the LED board I put behind it.
I'm using a 12v DC system as the battery is much smaller and it allows the use of the 12v auto radio board to power on and off (I got both these parts from China via ebay). I'm having issues with the board though as it powers down after a short delay and needs to be reset, which isn't ideal once buried in the sword! I've removed a fair bit of metal from the hilt in order to make room for my light strip in a circle around the perimeter, one complete circle on each side.

I'm working on a 3d printed insert to hold the led strip and wiring/battery which should help to reflect and diffuse the light and avoid shadows of internal parts showing through the eye. it will also need hold the eyes themselves in place on the sword, and allow quick release for battery change- so a bit of a tall order!

I'm still prototyping this at the moment and will probably have to swap out to an alternative control board/switch. Pretty pleased with the light effect myself, the still 10 year old inner me is very excited about how it looks! The first time I held the sword reassembled with it's new paint finish and upgraded eye was an emotional moment for me, so I have to say thanks to you for starting the ball rolling with your build!
 
Okay, my 3D printed eyes arrived from Womp, and they're perfect! They already look so good, and are the perfect size (66mm). I just need to paint the logo now, I'm hoping to use a pearlescent black paint.

I also need some advice from you fine (and much more experienced) people.....

As I mentioned before, I don't have enough confidence to install LEDs, at this point, so I will just be removing the existing sticker, and attaching the Eye(s) to the bare metal. As it's translucent, and will show any inconsistencies underneath, I want to use a glue that will hold well but, more importantly that will dry evenly, not go opaque, and not eventually dry out and crack. Can anyone recommend the best glue to use?

Many thanks in advance.
Ooohh Shiny! Those eyes look great! I would avoid glue altogether as it will be very hard to do it so you don’t see a complete mess through the eye. My suggestion would be wide double sided tape, or a spray glue of some kind. I’ll have to use a similar method when I do final assembly on mine.
 
So.... I think I'm done. I didn't need to use glue in the end as, when I heated the original sticker that was there, it came off clean but left behind the tacky white pad it was on, so the eye just popped straight onto there. I did debate stripping it all down to bare metal, and still gluing, but I took it as a sign, and I think having the white behind it would help the red pop.

I also heavily debated addind the blue 'eyes' on the hilt. I tried to match the blue of the rhinestones, and it came out okay, but I'm not sure I like how 'unreal' it looks, so I may change this at a later date, but for now it achieves what I set out to do, which was to replicate my old toy.

In the future I may copy what ReelClones did with dulling down the hilt and blade, and adding some dark wash, but for now, I think the more shiny version matches the gold and new aesthetic?

Anyway, here it is:
 

Attachments

  • IMG_6776.jpg
    IMG_6776.jpg
    2.7 MB · Views: 16
  • IMG_6779.jpg
    IMG_6779.jpg
    2.2 MB · Views: 15
  • IMG_6782.jpg
    IMG_6782.jpg
    2.7 MB · Views: 15
So.... I think I'm done. I didn't need to use glue in the end as, when I heated the original sticker that was there, it came off clean but left behind the tacky white pad it was on, so the eye just popped straight onto there. I did debate stripping it all down to bare metal, and still gluing, but I took it as a sign, and I think having the white behind it would help the red pop.

I also heavily debated addind the blue 'eyes' on the hilt. I tried to match the blue of the rhinestones, and it came out okay, but I'm not sure I like how 'unreal' it looks, so I may change this at a later date, but for now it achieves what I set out to do, which was to replicate my old toy.

In the future I may copy what ReelClones did with dulling down the hilt and blade, and adding some dark wash, but for now, I think the more shiny version matches the gold and new aesthetic?

Anyway, here it is:
I like the white behind the eye! I can see a shadow from it, it really gives it this other-worldly mystical feel. Great job!
 
Did you darken the metal any?
Also I’m surprised you didn’t try to make the “arrow” part that’s missing on the blade,
You never see that part on any of them
View attachment 1929537
I did not darken the metal on mine at all - the hilt already came darker than the blade as seen in my pics .
You're right - I'll go back and revisit this at some point and see if I can use a piece of sheet metal or something to fashion an arrow. maybe I can just slip it in between the blade and the habaki, the sword collar.
 
I'm using a 12v DC system as the battery is much smaller and it allows the use of the 12v auto radio board to power on and off (I got both these parts from China via ebay). I'm having issues with the board though as it powers down after a short delay and needs to be reset, which isn't ideal once buried in the sword! I've removed a fair bit of metal from the hilt in order to make room for my light strip in a circle around the perimeter, one complete circle on each side.

I'm working on a 3d printed insert to hold the led strip and wiring/battery which should help to reflect and diffuse the light and avoid shadows of internal parts showing through the eye. it will also need hold the eyes themselves in place on the sword, and allow quick release for battery change- so a bit of a tall order!

I'm still prototyping this at the moment and will probably have to swap out to an alternative control board/switch. Pretty pleased with the light effect myself, the still 10 year old inner me is very excited about how it looks! The first time I held the sword reassembled with it's new paint finish and upgraded eye was an emotional moment for me, so I have to say thanks to you for starting the ball rolling with your build!
Thanks for the reply! Please keep us updated. I'd love to see what you come up with. I wouldn't mind updating mine as well sometime down the road. At least with better lights. My remote is IR and it's just through a stroke of luck that my puck lights can see the signal through the eye. But I am limited to line of sight.

But yes, removing the metal from the hilt is a bit difficult. I didn't have any industrial special tools. I had to do it all by hand with a dremel. My wrists did not enjoy that weekend.
I'll come back and update you when I get a chance to do more. It'll be a while though cause I'm selling my house at the moment so my workshop is packed away now :(

I know what you mean about machining out the hilt! I don't have any special machining equipment either! I 3d printed a circular template to get even starter holes with the drill, then drilled out larger, then followed with the dremel using grinding and sanding bits! Took a while!
 
Back
Top