Thundercats Sword of Omens build (6/10 - first pull - w. images pg.9)

Re: Thundercats Sword of Omens build (2-3 update w. images pg.8)

Hi guys! Tis been a long time coming, but I didn't want to keep posting "I'm working on it" til I had some real progress to show.

But yep, I finally have something to show :D

lots of primer and sanding, then the hooks were attached. I decided on using black gloss spraypaint for the final coat.
final-spray.jpg


Final sanding was done, and used tech wax for the final finish. I chipped out the paint from the sandpapered areas. I hadn't masked them off when initially painting.
ready-for--mold-1.jpg


ready-for--mold-2.jpg


next up, molding~
 

Attachments

  • final-spray.jpg
    final-spray.jpg
    335.5 KB · Views: 186
Re: Thundercats Sword of Omens build (5-28 update w. images pg.9)

By Jaga that is beautiful. I can not wait to see this piece finished.
 
Re: Thundercats Sword of Omens build (5-28 update w. images pg.9)

I've been following this thread since 2010. Updates are like crack to me. Beautiful work, Fev. Can't wait to see the final product. I soo want one.
 
Re: Thundercats Sword of Omens build (5-28 update w. images pg.9)

Today I'm claying up the sword for moldiing. Decided to try using insuation foam and hardboard to build up sides a bit to save time :) I'm using plastic sculpting tools to do the edging to avoid scratching the original piece.

omens-clay.jpg

omens-clay.jpg
 

Attachments

  • ready-for--mold-2.jpg
    ready-for--mold-2.jpg
    248.7 KB · Views: 188
Re: Thundercats Sword of Omens build (6-1 update w. images pg.9)

The thread lives!!!
 
Re: Thundercats Sword of Omens build (6-1 update w. images pg.9)

I love your work! It's been my life long dream (I'm 31) that someone would take the time to make this sword and make it the right way and you're doing it! Are you going to make a site in which to sell your molds? PLEASE say yes! I'll sell my cat which I have properly named Lion-O for one haha.
 
Re: Thundercats Sword of Omens build (6-1 update w. images pg.9)

For those who have been asking, There WILL be a run once i get some test castings done and working smoothly :)

Thanks everyone for their insane level of patience with this project!

Time to Mold!

In order to save myself from having to clay up the whole thing, I cut a hole into some hardboard, and raised it up with insulation foam. When claying, I also included a ton of keys and a thin channel that will make sure the edges remain aligned.
sword-of-omens_blog_29.jpg


Print coat! (Smooth-on rebound 25). The excess was poured into clay scraps to make nubs
sword-of-omens_blog_30.jpg


a few coats of rebound later, and added the nubs to help lock it into the mother mold (this should help prevent potential "sagging" while casting). I had some sonite wax laying around, so i coated the hardboard with it, to hel[p make it easier to remove when casting the second half.
sword-of-omens_blog_31.jpg


Plastipaste! looks delicious! (I like to measure my stuff by weight because I personally find it faster, and get to use my shriveling math muscle a little at least!)
sword-of-omens_blog_32.jpg


After smearing on the plastipaste, I added tissue to the surface and pat it smooth. Plasti-paste tends to leave tons of sharp mean edges. Less sanding to do, and its easier on the hands, especially with the weight of this thing.
sword-of-omens_blog_33.jpg


When the plasti-paste set, I flipped it over and began demolding that side.
sword-of-omens_blog_35.jpg


the wax worked great, and the harboard just popped right off with no trouble!

After coating the silicone and plastipaste with more sonite, the same was done for the second half. after the thin print coat, I built up the sides (where the keys are) quickly using thivex silicone thickener.. a coulpe more regular coats of silicone were added to the rest of the sword, then topped off with thicker silicone to get the pesky raised areas taken care of.

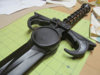
Here's the first half of the mold, ready for the second half of the mold :)
sword-of-omens_blog_36.jpg


Plastipaste again, and once that set enough, I sanded the edges. Its sitting in the middle of the living room waiting to get demolded.
sword-of-omens_blog_37.jpg


Time to do finger crossing!!
 
Last edited:
Re: Thundercats Sword of Omens build (6/7 big update w. images pg.9)

Using tissue over the Plasti-Paste is a great idea! I usually wait until it's no longer sticky and smooth it out by hand. But if you miss that window, you're in for a world of pain.

The sword is looking great! I can't wait to see the first pulls!
 
Re: Thundercats Sword of Omens build (6/7 big update w. images pg.9)

Look great! This is one of my favorite sword designs and you've done an amazing job on it! I think I need one hanging in my office :D
 
Back
Top