You are using an out of date browser. It may not display this or other websites correctly.
You should upgrade or use an alternative browser.
You should upgrade or use an alternative browser.
Thorssoli's Sith Stalker Project
- Thread starter thorssoli
- Start date
The Death Angel
Active Member
Thorssoli, i haven't comments, the only word i can say is "AWESOME"!
Nessy
Active Member
It was fun following along the republic commando builds so I am glad to see another Star Wars build from you. Are you planning to create a separate thread for each costume or put everything here? Just wondering if I should keep a closer eye on the Star Wars section of the forums.
Keep up the great work!
Keep up the great work!
Drac
Sr Member
Excellent I'll try and find them see if I can't give it a go ") any noticeable issues with the files at all? Excellent work your doing on this btw but looking at the other projects you have there it seems you have been doing this for some time lol I look forward to more updates :thumbsup
any noticeable issues with the files at all? Excellent work your doing on this btw but looking at the other projects you have there it seems you have been doing this for some time lol I look forward to more updates :thumbsup
any noticeable issues with the files at all? Excellent work your doing on this btw but looking at the other projects you have there it seems you have been doing this for some time lol I look forward to more updates :thumbsupThe files I used were from Darkside_501st.
Sorry for the lack of updates. I've been all over the place for the holidays, but I'll be back in the workshop tomorrow.
No problems with the files. But it's been a few months since I did the pep work and those kinds of memories seem to have a half-life of about three drinks.
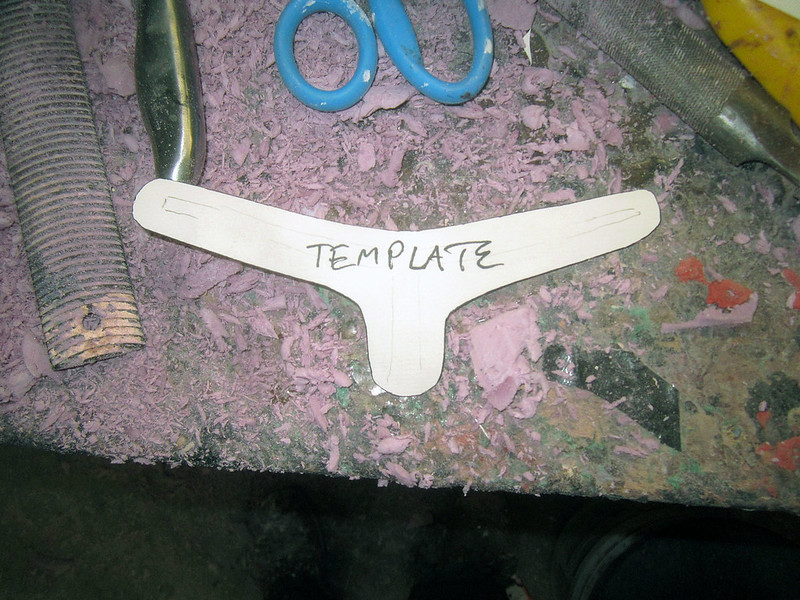
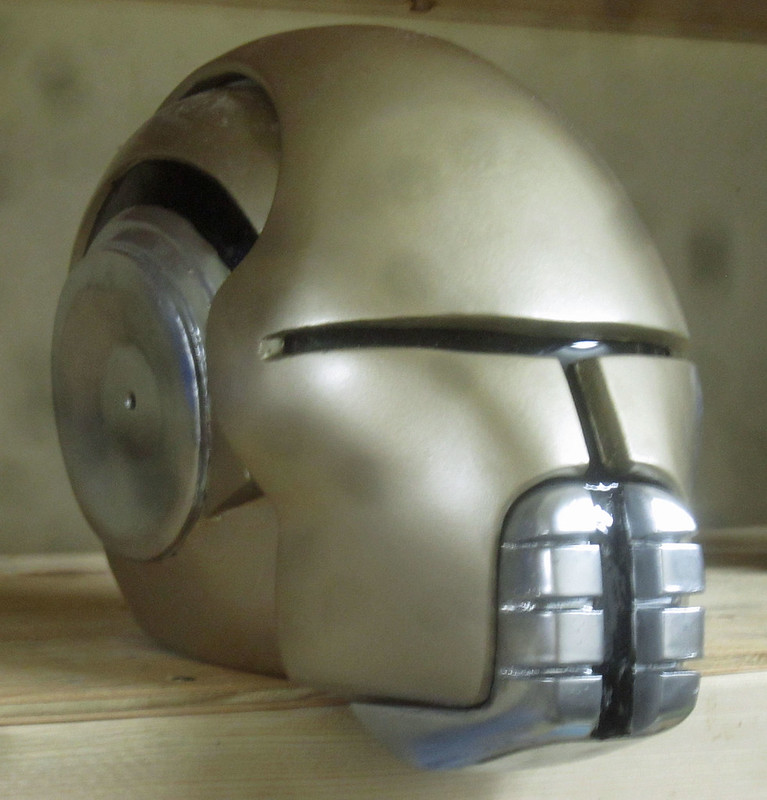
Today I finally got a few more minutes to spend on the helmet. I started by making a paper template for the visor. This is what the template looked like:
I used it to trace onto a piece of acrylic and cut out a couple of copies with the scroll saw:

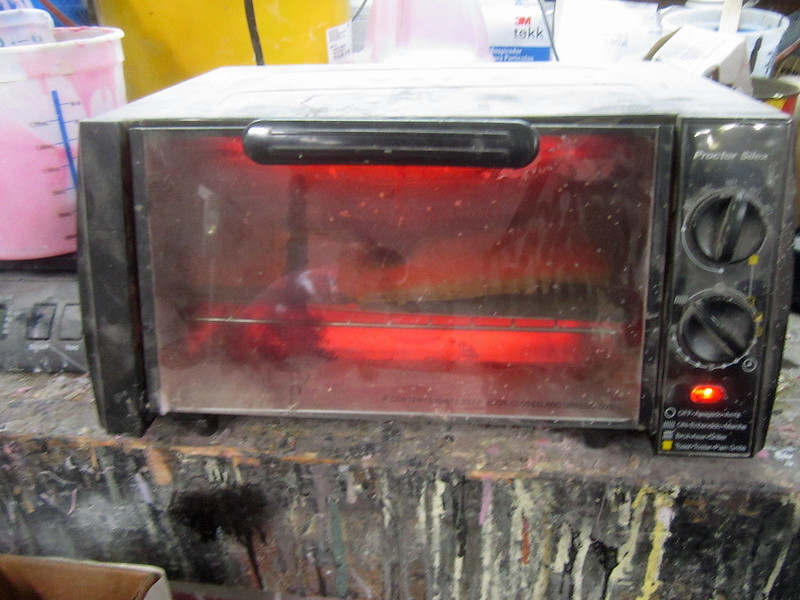
Then I peeled the backing paper off of one of them and cooked it in the workshop toaster oven until it was soft and flexible:
NOTE: Acrylic has tiny pores on the surface and at normal temperature and humidity levels, these pores will have tiny bits of water vapor in them. If you heat the acrylic too fast, the water vapor will boil and expand and cause bubbling in the acrylic sheet. You can mitigate this by pre-baking the acrylic at about 120 degrees for a while. If, like me, you're too impatient for that kind of noise, you can get away with skipping that step. You just have to watch carefully and remove the acrylic piece from the oven after it's flexible and before it starts to bubble.
MORE IMPORTANT NOTE: Cooking acrylic like this releases all manner of nastyness. So if you try this at home, don't huff the fumes or you'll probably get nostril cancer or something.
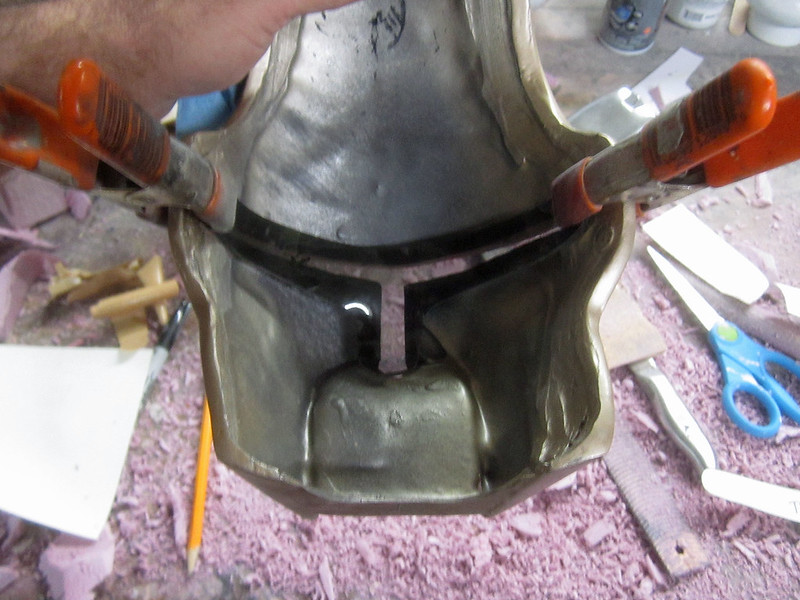
Once the acrylic cutout was nice and flexible, I pulled it out of the oven and put it in place inside the helmet. Once I was happy with the positioning, I clamped the ends in place:
Then I used a paper towel to push the nose part into place without burning my delicate fingertips:

The trick here is to avoid marking up the area I'll have to see through later:
With that done, I used some cyanoacrylate adhesive (like Krazy Glue) to hold it in place:

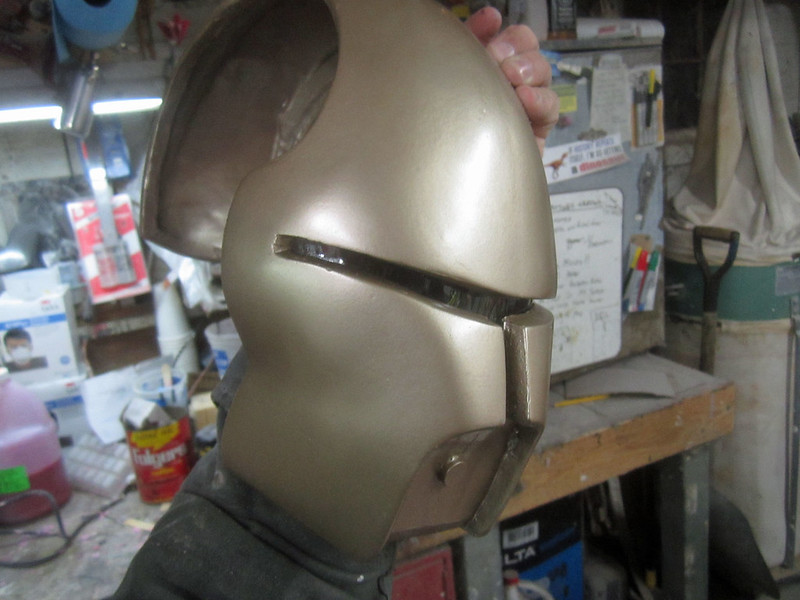
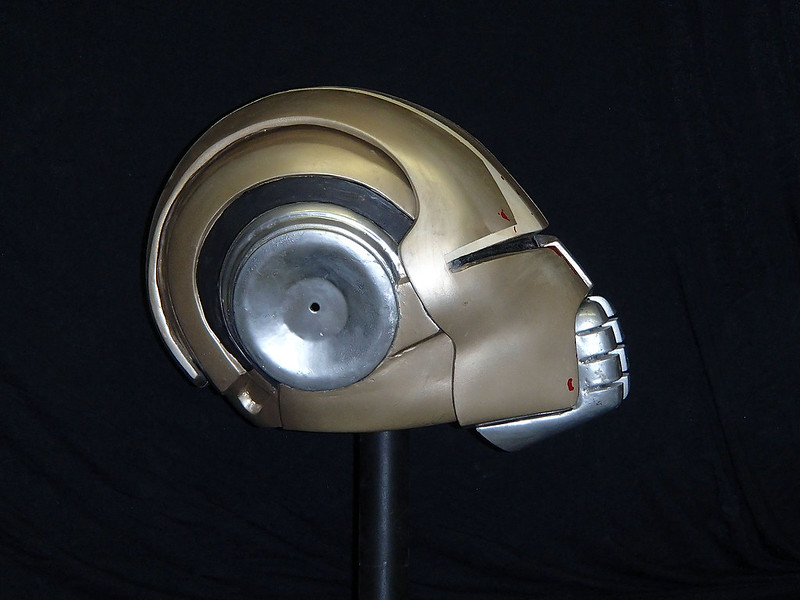
Here's how it looks from the outside:
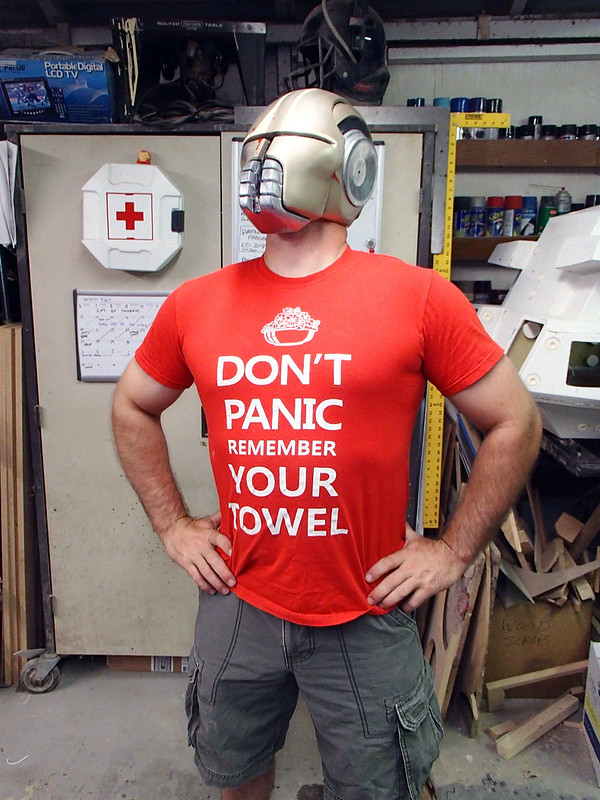
And a quick sith selfie:
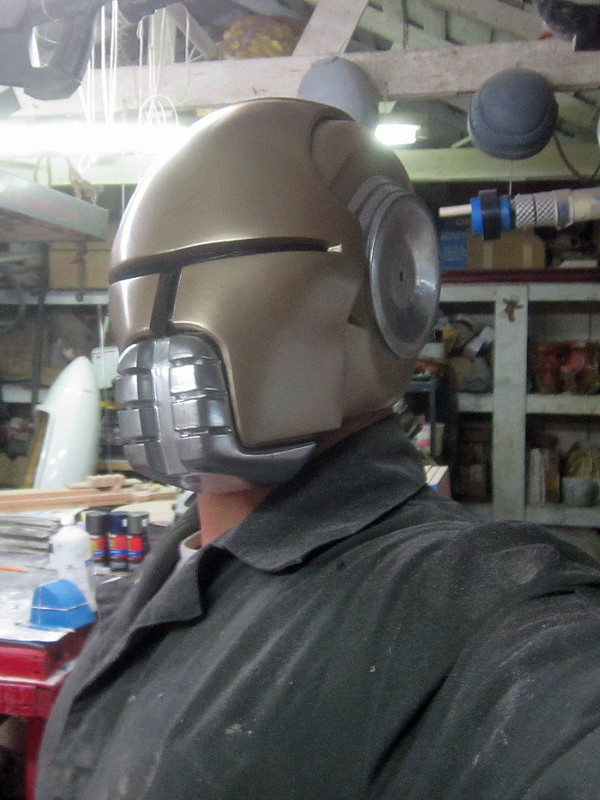
Not bad:

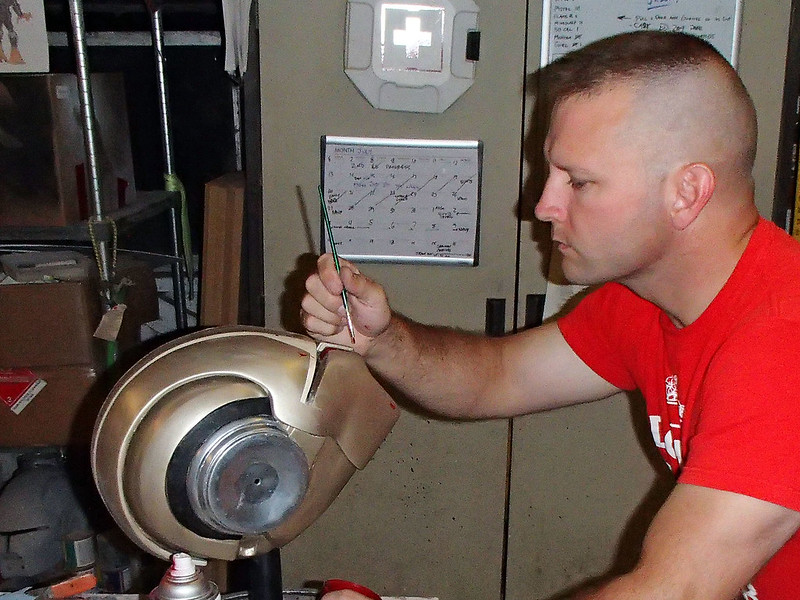
I've still got some paint work to do. For now it sits on the shelf while I get working on the rest of the parts:
Stay tuned...
Today I finally got a few more minutes to spend on the helmet. I started by making a paper template for the visor. This is what the template looked like:
I used it to trace onto a piece of acrylic and cut out a couple of copies with the scroll saw:
Then I peeled the backing paper off of one of them and cooked it in the workshop toaster oven until it was soft and flexible:
NOTE: Acrylic has tiny pores on the surface and at normal temperature and humidity levels, these pores will have tiny bits of water vapor in them. If you heat the acrylic too fast, the water vapor will boil and expand and cause bubbling in the acrylic sheet. You can mitigate this by pre-baking the acrylic at about 120 degrees for a while. If, like me, you're too impatient for that kind of noise, you can get away with skipping that step. You just have to watch carefully and remove the acrylic piece from the oven after it's flexible and before it starts to bubble.
MORE IMPORTANT NOTE: Cooking acrylic like this releases all manner of nastyness. So if you try this at home, don't huff the fumes or you'll probably get nostril cancer or something.
Once the acrylic cutout was nice and flexible, I pulled it out of the oven and put it in place inside the helmet. Once I was happy with the positioning, I clamped the ends in place:
Then I used a paper towel to push the nose part into place without burning my delicate fingertips:
The trick here is to avoid marking up the area I'll have to see through later:
With that done, I used some cyanoacrylate adhesive (like Krazy Glue) to hold it in place:
Here's how it looks from the outside:
And a quick sith selfie:
Not bad:
I've still got some paint work to do. For now it sits on the shelf while I get working on the rest of the parts:
Stay tuned...

The Schlitzie
Sr Member
Awesome. On the one I made I ended up using a straight across visor and putting in mesh in the section were your nose ends up because mine fogged up pretty easily.
On a side note, I want that medkit! lol
I'm surprised yours isn't "weathered" more with scraped knuckles and such going on in a workshop.
On a side note, I want that medkit! lol
I'm surprised yours isn't "weathered" more with scraped knuckles and such going on in a workshop.
The mask came out great, what is the plan for the other 7 characters?
The girlfriend is going to be flying in pretty late at night on the first day of the convention, so I'll be going it alone that day. I'm contemplating an Admiral Ackbar build for that day. I may also just get in on my friend Matt's Death Watch group. So far he's got a helmet that's about ready to mold and since he's using my shop and my materials, I'll get to keep the molds when he's done. He's got a build thread going at the Dented Helmet. The other option is to get insanely ambitious and add an Ithorian to my to-do list. You hardly ever see anyone dress as one of those guys.
The next day she'll be jet-lagged and tired, so I'll be dressing her as the Imperial version of Juno Eclipse (she actually looks the part quite well) and I'm going as the Sith Stalker.
Then she'll be wearing the Shae Vizla armor I'm building in collaboration with DW Design Studios and I'll be wearing some other Old Republic character to be determined.
For the last day, she'll be Darth Talon (I've got pics of that costume coming together on Flickr LINK) and I'll probably be a Sith Inquisitor customized to some extent. Not that it matters what I'm wearing that day. Nobody's going to notice the guy standing next to the hot girl wearing almost nothing but red paint and lekku.
I'm also helping a friend put together what he calls a mashup between a Spartan from 300 and a Mandalorian, but that'll be a one-off. I got a set of clonetrooper armor from DW Design Studios that I'll probably use to dress a friend up as a Clone Wars version of Obi Wan Kenobi. Then there's the chance I'll end up helping a couple or three more friends dress as Twi'leks once I finish sculpting out the lekku for my girlfriend.
Add to this a handful of fascinating new commission projects that have come up and there's quite a lot to do.
Time to dust this project off and make a bit more progress again.
If you were following along, you may have guessed that I didn't get it done in time for the convention. Instead, I ended up getting roped into a massive Death Watch/Nite Owl Mandalorian build. How massive? We ended up making nineteen sets of armor complete with jumpsuits, jetpacks, and pistols. You can see some of them here:

Of course, with a group that size, getting photos is a lot like herding cats. The most we ever managed to get together in one pic was fourteen:

It was a big project and sadly, the Sith Stalker build fell by the wayside. Then the other day I was finally spurred into pulling the armor pieces off of the backburner and prepping them for molding:

After wet-sanding and polishing, it was time to mount the parts to some cardboard:


Then I built up some clay parting walls and applied mold release over everything:


Once that dried, it was time to apply some tooling gelcoat over everything:

Then lay up the fiberglass:


So the molds will be done soon and I should have the first set of parts pulled in a couple of days. I've got a big bag of leather odd bits and off cuts from the local tannery that will become the vest and skirt parts. I've also been collecting lightsaber hilts to hang off the belts. So the next challenge will be the prosthetic bits for the damaged right arm.
More to come...
If you were following along, you may have guessed that I didn't get it done in time for the convention. Instead, I ended up getting roped into a massive Death Watch/Nite Owl Mandalorian build. How massive? We ended up making nineteen sets of armor complete with jumpsuits, jetpacks, and pistols. You can see some of them here:
Of course, with a group that size, getting photos is a lot like herding cats. The most we ever managed to get together in one pic was fourteen:
It was a big project and sadly, the Sith Stalker build fell by the wayside. Then the other day I was finally spurred into pulling the armor pieces off of the backburner and prepping them for molding:
After wet-sanding and polishing, it was time to mount the parts to some cardboard:
Then I built up some clay parting walls and applied mold release over everything:
Once that dried, it was time to apply some tooling gelcoat over everything:
Then lay up the fiberglass:
So the molds will be done soon and I should have the first set of parts pulled in a couple of days. I've got a big bag of leather odd bits and off cuts from the local tannery that will become the vest and skirt parts. I've also been collecting lightsaber hilts to hang off the belts. So the next challenge will be the prosthetic bits for the damaged right arm.
More to come...
I keep forgetting to update this thread. I suppose that's okay though, since nobody seems interested anyway.
Regardless, after laying up the rest of the molds, they parted cleanly off of the prototypes. Once the molds were cleaned and polished, they were coated with release agent and I pulled a complete set of parts:

They still need the edges trimmed and sanded, but it looks like they'll be a good enough fit:

Next I get to start patterning the soft parts...
Regardless, after laying up the rest of the molds, they parted cleanly off of the prototypes. Once the molds were cleaned and polished, they were coated with release agent and I pulled a complete set of parts:
They still need the edges trimmed and sanded, but it looks like they'll be a good enough fit:
Next I get to start patterning the soft parts...
We're ALWAYS interested!
Similar threads
- Replies
- 7
- Views
- 385
- Replies
- 3
- Views
- 279
- Replies
- 10
- Views
- 1,001
- Replies
- 18
- Views
- 1,167