Thorssoli's Ironman MkIII Build - Finished Suit Pics Page 26!!

Re: Just What This Forum Needs: Another Ironman Build

Subscribed some time ago, but this is getting more and more awesome with every update!!!
 
Re: Just What This Forum Needs: Another Ironman Build

Yesterday saw a lot of progress, but not as much as I'd like.

First, I started by smoothing out the thighs a bit:


Then I primed them:


When the primer had dried, I started adding spot putty to all of the trouble spots:


I decided there were a lot of trouble spots:


When I'd thought they were finally perfect, I made them shiny:


As is often the case, the shiny coat made it clear that there are still flaws that need attention.

Still, while I was waiting for the paint to dry, I got a chance to rough-trim the fiberglass parts:


Which left me with this pile at the end of the day:


I really can't wait to start shooting paint on some of these things...
 
Re: Just What This Forum Needs: Another Ironman Build

you ever try a metal cut off disc..its like a mini table saw blade. It works great..Micromark (Miniature Saw Blade (1-1/2 Inch Dia. x 100 Teeth)) sales them. I have had one for 10yrs now. I used it the other weekend to finish trimming you kit helmet. need to get some pics for you. a little fan also helps blow away the dust and smoke if you dont have a hood or vac system to catch the stuff. A mask and safety glass are a must as you know. oh and leather gloves never hurt ..resin and glass can be nasty sharp
Great work mate
 
Re: Just What This Forum Needs: Another Ironman Build

bump cause of double post machine
 
Re: Just What This Forum Needs: Another Ironman Build

Whats up Shawn!? I am so awed to see your thread here! I met you and talked at the Maker Fair about creating a semi functional MK 42. Then, I also met the directors at Make Magazine the other day and they told me about you up in Ptown. Thats actually where I grew up and I'm currently in Novato. Could I take a look at what your progress looks like? I also have a blog on my current started build for the boot: Project Mark 42 Prototype

Talk to you soon man!

James
 
Re: Just What This Forum Needs: Another Ironman Build

Hi James! If you go back through the last couple of pages, you'll see all sorts of pictures of my work in progress so far. I've been doing a pretty good job of documenting this build so far. Your Mk42 looks great so far. Do you plan to smooth out the parts and mold them, or are you just planning on wearing the printed parts?

Today's update: clear cast parts...

Here's the molds for the outer ring of the unibeam and the palm repulsors:


Here's the palm repulsors installed:


I'm hoping to do a paint test today or tomorrow. Stay tuned...
 
Re: Just What This Forum Needs: Another Ironman Build

Yesterday I did a bunch more cleanup on fiberglass parts:

Mostly I just wanted to get the dust and stray glass fibers off of them. There's still quite a bit of work to do. Here's a closeup of the iron jockstrap showing some of the gelcoat surface flaws:

I'm not sure why it didn't come out smooth like the initial urethane resin test cast I did, but fortunately it's just a question of doing more sanding.

I also made some progress on the first pair of gloves:


That's my proprietary, patented individual finger digit inventory system. It's going to be tough to keep track of what goes where pretty soon.

Since it's going to be a while before I've got something else to brag about for this build, I decided to dust off and finish a tiny project from a few years back:


That's a casting I picked up from Jarvis B quite some time ago. It's only in the past week that I've finally taken the time to clean it up and paint it. More of the parts are coming in the mail too. So once I add straps, a hat, and a custom black leather SS uniform I had my tailor in Afghanistan make, I'll be able to check a Kroenen costume off of my to-do list.

Meanwhile, I'm grinding out more Ironman parts and working on my dust mask tanlines:


Stay tuned...
 
Re: Just What This Forum Needs: Another Ironman Build

Wow, a whole week and I am the first reply. Shocking when you consider the quality of the build.

I like your system for keeping track of which finger bits go where. They must be a real pain to tell apart.
 
Re: Just What This Forum Needs: Another Ironman Build

Agreed Nessy, if any thread deserves the love its this one! A stunning build and so much shared info.
My eyes are hungry for more though :D
 
Re: Just What This Forum Needs: Another Ironman Build

Thanks for the compliments guys. Sorry for the lack of updates. I'm out of town doing my annual training with the naval reserves and I haven't really had much opportunity to get to a proper internet connection. I also don't have much to post.

What I do have is these two pictures of the new lighting arrangement for the unibeam. Here's a closeup taken with a flash:


And a much wider angle without a flash:


The lighting I used is a 60mm "angel eyes" ring designed to go around automotive headlight bulbs. You can pick them up by the pair by clicking HERE. I'll just have to come up with a decent 12V battery pack that weighs less than the 8 AAA batteries I'm currently contemplating.

I'll be back in the workshop on Saturday. It's been nice to take a break to do Navy stuff for a while, but I'm very much looking forward to getting things knocked out when I get back.

EDIT: Forgot to mention, there will be another smaller LED array installed behind the grill in the center of the Unibeam so I can have an occasional, much brighter, flash when it fires.
 
Re: Just What This Forum Needs: Another Ironman Build

nice work, I just picked up a little paperback; " Getting started with Arduino" hopefully it will begin to rekindle some old High School memories

BTW did you find a stretchier rubber for the neck piece?
 
Re: Just What This Forum Needs: Another Ironman Build

I just picked up a little paperback; " Getting started with Arduino" hopefully it will begin to rekindle some old High School memories

BTW did you find a stretchier rubber for the neck piece?

I've been doing a tiny bit of tinkering with an Arduino. In the end I'll be integrating at least one into this build.

I did find a stretchier rubber. Right now I'm experimenting with Vitaflex 50 from Reynolds Advanced Materials (it's a Smooth-On product, they're my nearest distributor). If it performs as advertised it'll work great. It has a 60-minute pot life, so it's a pain to rotocast. The real problem is that it has a 16-hour cure time, so I won't know if it works until tomorrow. For now it looks promising:


The color is the result of a careful blending of pigment into the rubber. If I got the ratios right, I won't have to paint these pieces.

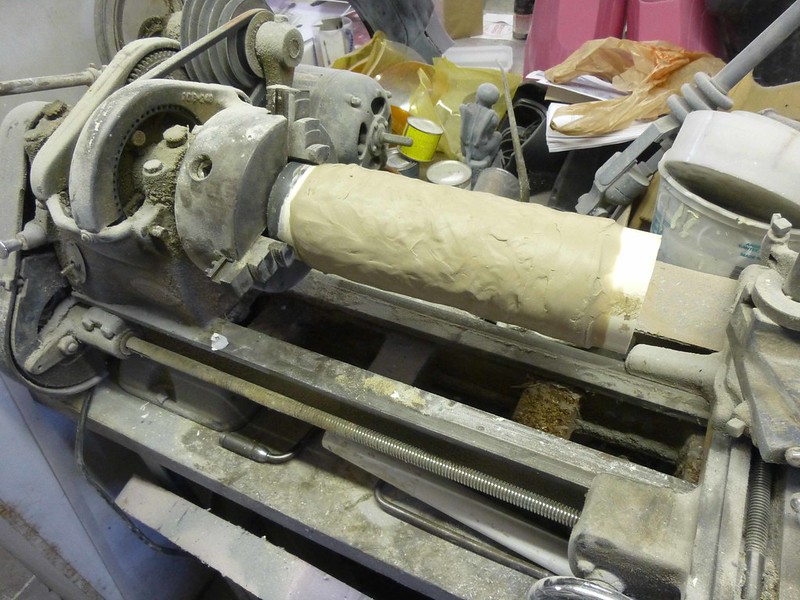
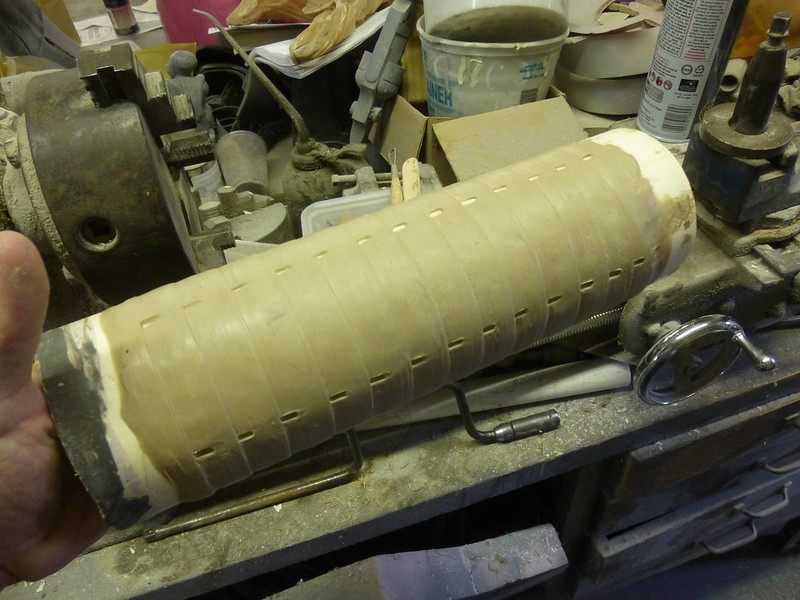
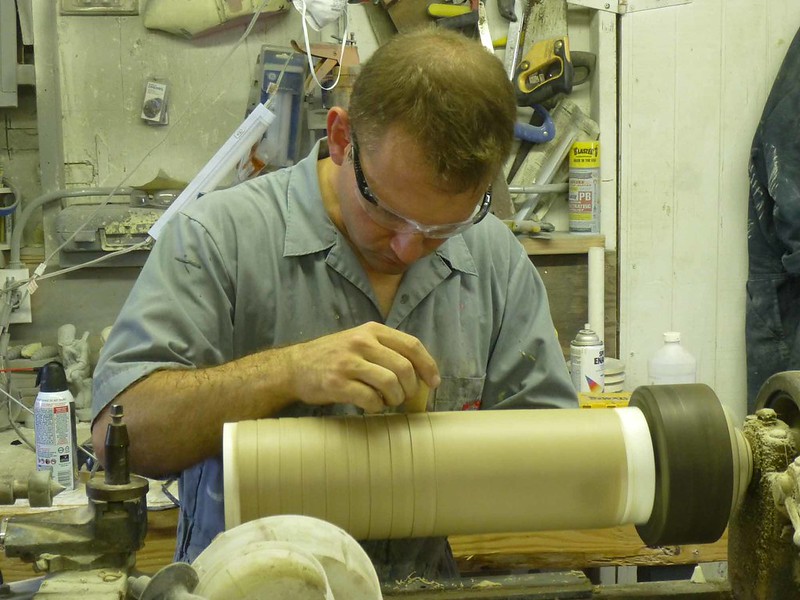
On the subject of rubber parts, I've finished the sculpt for the inner elbow pieces. I started by lumping some clay onto a piece of PVC pipe and chucking the whole thing into the lathe:


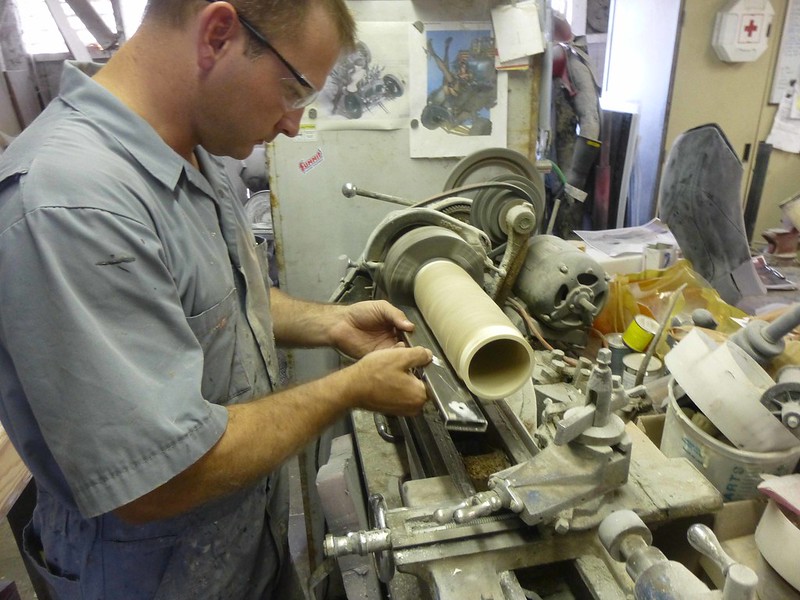
Using the lathe as a sort of horizontal pottery wheel, I smoothed the clay using a variety of tools:


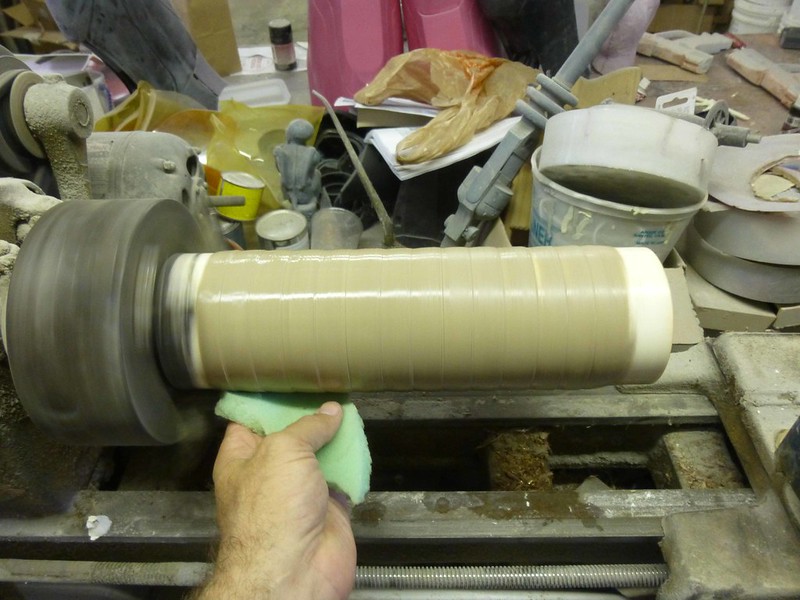
Since I was using oil-based clay, final smoothing was done with a piece of upholstery foam soaked in isopropyl alcohol:


Once everything was appropriately ribbed and smoothed, the last step was to sculpt in a few little notches to either side of the centerline:


The next step will probably be building a stone mold using Ultracal 30 and slipcasting the whole thing in latex just like a Halloween mask. Since the whole sculpt is so long, each pull will actually give me both elbows stuck together end to end. That'll make more sense once I've done it.

I've started on the inner knee sculpt too:


It still needs quite a bit more work, but with the insanely hot weather I've had this week, the clay is a bit too soft:


Once it was too warm to sculpt with the clay I was using, I shifted focus to making the molds for the thighs:


Since I was unhappy with the rotocast versions of the smaller size, I'm setting these molds up so they'll be easier to lay up in fiberglass. This means making them into two-part molds. So I'm starting with a clay wall:


Once it was watertight, I poured on a print coat:


At that point, I decided it was too hot and I had to get out of the workshop for a bit. I don't know how hot it was because I don't have a thermometer in there. I don't want one because it will confirm that either it's really hot or I'm really a wimp. In any case I was sweating bullets and decided to go to the gym to cool off on the treadmill for a while. I'll be heading back out to the shop in a bit to layer on some more thickness. The silicone will cure overnight, so tomorrow morning I'll be able to built the mothermold for this side, then flip the whole thing over and start the jacket for the other side.

So stay tuned for more updates...
 
Re: Just What This Forum Needs: Another Ironman Build

...mate you take Patrick Swayze's movie GHOST to another level :)

Looking good as always -> simple thinking = extraordinary outcomes!
 
Re: Just What This Forum Needs: Another Ironman Build

Wonderful work! Once again I'm astounded by the innovative thinking. :)

If it's not too much trouble, what brand and kind of pigments did you use for the rubber coloration? I'm working on a project where I need to color latex without losing the material's stretch, and I'm thinking it might be better to go directly to pigments rather than testing with adding acrylic paints. Any pointers you have about your search for the right materials and colors for the neckpiece would be greatly appreciated.
 
Back
Top