The Ultimate X-Wing Pilot Thread

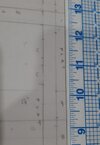
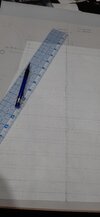
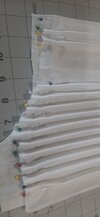
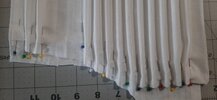
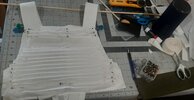
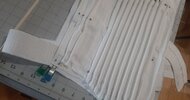
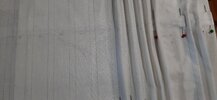
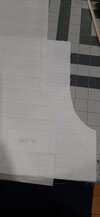
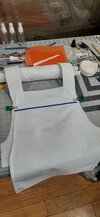
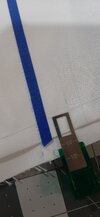
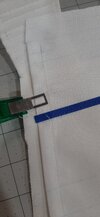
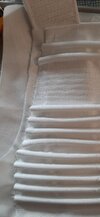
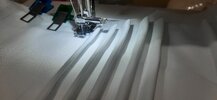
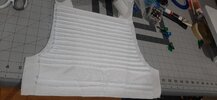
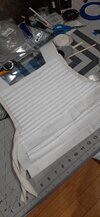
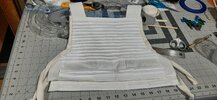
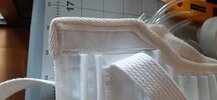
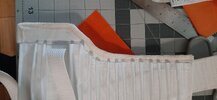
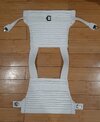
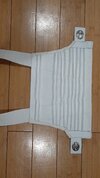
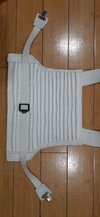
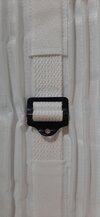
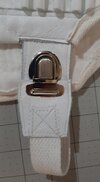
I re-ran the math on the flak vest over the weekend. I wanted to be sure the top "ribbed" portion was long enough to accomodate for all the ribbing needed. I came to another problem. Its possible the bottom base portion is too short for the needed ribs using the template and instructions. I need to re-run the math for that next to be sure. Not sure how that little detail got lost in all this, and it still may be nothing, but its an important piece so i want to have it correct. I am going to cut a test piece of the bottom and top and check it all out before doing it on the actual good fabric.
I am trying to keep this project moving forward while i sew tutus for my daughters ballet shows coming up this weekend. (y)
 
After running the math a third time for the vest front, and drawing a longer pattern template, I ended up with an acceptable solution for the ribbing layer.
I cut a new test piece, drew on the pattern pencils, and pinned it to the test vest first layer to see if it all lined up correctly. I think it worked rather well considering this is the first time I have been this close to a vest in construction. I found a couple minor cut changes that will be made on the final pieces but it all lined up fairly well and I could not resist putting the test pinned piece up against the final vest in progress to see some of the future look.. and throwing it over my shoulders for a sneak peek.
I went ahead and re-ran the math for the back since I figured the same issues would be present there and they were... and were fixed in less than 15 minutes.
Next step will have to wait a couple weeks as I will be travelling. its sad to leave it in this state when I can smell the actual assembly of the actual vest approaching..
when I return I will be finishing the front I hope.
 

Attachments

  • 20220513_184333.jpg
    20220513_184333.jpg
    1.1 MB · Views: 105
  • 20220513_190100.jpg
    20220513_190100.jpg
    856.5 KB · Views: 99
  • 20220514_154237.jpg
    20220514_154237.jpg
    942.5 KB · Views: 103
  • 20220514_154354.jpg
    20220514_154354.jpg
    1.9 MB · Views: 108
  • 20220514_155136.jpg
    20220514_155136.jpg
    1.3 MB · Views: 98
  • 20220514_155112.jpg
    20220514_155112.jpg
    1.3 MB · Views: 94
can you give me a pre-opening fabric quote? im in the market now but maybe not in a month. :) And what is TCSS?

That sounds Awesome! I can't wait to see it all put together.

If either of you are interested here are the links I spoke of earlier:


Even after Anovos having used nylon for their Snowspeeder pilot jackets, I'm still not convinced that the fabric wasn't a "raincoat" type of fabric coated with wax or some polymer.
 
Accept for the collar, colored stripes, greeblie window and zipper cover, these are the same jackets.
spdd2040.jpg


The there's this one.
Again, the same jacket.
ceremonialjacketmany.jpg
 
The ceremonial jacket is most likely the same type as worn by Ponda Baba and by spacemen in Space:1999, yes. But I think it was most likely store-bought.
As per directives, garments in Star Wars weren't supposed to have visible buttons or zippers: which is why those details were ripped/covered up on the ceremonial jacket. A jacket made from scratch for Star Wars wouldn't have those.

The ceremonial jacket obviously served as the inspiration for the pilot jacket, which must have been made from scratch especially for the production, so as to get the number of jackets needed, with zipper cover and padded collar in the same fabric.
There are more differences than those you mentioned:
- Sleeve ribs are box-pleated without padding. (Because the fabric is heavier than the ceremonial jacket, the ribs stand up by themselves - and no padding is necessary)
- No lining: this can be seen in detailed pictures of Luke elevating himself to the AT-AT and throw a grenade into a hatch. In the shot when he grabs the jacket to suit up, it can be seen that it is quite thin. Mark Hamill had also worn a crew jacket on top of the outfit in-between takes in Finse, because the outfit was not warm enough.
- Straighter, looser, less fitted pattern - as it is made to go on top of the flight suit.
- No side pockets.

Edit: My old tutorial for sewing the jacket is still up, but without images (had been on Photobucket). Below are the pictures I used to prove my points:
1: Loose fit
2: Box pleats
3: No lining
 

Attachments

  • research1.jpg
    research1.jpg
    15 KB · Views: 97
  • research3.jpg
    research3.jpg
    28.4 KB · Views: 101
  • research4.jpg
    research4.jpg
    60.5 KB · Views: 102
Last edited:
The ceremonial jacket is most likely the same type as worn by Ponda Baba and by spacemen in Space:1999, yes. But I think it was most likely store-bought.
As per directives, garments in Star Wars weren't supposed to have visible buttons or zippers: which is why those details were ripped/covered up on the ceremonial jacket. A jacket made from scratch for Star Wars wouldn't have those.

The ceremonial jacket obviously served as the inspiration for the pilot jacket, which must have been made from scratch especially for the production, so as to get the number of jackets needed, with zipper cover and padded collar in the same fabric.
There are more differences than those you mentioned:
- Sleeve ribs are box-pleated without padding. (Because the fabric is heavier than the ceremonial jacket, the ribs stand up by themselves - and no padding is necessary)
- No lining: this can be seen in detailed pictures of Luke elevating himself to the AT-AT and throw a grenade into a hatch. In the shot when he grabs the jacket to suit up, it can be seen that it is quite thin. Mark Hamill had also worn a crew jacket on top of the outfit in-between takes in Finse, because the outfit was not warm enough.
- Straighter, looser, less fitted pattern - as it is made to go on top of the flight suit.
- No side pockets.

Edit: My old tutorial for sewing the jacket is still up, but without images (had been on Photobucket). Below are the pictures I used to prove my points:
1: Loose fit
2: Box pleats
3: No lining
do you still have photos for this tutorial? can you share them or are they lost to the internet forever?
thanks for the link!
 
the next steps to my x-wing vest were to create the overlays to go on top of the backing fabric.
the overlays include the ribs and take a bit of math to complete.
i had to cut 2 sets for each side, front and back, to make sure it all worked out lengthwise as well as the correct width for the ribbed portions..

this is the completion of the back side of the vest overlay measurements and tests.. you can see in the last couple photos how long the overlays are versus the backing fabric. I tested my pattern by cutting out cheap cotton and marking up with pencil and then pinning the 2 together to see if it all fits together.. this will then become my final pattern for the final fabrics for the final vest assembly.

I may be taking a bit longer than it should be but this is the first one i have done... actually, now that i have taken this time on this one... future ones will be a breeze since i have all the patterns made now.

I finished last night by cutting the final fabric for the overlays and sewing the seam allowances on the edges and marking them with fabric pencil.. now the marking on the final vest backing fabric and then to assembly!
more photos to come.......
 

Attachments

  • 20220604_184924.jpg
    20220604_184924.jpg
    941.5 KB · Views: 67
  • 20220604_184936.jpg
    20220604_184936.jpg
    2 MB · Views: 60
  • 20220604_202255.jpg
    20220604_202255.jpg
    1 MB · Views: 68
  • 20220605_155619.jpg
    20220605_155619.jpg
    845.9 KB · Views: 62
  • 20220605_155913.jpg
    20220605_155913.jpg
    804.7 KB · Views: 63
Last edited:
i got the first line of final sewing done on the front panel of the vest last night. i was able to cut the final pieces, get the hem of the top piece sewn, got all of the vest marked for ribs and tried something with getting a straight sewing line... used graphic tape for a guide, placing it just above where i wanted my seam to be. still not sure how that is going to play out over the course of one side but ill try it. so far the first seam is super straight and i think I'm on board.

next update one side will be full of ribs!
 

Attachments

  • 20220608_204020.jpg
    20220608_204020.jpg
    838.5 KB · Views: 60
  • 20220608_204010.jpg
    20220608_204010.jpg
    930.3 KB · Views: 60
  • 20220608_204005.jpg
    20220608_204005.jpg
    1.2 MB · Views: 67
ok my mistake... once I started "ribbing" I could not stop. I had too much fun. it wasn't as difficult using the clips as I went. that made things pretty straight forward.
so both front and back panels are added and I started on the trim for the sides and now to the clips and straps... once I find where I put the strap stuff...
enjoy photos

a note on the process: I know i posted earlier about using graphic tape to sew along and keep the line.. well this was to prevent having lines drawn on the fabric that i had to find a way to get rid of later.. since my regular pencil marks were not coming up easy on this nylon.
i found a fabric water soluble pencil and decided to try that.. and it worked great because i drew the lines lightly, and they already had a tendency to dissolve as i was touching it anyways, so i switched to the fabric pencil method after the front panel was mostly done.
Also the lines i sewed were a bit straighter using the ruler and fabric pencil method, so the back side up close is much more "factory", which is nice, since most of the front will be covered by the chest box anyways.
 

Attachments

  • 20220610_121946.jpg
    20220610_121946.jpg
    1.1 MB · Views: 81
  • 20220612_172010.jpg
    20220612_172010.jpg
    1.4 MB · Views: 81
  • 20220612_181241.jpg
    20220612_181241.jpg
    2.1 MB · Views: 81
  • 20220612_225614.jpg
    20220612_225614.jpg
    1.2 MB · Views: 76
  • 20220612_225620.jpg
    20220612_225620.jpg
    1.8 MB · Views: 86
Last edited:
i trimmed up the back side and now moving to the front. i added a couple small leather pieces to the lower edges to give some extra weight and grip in case its needed, as well as some wear surface for the straps.
i have a tendency to add more where its not needed, but i like the detail.

hopefully i can finish the front tonight...
 

Attachments

  • 20220617_110246.jpg
    20220617_110246.jpg
    1.9 MB · Views: 65
  • 20220617_110347.jpg
    20220617_110347.jpg
    1 MB · Views: 62
well.... I finished the vest on Friday and neglected to post here.
I moved to the front and had some good ideas from my previous sketches (also posted) with I wanted to do there, and after cutting paper patterns for the leather, I cut the leather for one side and finished fairly quickly... considering the mess i had while trying to sew around the latch and having the foot move on me constantly.. i mitigated that by lessening the pressure on the sewing foot, which worked... ok.. but not ideal. Then went to the other side and realized I cut the same leather, thinking I had cut the reverse... so good thing I had extra to use. The first side was a bit frustrating.

The other side sewed a lot easier after changing the foot twice on the machine to work better along the latches... I debated then redoing the first one again but decided to "let it be" as it was still functional, and the stitching was mostly ok with exception of one or two small areas.

The trim went on pretty easy and I re-inserted the rib tubes, but I will be removing most of those since leaving those in causes way too much curl and heat and pressure is not alleviating that. if anyone knows how I can uncurl my tubing for the ribs please let me know..no one I talked to over the weekend had a good solution for that.

I left a bit of extra strap on the back side so i can adjust if needed. It seems most just sew enough strap to have it be non-adjustable, but the actual vest on the actual pilot would have been a functional adjustment on the strap and buckle. So since i am not going for 100% screen accuracy, and more function accuracy, i am creating a functional strap.

the vest is now complete! on to the flight suit!.... first to wash all my newly acquired nomex orange fabric. wish me luck!
 

Attachments

  • 20220617_202719.jpg
    20220617_202719.jpg
    1,010.6 KB · Views: 100
  • 20220617_202731.jpg
    20220617_202731.jpg
    1.1 MB · Views: 97
  • 20220617_202736.jpg
    20220617_202736.jpg
    1.7 MB · Views: 78
  • 20220617_202755.jpg
    20220617_202755.jpg
    734.3 KB · Views: 78
  • 20220617_202807.jpg
    20220617_202807.jpg
    959.8 KB · Views: 85
  • 20220617_202833.jpg
    20220617_202833.jpg
    1.2 MB · Views: 75
  • 20220617_202856.jpg
    20220617_202856.jpg
    1.3 MB · Views: 94
Last edited:
Nice. Thanks for the post. I start my own tonight... For the tubing, it I've prepared the fish tank airline. It is still a little curly, but not like it was. 2 options. if you have a truck with a cap, attach it crossways in the bed and let the sun and heat this week do it's job. Alternately and what I did this winter is use boiling water. submerse for a few minutes, then take out and spread out in straight segments. I used an old ladderback chair and just wound it arund. lots of curved places and ultimately waste, but it was free so OK.
 
Nice. Thanks for the post. I start my own tonight... For the tubing, it I've prepared the fish tank airline. It is still a little curly, but not like it was. 2 options. if you have a truck with a cap, attach it crossways in the bed and let the sun and heat this week do it's job. Alternately and what I did this winter is use boiling water. submerse for a few minutes, then take out and spread out in straight segments. I used an old ladderback chair and just wound it arund. lots of curved places and ultimately waste, but it was free so OK.
interesting ideas. i do not have a truck but i will try the hot water treatment and see how it goes! thanks. if you have questions on the vest, feel free to post here.
 
well.... I finished the vest on Friday and neglected to post here.
I moved to the front and had some good ideas from my previous sketches (also posted) with I wanted to do there, and after cutting paper patterns for the leather, I cut the leather for one side and finished fairly quickly... considering the mess i had while trying to sew around the latch and having the foot move on me constantly.. i mitigated that by lessening the pressure on the sewing foot, which worked... ok.. but not ideal. Then went to the other side and realized I cut the same leather, thinking I had cut the reverse... so good thing I had extra to use. The first side was a bit frustrating.

The other side sewed a lot easier after changing the foot twice on the machine to work better along the latches... I debated then redoing the first one again but decided to "let it be" as it was still functional, and the stitching was mostly ok with exception of one or two small areas.

The trim went on pretty easy and I re-inserted the rib tubes, but I will be removing most of those since leaving those in causes way too much curl and heat and pressure is not alleviating that. if anyone knows how I can uncurl my tubing for the ribs please let me know..no one I talked to over the weekend had a good solution for that.

I left a bit of extra strap on the back side so i can adjust if needed. It seems most just sew enough strap to have it be non-adjustable, but the actual vest on the actual pilot would have been a functional adjustment on the strap and buckle. So since i am not going for 100% screen accuracy, and more function accuracy, i am creating a functional strap.

the vest is now complete! on to the flight suit!.... first to wash all my newly acquired nomex orange fabric. wish me luck!
It's absolutely Amazing, Well Done!:love:
 
interesting ideas. i do not have a truck but i will try the hot water treatment and see how it goes! thanks. if you have questions on the vest, feel free to post here.
Thanks. I will. I finially found the last part I needed for the chestbox attachment. a 3/4" x Rainbird flex pipe elbow from the hardware. Lowes part number 875271 Model SWGS075S or it's. I have a couple metal washers to glue on it. One washer will get the magnet for inside the jump suit.
 
I'm having some difficulties with the vest, but I will persevere. It is not an easy thing to sew.
it does take some thinking. and some foot swaps on the sewing machine. if you need anything feel free to ask. if i haven't posted on it before i would be happy to add some details.
 

Your message may be considered spam for the following reasons:

If you wish to reply despite these issues, check the box below before replying.
Be aware that malicious compliance may result in more severe penalties.
Back
Top