i got my stuff today, and everything shipped as ordered. so i got the 2" and the 1".
You are using an out of date browser. It may not display this or other websites correctly.
You should upgrade or use an alternative browser.
You should upgrade or use an alternative browser.
The Ultimate X-Wing Pilot Thread
- Thread starter Jimbo890
- Start date
rickrickrick
Sr Member
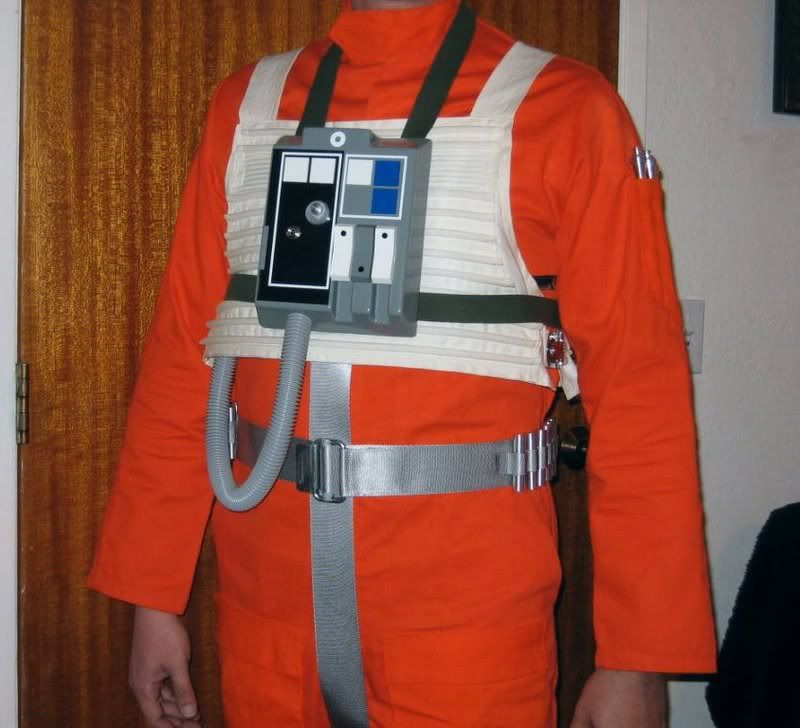
Speaking of straps, I have an urgent plea for help regarding straps; specifically, the one in the center back of the chest box.
I've attached 2 pix.
I bought MonCal's very nice chest box, and I need to use it for the first time Monday. But the strap on the chest box that goes around your body is giving me a migraine.
The buckle came with the two ends of the strap threaded through it as shown in my pix. But it doesn't adjust this way - the straps simply bind against each other when you pull the ends, and make it impossible to tighten. Can somebody PLEASE tell me how the strap should be threaded through this peculiar buckle such that I can adjust it? It seems to me one end should be stitched to the buckle and the other end threaded through somehow, but I can't figure it out.:cry
Many thanks in advance for your help!
Rick
It seems to me one end should be stitched to the buckle and the other end threaded through somehow, but I can't figure it out.:cry
Yes, one end should be stitched to the buckle. It depends......if you are right handed, stitch the left hand side so you can adjust the strap by just pulling to your right side with your right hand. Use the second bar to stitch your strap and the third bar to loop for adjustment.
I did a couple quick snaps. Hope it helps.
The reason we did not stitch the strap to the buckle due to left handed/right handed issue. So we let the costumers do it themselves


Last edited:
rickrickrick
Sr Member
Absolutely, that makes perfect sense!
I actually had it like that once, but it just didn't seem right, because I was used to seeing it without a gap in the strapping visible. But the way you describe and show is precisely what I need to do.
Thanks so much!
Rick
I actually had it like that once, but it just didn't seem right, because I was used to seeing it without a gap in the strapping visible. But the way you describe and show is precisely what I need to do.
Thanks so much!
Rick
Miana
Well-Known Member
Nice stuff everyone!
I bought some of Kenny's machined "mini flares" to go on my belt, but I'm not sure how to make those small loop sections that attach to the main belt.
What I found worked (but was a pain in the butt, like all flares are) is to measure where you want to place the small strap (about 1/2 inch from top and bottom, and sew one end down. I went over it like 2-3 times. Then I moved less than an inch over and sewed one more line down. Making sure I'm still at 1/2" from top and bottom, put the flare under the small webbing, pucker the webbing over it so it's snug, and pin it right down as close as you can get it. Then, I slipped the flare out and sewed where the pin was. Repeat.
If Kenny gave you a set with the screw and washer, you don't have to make the loops too tight, since it's easier to just put them in, punch through the main belt, and screw them on so they're sure to hold.
For the leg flare holder, though, it's better to sometimes sew a little further from the pin, so the flares are ridiculously snug and won't fall out.
superjedi
Sr Member
Miana,
Thanks! That's sort of what I wound up doing.
I did get the flares with the small screws, so I marked where I wanted them to go, then made holes thru the belt and screwed them in. Then I took the 1" material and used some fabric glue to secure it to one end, then made loops in between all the flares.
I'm up to the final stage now, where I'll go back and put a couple of stitches in each loop, just to make sure they're secure.
With the mini-flares being attached with screws, there's really no stress being placed on the 1" fabric, so I'm hoping this will work.
rickrickrick
Sr Member
Miana,
I took the 1" material and used some fabric glue to secure it to one end, then made loops in between all the flares.
I'm up to the final stage now, where I'll go back and put a couple of stitches in each loop, just to make sure they're secure.
That's a great way to make sure the spacing works out. Yes, do stitch them now that they're where they should be - fabric glue won't take much abuse (like brushing your arm against it when you walk!), so you'll definitely want it sewn.
Rick
JHVanOphem
Well-Known Member
For my leg flares and the mini-flares I did another "cheat".
I sewed elastic down flat to the surface, then stitched the vertical lines the same width as the flares and an X stitch in the sections between.
Because the elastic was sewn flat and with an exact width gap, it was a very tight fit to work the flares into position, and then the covering fabric was sewn on top. The flares have yet to come loose, and you can't see the elastic at all.
superjedi
Sr Member
Thanks again for the advice on how to work on the belt!
I got it finished last night, and wanted to show a couple of pics of my new stuff. I redid the belt and ejection straps with the new Strapworks material. I do like this webbing better than the seatbelt material I had used before.
I was standing a little weird to show the mini flares.
Here's most of my costume.

Did the new strapping come out OK?
My flightsuit is still my old hand-modified Dickies coverall. And I'm not the greatest seamstress (seamster? :lol) the universe has ever seen. I still want to upgrade that suit at some point. :redface
I got it finished last night, and wanted to show a couple of pics of my new stuff. I redid the belt and ejection straps with the new Strapworks material. I do like this webbing better than the seatbelt material I had used before.
I was standing a little weird to show the mini flares.
Here's most of my costume.
Did the new strapping come out OK?
My flightsuit is still my old hand-modified Dickies coverall. And I'm not the greatest seamstress (seamster? :lol) the universe has ever seen. I still want to upgrade that suit at some point. :redface
lookin' good! kenny's flares will be a way out for me... for now i'm going to have wood.
i'm not putting the belt together yet since i still need the buckles. soon. soon.
i'm not putting the belt together yet since i still need the buckles. soon. soon.
RogueSolo
Sr Member
Looks great so far!
You leg straps look a little too long to me; how do they feel on you? If you want the real test, go climb up some stairs.
You mean try and climb up some stairs
rickrickrick
Sr Member
After studying stills, and repeated viewings of ANH in high def, to my eye, all the leg flares and belt mini-flares look the same - wood dowels painted silver. The tops of them are all extremely irregular, even the lengths of the belt bits seem to vary. Perhaps they look grey sometimes because, after all, silver paint on wood is never very shiny.
I bought Kenny's excellent code cylinders, then made my own wooden leg and belt flares.
Rick
I bought Kenny's excellent code cylinders, then made my own wooden leg and belt flares.
Rick
superjedi
Sr Member
Im finishing up an APH Helmet that I intend to have molded to offer Fiberglass helmets.I will post pictures soon.
Oooh!! Yes, pics please.
Miana
Well-Known Member
When I go up stairs I only trip and fall 4 out of 10 times, so it's not that bad. :lol
Not bad at all! :lol
Kenny makes great stuff and I have many things of his myself, but why aluminum belt flares? Aren't the screenused flares grey?
The completely screen accurate ones, like rick has said below, were grey-painted wood. Both metal and wooden ones are accepted if you're applying for a formal costume in the Rebel Legion. It's just personal preference, really. I used Kenny's machined sets because I like shiney stuff, and a lot of my friends made the wooden ones because they wanted to go the extra leg for completely accurate. Just depends on what you want to do.
Similar threads
- Replies
- 4
- Views
- 1,241
- Replies
- 8
- Views
- 1,674
- Replies
- 4
- Views
- 995