The Rise of Skywalker: Episode IX Graflex

KR saber conversion kit has arrived!!!

I put Roman's GEN 2 top on for this picture. I would like to know what tape is used as well Kyrack.

ROS saber kit.jpg
 
Here ya go.
 

Attachments

  • thumbnail_IMG_0520.jpg
    thumbnail_IMG_0520.jpg
    43.7 KB · Views: 175
  • thumbnail_IMG_0521.jpg
    thumbnail_IMG_0521.jpg
    39.6 KB · Views: 176
  • thumbnail_IMG_0522.jpg
    thumbnail_IMG_0522.jpg
    30.7 KB · Views: 187
So my KR kit arrived today and I love it! Beautiful engineering and craftsmanship. I’ve started to assemble it, starting with the clamp. As much as I like Khal’s solution for the dummy rivets, I decided I wanted something that looked closer to the prop, so I opted for 2.4mm pop rivets, which I glued in and sanded down, very happy with the results so far! Khal this kit is amazing! Thank you!
What method did you use for the scorch effect? Specifically the painting method.
 
I’ll start production on some more kits now to be able to offer more without the lowers and without the grips attached :)

Just now realized the email notification went to spam, and I missed the round of lower kits last week... that's twice now.

Do you have a rough idea when another batch might come about?
 
Finally got my kit installed this week.
MfIRgXC.jpg

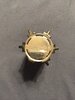
Saber is a combination of a TGS 1.9 'blem' upper shell (ears, eye, button) and the KR 'conversion' kit.
uUA6O6i.jpg

Scorch marks were done with a dremel cutting bit and enamel weathering wash. I'm not sure I really captured the 'burn marks' as well as I'd like, so any suggestions for improvement would be appreciated.
hXEGPsx.jpg

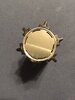
Saber is fully installed with a mb-sabers chassis printed in plastic, combined with a brass fin kit and a quartz crystal. The bladeholder is the TGS unit, so I didn't go for the fully removable chassis with 'plasma gate.' Did the chamber rods by hand with some 1/16 rod picked up at the hobby store.
byOzyrp.jpg
GfOLsHi.jpg

Chamber closeups. I'm actually pretty happy with how the chamber turned out. When I purchased the chassis parts, Shapeways wasn't printing in metal due to Covid restrictions. If I had it to do over again, I'd probably print the crystal holder pieces in brass, rather than plastic. Still, I went for a heavily carbon-scored look for the chamber parts and I think it was pretty successful.
Q14EjKa.jpg

And lit up. Now that I've got it installed, it's time to get the chamber and the chassis 'windows' programmed to do more that just mimic the blade as they are now. All the leds are neopixel, so I should be able to program some solid blinky variations for the window section and color-match the crystal for all the various blade styles.

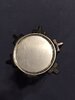
The mb-sabers chassis is actually a fairly easy install, the only major frustration was getting the brass rods bent nicely for the crystal chamber and ensuring that it was all bolted together straight so that it fit inside the graflex shell. I find that the KR kit is just ever-so-slightly thicker gauge than the TGS kit, so the ID of the lower section makes for pretty snug fit on the chassis. Getting the kill switch at just the right level so I could actuate it AND it would fit inside the saber was somewhat challenging.

One of these days I'll spring for a two-piece emitter and do the fully-removable mb-chassis but I doubt I'll ever want to spend the $$ for the full-metal option.

The KR kit was really nicely made and the included stencil for the burn marks was welcome. I now have installed saber replicas for all the 'major' Graflex variants: ANH, ESB, TFA/TLJ and TRoS. I should really get them all in the same room for a 'family photo.'
 
Just now realized the email notification went to spam, and I missed the round of lower kits last week... that's twice now.

Do you have a rough idea when another batch might come about?

Shoot me an email on the store bud. I’ll sort you out [emoji106][emoji106]
 
Hey Gang,

Here's my KR Kit with a Roman's Graflex top half. I used real rivets. For the welded spots, I used the template to Dremel the brass spots. After that, I airbrushed the scorch marks. and then scratched the paint away where the brass was exposed. I redid the airbrushing several times until I was satisfied with the result. It's still not perfect, but I'm happy with it. The last step was exposing the whole top half to ammonia fumes for about 30 minutes to knock down the shininess of the brass. Pics:
E9-Graflex-01.jpg

E9-Graflex-02.jpg


E9-Graflex-03.jpg


E9-Graflex-04.jpg


E9-Graflex-05.jpg


E9-Graflex-06.jpg
 
Hello. First time posting here. Will there be another run of the stencils or spare parts available soon? Specifically I need the leather strip, the clamp card, grips, rivets and stencils.
 
Hello. First time posting here. Will there be another run of the stencils or spare parts available soon? Specifically I need the leather strip, the clamp card, grips, rivets and stencils.

We don’t sell the parts individually like that as all of them were made in sets.
 
Assuming the body is nickel-plated, you could try something like Birchwood Casey Brass Black.
 
I finally got around to finishing my Rey‘s lightsaber. I have to say that Khal and Roy really knocked it out of the park with this one. All of the materials are top notch quality. Many thanks to them for creating such a great kit. I had a lot of fun putting it together.
The bottom half is KR sabers and I used the top half of a Romans Z Flashgun 8 (also an amazing product). I used the provided stencil as a rough guide to paint a very fine layer of Tamiya smoke. It wasn’t much. Just enough to help me know where the scorch marks were going to go. You could hardly see it. Then I eyeballed the welding marks using a Dremel with the round carving tool and the bullet grinding tool to flatten some of the area. Then a healthy coating of Tamiya soot was applied to really bring out the scorching And a wash of black ink over the brass to dull it down some.
I haven’t made a lot of sabers, but I had a lot of fun with this. Now, I can’t wait for the KR sabers KRossguard to come in.
F2C8BCD0-29E6-45A3-9CF9-13A56A347F6B.jpeg
FF0B3547-18A0-4EC0-9A2C-C4347A42C290.jpeg
F08D97D5-19ED-4F2D-86AB-1CA73F4366C1.jpeg
5522066D-DE5B-4CC8-883F-4D9B94E03841.jpeg
 
Last edited:

Your message may be considered spam for the following reasons:

If you wish to reply despite these issues, check the box below before replying.
Be aware that malicious compliance may result in more severe penalties.
Back
Top