hi, folks.... It has been a while since I last posted here at the RPF.
Heck, I don´t even recall when I did it, anyway, but I thought this would be a nice post to get back to the fold, as it were.
Just like Kermet, who posted a thread here - 1966 tv Batmobile 1/6th scale - I got the same Batmobile in a deal, and similarly I was extremely disappointed, since not only the interior, but every thing in the car was sub-par to say the least, and my intention was never to have anything this lacking in the collection. So it lingered at my living room for about two months, while I pondered what to do.
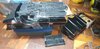
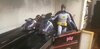
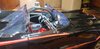
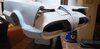
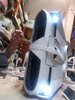
As I saw the measurements, I dejectedly thought that either I would have to try and dump that POS in an unsuspecting person or just do something WAY radical. Since I couldn´t bear the thought of having it pushed onto anyone, I pushed myself to be confident enough to just shred the car to pieces. Having seen Kermet´s thread I thought - well, can´t be all that bad, so my first idea was to rip out the cockpit, as you will see by the pictures. (there are at least 100 of them here in the computer now so even not showing all of them, which is an exercise in self-restraint, you will have lots to see)
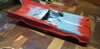
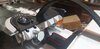
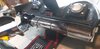
Having taken the cockpit from the car, and comparing its original measurements to what a true 1/6 rendition should be, I noticed that it was just lacking length-wise, so I cut it in half, but that was not the first thing I have done, besides the cockpit. The rear axle was way too close to the rear end, about 4 cm (that would be 1.5 inch for the metrically-chalenged in the audience), so I took it off along with the full rear wheel housing and top of the curved part of the fender,, pulled it these 4 cm frontward, and fixed it in place with plumber´s epoxy (which was used extensively in every structural part of the car.)
Having the rear wheel assembly thus repositioned, I noticed that the front wheel was similarly less than ideally placed, so I bit the bullet and did the same cutting off/reassembling process.
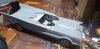
(a note on the cutting of the car - To its credit, the car could have been sculpted as if a 2-year old having only heard of the existance of the Batmobile would try to replicate it out of plasticine in the dark, wearing boxing gloves, inside a roller coaster car. Yes, and it wasn´t even that good, BUT the material is VERY sturdy. Usually one could cut it with a Dremel or something, but I reasoned that for the first part I could do it with an X-Acto Knife. It took some elbow grease and some blades but most of the car was cut this way, which I thought could help me in the process of putting it back together, and sure enough, it did.
Note to you guys. If you cut a similar car, go with the Dremel, if you have space and the way to get rid of the dust easily.
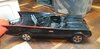
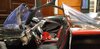
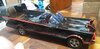
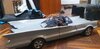
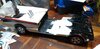
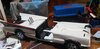
anyway, you will see in the pictures that I had to extend the car a good 12 cm ( almost 5 inches), Just sculpting it would be a similarly bad prospect, but instead, I noticed I could have laminated the entire car in 1 mm Sintra, which I did, covering it generously on the inside with plumber´s Epoxy. ( OH by the way, the final car is rather heavy but I kinda like it to be this heavy)
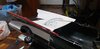
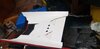
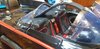
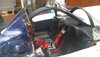
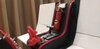
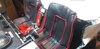
Back to the car, I was thinking whether I should or not cut off the doors, but upon making the upholstery (and yes,it IS real upholstery,sewn, lined with upholstery foam), it was clear to me that it HAS to open, so it was a full makeover of the car I had to do.
the interior of the cabin was made thus -
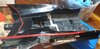
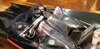
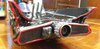
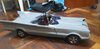
upon studying the pictures of the real car I scaled it by sheer power of guestimation and found that round eyelets would be ideal for the gauges, so I printed in a glossy paper pictures of the original gauges and glued the eyelets around them. The red background to that part is red adhesive tape, ideal for demarcating lines in bank floors, so I knew they would be resistant. The dashboard was sketched using 1, 2 and 3 MM Sintra, covered in black pleather frontwise and in the silver area, by a very reflective plastic, just like the one some people use to make shoes, which I had laying around. The lines in the panel were scored with an X-Acto Knife and the black part of the dash, just above the steering wheel, was painted with a self-levelling paint. The fire extinguisher is a pen cap, covered in the same red tape and the Bat-Symbol was , along with all the stickers in the dash, printed in an adhesive-backed glossy paper, which helped a bit but not much so I had to glue it with contact cement anyway.
You will notice that there are weird-looking windows on the car. so I thought It should be hard to make them. Actually it was super easy, barely an inconvenience! I just found Easter Egg molds! Sure, when I was in the store, I couldn´t decide on the size so I took 4 of each in the store! As it turns out, the best for the job was the one I WASN`T bringing, for I thought it was way too large, but that is how things go.
The headlights were repurposed from a small owl I had bought to my daughter, it had real headlights for eyes, and as it turns out, the right scale, so I took them off and fashioned them into place , using the metal grid that came with the car to complete the look. As for the orange blinkers, I had to cut some plastic from the lid of a knick-knack storage box, took some tries but the final result speaks for itself")
As I neared the completion of the car, I was watching many videos on the real Batmobile, and one of them showed the car in the painting booth! It was the first time I saw it being painted, so to my delight I saw that the car was painted red first, which helped a LOT in the final result. Painting it red after the black would not be nearly as nice. So after doing that, it was time to add more details
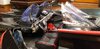
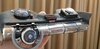
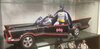
The back had some important parts, namely the parachutes and antenna. That antenna was made by repurposing a Force Pike from a Star Wars Royal Guard 3.75" figure, which had the right shape and size, so it fit very well! The backburner was made by Mcgyvering together some round car parts (which I always do. these are taken from a window roller from a VW Bug) and a .40 schedule pipe, which I attached plastic H-Tracks with cyanoacrilate glue . The parachutes were a block of half-inch EVA Foam, covered with pleather, the details are nails and a telephone wire. The straps were made by gluing sandpaper cut to shape, then crazy glued all to the back of the car, where they are now
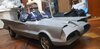
But would Batman and Robin fit in there? Since the Hot Toys figures are very delicate, I decided NOT to bring them together at all before the car was finished, so as a stand-in, a 12th Doctor figure I was making stepped up to the plate, and you can see him happily sitting in Batman´s place in a picture or two.
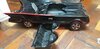
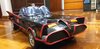
The final result was photographed BEFORE having the Adam West Batman figure and Burt Ward Robin in place. Once I put it there, it was, after about 4 weeks working on and off in the car, very moving .I felt just like a kid in front of the TV set again, more than 45 years ago. And THAT made it all worthwhile.
So I hope you guys like the pictures now.... I could have spoken less, but oh well, it has been years since I posted here so I kind of indulged myself a bit, and I thank you guys for the attention
Heck, I don´t even recall when I did it, anyway, but I thought this would be a nice post to get back to the fold, as it were.
Just like Kermet, who posted a thread here - 1966 tv Batmobile 1/6th scale - I got the same Batmobile in a deal, and similarly I was extremely disappointed, since not only the interior, but every thing in the car was sub-par to say the least, and my intention was never to have anything this lacking in the collection. So it lingered at my living room for about two months, while I pondered what to do.
As I saw the measurements, I dejectedly thought that either I would have to try and dump that POS in an unsuspecting person or just do something WAY radical. Since I couldn´t bear the thought of having it pushed onto anyone, I pushed myself to be confident enough to just shred the car to pieces. Having seen Kermet´s thread I thought - well, can´t be all that bad, so my first idea was to rip out the cockpit, as you will see by the pictures. (there are at least 100 of them here in the computer now so even not showing all of them, which is an exercise in self-restraint, you will have lots to see)
Having taken the cockpit from the car, and comparing its original measurements to what a true 1/6 rendition should be, I noticed that it was just lacking length-wise, so I cut it in half, but that was not the first thing I have done, besides the cockpit. The rear axle was way too close to the rear end, about 4 cm (that would be 1.5 inch for the metrically-chalenged in the audience), so I took it off along with the full rear wheel housing and top of the curved part of the fender,, pulled it these 4 cm frontward, and fixed it in place with plumber´s epoxy (which was used extensively in every structural part of the car.)
Having the rear wheel assembly thus repositioned, I noticed that the front wheel was similarly less than ideally placed, so I bit the bullet and did the same cutting off/reassembling process.
(a note on the cutting of the car - To its credit, the car could have been sculpted as if a 2-year old having only heard of the existance of the Batmobile would try to replicate it out of plasticine in the dark, wearing boxing gloves, inside a roller coaster car. Yes, and it wasn´t even that good, BUT the material is VERY sturdy. Usually one could cut it with a Dremel or something, but I reasoned that for the first part I could do it with an X-Acto Knife. It took some elbow grease and some blades but most of the car was cut this way, which I thought could help me in the process of putting it back together, and sure enough, it did.
Note to you guys. If you cut a similar car, go with the Dremel, if you have space and the way to get rid of the dust easily.
anyway, you will see in the pictures that I had to extend the car a good 12 cm ( almost 5 inches), Just sculpting it would be a similarly bad prospect, but instead, I noticed I could have laminated the entire car in 1 mm Sintra, which I did, covering it generously on the inside with plumber´s Epoxy. ( OH by the way, the final car is rather heavy but I kinda like it to be this heavy)
Back to the car, I was thinking whether I should or not cut off the doors, but upon making the upholstery (and yes,it IS real upholstery,sewn, lined with upholstery foam), it was clear to me that it HAS to open, so it was a full makeover of the car I had to do.
the interior of the cabin was made thus -
upon studying the pictures of the real car I scaled it by sheer power of guestimation and found that round eyelets would be ideal for the gauges, so I printed in a glossy paper pictures of the original gauges and glued the eyelets around them. The red background to that part is red adhesive tape, ideal for demarcating lines in bank floors, so I knew they would be resistant. The dashboard was sketched using 1, 2 and 3 MM Sintra, covered in black pleather frontwise and in the silver area, by a very reflective plastic, just like the one some people use to make shoes, which I had laying around. The lines in the panel were scored with an X-Acto Knife and the black part of the dash, just above the steering wheel, was painted with a self-levelling paint. The fire extinguisher is a pen cap, covered in the same red tape and the Bat-Symbol was , along with all the stickers in the dash, printed in an adhesive-backed glossy paper, which helped a bit but not much so I had to glue it with contact cement anyway.
You will notice that there are weird-looking windows on the car. so I thought It should be hard to make them. Actually it was super easy, barely an inconvenience! I just found Easter Egg molds! Sure, when I was in the store, I couldn´t decide on the size so I took 4 of each in the store! As it turns out, the best for the job was the one I WASN`T bringing, for I thought it was way too large, but that is how things go.
The headlights were repurposed from a small owl I had bought to my daughter, it had real headlights for eyes, and as it turns out, the right scale, so I took them off and fashioned them into place , using the metal grid that came with the car to complete the look. As for the orange blinkers, I had to cut some plastic from the lid of a knick-knack storage box, took some tries but the final result speaks for itself
As I neared the completion of the car, I was watching many videos on the real Batmobile, and one of them showed the car in the painting booth! It was the first time I saw it being painted, so to my delight I saw that the car was painted red first, which helped a LOT in the final result. Painting it red after the black would not be nearly as nice. So after doing that, it was time to add more details
The back had some important parts, namely the parachutes and antenna. That antenna was made by repurposing a Force Pike from a Star Wars Royal Guard 3.75" figure, which had the right shape and size, so it fit very well! The backburner was made by Mcgyvering together some round car parts (which I always do. these are taken from a window roller from a VW Bug) and a .40 schedule pipe, which I attached plastic H-Tracks with cyanoacrilate glue . The parachutes were a block of half-inch EVA Foam, covered with pleather, the details are nails and a telephone wire. The straps were made by gluing sandpaper cut to shape, then crazy glued all to the back of the car, where they are now
But would Batman and Robin fit in there? Since the Hot Toys figures are very delicate, I decided NOT to bring them together at all before the car was finished, so as a stand-in, a 12th Doctor figure I was making stepped up to the plate, and you can see him happily sitting in Batman´s place in a picture or two.
The final result was photographed BEFORE having the Adam West Batman figure and Burt Ward Robin in place. Once I put it there, it was, after about 4 weeks working on and off in the car, very moving .I felt just like a kid in front of the TV set again, more than 45 years ago. And THAT made it all worthwhile.
So I hope you guys like the pictures now.... I could have spoken less, but oh well, it has been years since I posted here so I kind of indulged myself a bit, and I thank you guys for the attention
Attachments
-
 20200428_185249.jpg3 MB · Views: 477
 -
 20200425_002133.jpg2.7 MB · Views: 468
 -
 20200428_175131.jpg2.8 MB · Views: 422
 -
 20200426_224051.jpg2.9 MB · Views: 444
 -
 20200426_223900.jpg2.9 MB · Views: 430
 -
 20200426_223505.jpg3.1 MB · Views: 377
 -
 20200425_000512.jpg2.7 MB · Views: 523
 -
 20200428_221902.jpg3 MB · Views: 364
 -
 20200602_073059 (1).jpg2.9 MB · Views: 375
 -
 20200604_015512 (1).jpg2.6 MB · Views: 470
 -
 20200602_072840 (1).jpg1.4 MB · Views: 425
 -
 20200602_072950 (1).jpg3.1 MB · Views: 382
 -
 20200602_072936 (1).jpg3.1 MB · Views: 374
 -
 20200602_072814.jpg1.6 MB · Views: 478
 -
 20200602_073957 (1).jpg3 MB · Views: 581
 -
 20200531_234244.jpg2.8 MB · Views: 569
 -
 20200530_225706.jpg2.8 MB · Views: 325
 -
 20200601_035422.jpg3 MB · Views: 341
 -
 20200530_164344.jpg2.7 MB · Views: 352
 -
 20200601_035416.jpg2.9 MB · Views: 393
 -
 20200601_035405.jpg2.8 MB · Views: 317
 -
 20200528_224227.jpg3.2 MB · Views: 314
 -
 20200527_030702.jpg2.6 MB · Views: 382
 -
 20200527_030713.jpg2.7 MB · Views: 297
 -
 20200527_030843.jpg3.3 MB · Views: 398
 -
 IMG-20200523-WA0002.jpeg1.2 MB · Views: 365
 -
 20200520_064516.jpg3.4 MB · Views: 280
 -
 20200520_064422.jpg2.8 MB · Views: 349
 -
 20200517_015026.jpg2.8 MB · Views: 289
 -
 20200521_001108.jpg2.6 MB · Views: 304
 -
 20200518_034253.jpg2.8 MB · Views: 297
 -
 20200503_213327 (1).jpg534 KB · Views: 369
 -
 20200429_235400.jpg2.8 MB · Views: 283
 -
 20200430_063501.jpg3.1 MB · Views: 392
 -
 20200604_015548 (1).jpg2.7 MB · Views: 525
 -
 20200604_015512 (1).jpg2.6 MB · Views: 423
 -
 20200604_020010.jpg3.6 MB · Views: 459