The New Core - Tom's Accurized ESB Stunt

Okay folks. I’ve learned some things.

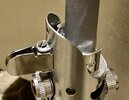
I used all the reference I had to locate the upper bolts. As best I can tell, this is the exact positioning. Weirdly, older bolts like these tend to have bigger heads. I have brand new M3 bolts so the heads are more compact. My zero flute countersinking bits were too big. These heads are only a few mm high, and the cutting area is a few mm from the tip. I used some normal fluted bits that left chatter, but whatever.
A1E33268-89D1-45BD-B78A-74B4D5011CBC.jpeg
409B19E8-AEC1-43B9-A246-9785053A1678.jpeg
F940F5CD-05D6-472A-9244-80B1B562898D.jpeg
731621AC-3AD2-4687-A9D0-77EADEC6358A.jpeg

So here are all the parts. I have to grind a step in the tang. I took creative license and added a grub screw to keep the tang in place.. we don’t know how they did this part.
E0D83554-4EB4-48C0-983E-A69C685D77BE.jpeg
4624043C-DC74-4D85-8A25-08BA16E54E88.jpeg

Screwing the flash socket to the core is also creative license. They may have done this… maybe ran the screws up from the bottom or they milled space in the upper core like Roy did.. who knows.
D2857016-1AEF-49C6-BB0D-27C6E0E8F18C.jpeg

Next is the blade. I left a longer tang, and I’m going to try and figure out how to do a longer spacer, because this saber is a bit back heavy.

Also, two bolts are directly opposite eachother. I’m not kidding, I needed depth to push a tap through and … well…

5B65FA1C-BE1A-4B3B-84FE-675EDB034450.jpeg
158AD3AE-EFC3-4ACD-8A6A-19198AFB1A56.jpeg
 
I think it might be pertinent to add that the upper row of bolts has the tang hole to push all the metal chips into.

The lower ones.. if they don’t and if the tang only goes as far as I drilled, then you’d need somewhere for the chips to go. It could very well be that they drilled straight through. And then… added one on either side. Now with space for the chips to go.

I don’t understand the reasoning really, maybe the flash was bent in an oval, maybe some other reason.

I trust Roy’s placement of the bolts, so I’m excited to learn that two of them point right at eachother. Doing it myself I stumbled on them all connecting
 
I’m going to upload pics tomorrow, I finished the hardware (blade) and ground a channel in the tang. This is looking pretty good.

The center of balance is right behind the red button, with our modern hollow antennas. (My inner blade bushing is 3-4 inches long now)

I may spray foam inside like I did before on my warehouse stunt. Resin would prevent the blade from flexing

It was tough - that piece of aluminum I found was too skinny for where I measured the thickness in photos. I chose a glomex antenna instead so I had to start with thicker aluminum… took a while to reduce, and it’s length is longer so it took even longer haha

I used a 5/16 threaded rod with two wing nuts and some drywall sandpaper/files to reduce and shape the piece.

I got so tired it took me three tries to cut the outer collar with a hacksaw!
 
Last edited:
I’ve got some updates. I dremelled the rivet in the bunny ear ring and removed the spring. Right now I just have a screw I got from an antique store in there… I kept the bushing in there since the graflex tabs have a smaller hole, so whatever bridges the tube and ears has to be that small.

The blade… check out my “converting an OT blade” thread, this is Chinese reflective fabric, cut to shape and affixed with super 77 spray

Still up in the air: anything going on with the clamp and what is going on with the kobold and end cap.

I tried to duplicate that one Dagobah photo from teecrooz
250DA4B9-3A64-48DB-B074-237DE7F9E231.jpeg
Screen Shot 2022-11-11 at 9.19.01 PM.png
642026D9-A29C-4F24-8AF4-9CE1170AE8F7.jpeg


B70F3BFC-A20F-4506-8689-ADEBD5F6A23E.jpeg
11549B92-4118-46E2-851A-937599C29B57.jpeg


DA0B9A8D-BE62-4224-9828-C5025186595A.jpeg
7818B2F7-D039-48C3-A07A-6413571DB8D5.jpeg
477DA7DB-FBB1-433C-B461-C7B402BB65AB.jpeg
3C202967-F904-4E80-BAE1-5AEECDCEB6CF.jpeg


* I just realized you can hear my dad yelling about the condition of a booster he saw online hahahaha *
 

Attachments

  • FEDB23C1-6838-4469-8298-D98923131AB6.jpeg
    FEDB23C1-6838-4469-8298-D98923131AB6.jpeg
    1.5 MB · Views: 36
Last edited:
Before I knew the graflex tabs were smaller I spent a half hour lathing a beautiful brass rivet

Then realized I could only stick it in the ears.. not the tabs lol
25072C9F-0688-4C1A-ADFA-94AB3C4EF9DC.jpeg
014F4F26-419F-4A67-BED1-6827949F4392.jpeg
 
Last edited:

Your message may be considered spam for the following reasons:

If you wish to reply despite these issues, check the box below before replying.
Be aware that malicious compliance may result in more severe penalties.
Back
Top