The Martin Builds a Thing. Dredd Helmet

The martin

Member
Hello all. Long time lurker here. Ive posted once or twice on some other builds and after taking the time to start one of my own its high time i post it. This isnt my first pep but its becoming my favorite.

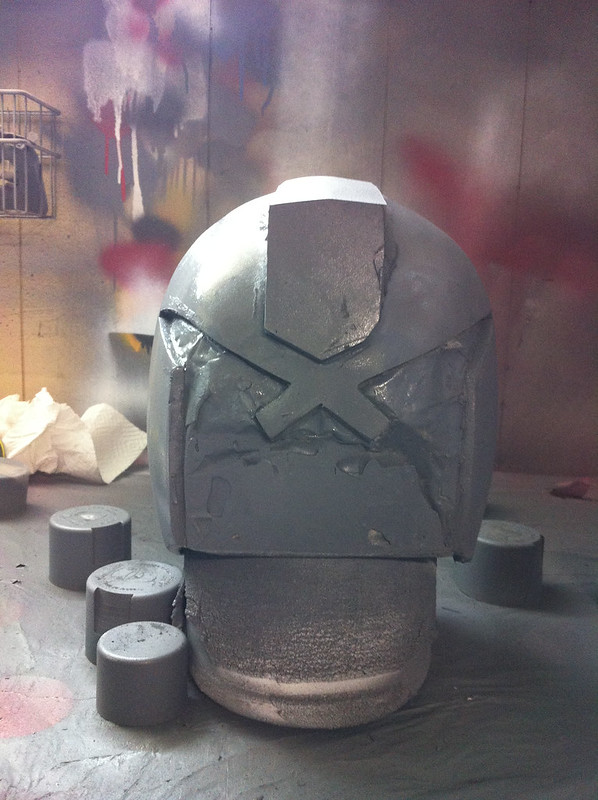
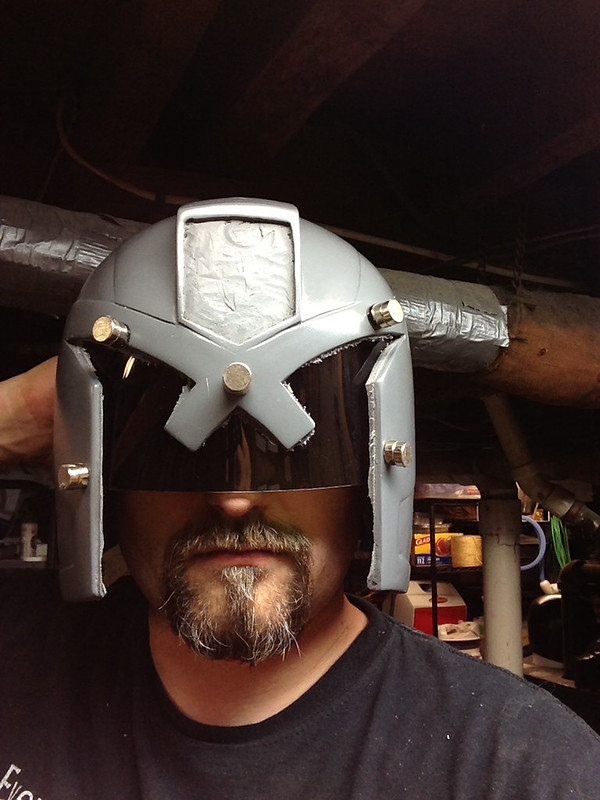
I started with a Pep file by blaxmythe, no adjustment to the scale, just a print and go. After getting it all together I went and did 2 light coats of resin on the outside. 20130810_162343.jpg20130810_162348.jpg

After that I started to fiberglass the inside. I used some spray adhesive to hold the pieces of fiberglass to the shell before applying resin. Ive used fiberglass mat before and didnt really like how messy it was. This time I used fiberglass cloth. soooo much nicer.
20130810_190219.jpg20130810_190222.jpg20130810_192826.jpg20130810_192835.jpg20130810_192844.jpg


Two layers of cloth later I decided it was strong enough.
 
obligatory wearing the project pics
20130811_160409.jpg20130811_160422.jpg

Then I started the sanding. After reading some other members builds and their suggestion to knock down all the pointy edges first I went a head and started. everything was going great until i found a air pocket. progress halted there while I filled in the hole. That brings me up to today. Im currently waiting on the reisin to dry. 20130813_191853.jpg20130813_191903.jpg20130813_191912.jpg

20130813_191828.jpg20130813_191936.jpg20130813_191921.jpg
 
Looks great so far mate! Good fit too. Wish I had the patience for pep but even looking at the built up helmets using peps look like I'd end up pulling my hair out lol. How long did it take you to build the pep, and is it difficult?
 
The only thing that bugs me about the peps is the angled eyes, they seem a bit too angled and wide if you look on this pic of dredd

image.jpg


The eye part is level with the bottom of the badge. Don't know if its just me?
Not knocking your helmet as yours looks MILES better than the state of a helmet that I working on lol, just trying to help!
 
The pep was very easy to build. It's hands down the easiest,and fastest one I've found. Total time from print to last bit of glue was around two hours. I didn't score any of the tabs except the ones that needed right angles. Like around the eyes, the badge,and the base. I figured since it was all round to just let the card stock do its thing.
 
The pep was very easy to build. It's hands down the easiest,and fastest one I've found. Total time from print to last bit of glue was around two hours. I didn't score any of the tabs except the ones that needed right angles. Like around the eyes, the badge,and the base. I figured since it was all round to just let the card stock do its thing.
 
Cool man cheers I might have to give it a go if mine goes wrong! My delta sander arrived in the post today so I've got lots of filling and sanding to do to give it that curved look, at the moment mine I look like im wearing r2-d2 on my head lol
 
I think he's right about the eyes too. However since this is the only pep file I found I'm going to finish it. Will it be screen accurate? No. Will it look convincing to most people? Very much so. Time for bondo and filler work tonight
 
You could probably alter it after you put a bit more bondo on it! Would just take a bit more sanding.. I'm guessing, but I'm sure that would work?
 
The more I think about the more the eyes are starting to bug me. Guess this means Im not quite done yet.
Heres my progress so far. First round of bondo.
20130818_140733.jpg
20130818_140724.jpg
20130818_140740.jpg
20130818_140747.jpg

The pep file really leave a bit of a gap in the shape of the helmet in the back on the sides. The low spots are pretty visible. Sanding here was done with 60 grit to make the shape quick.

2nd round of bondo.
20130820_165247.jpg
20130820_165255.jpg
20130820_165303.jpg
20130820_165318.jpg

Looking better already. Sanding here done with 150 grit. There is still spots that need some filler but much smaller amounts and fewer of them. I may play around with the eyes and see what I can come up with.

And with his friends on the shelf...
20130820_165547.jpg

Till next time...
 
its been a week and what a week!

I decided that the easiest way to get the raised edges was to use the double sided foam tape as a border. It works great. Id recomend having a layer or regular masking tape down first so the double sided foam tape is easier to remove. Then I just filled in like a color by number
20130827_204322.jpg
20130827_204332.jpg
20130827_204353.jpg
20130827_204400.jpg

The edges come out great.

20130827_221637.jpg
20130827_221647.jpg
20130828_140217.jpg
20130828_140225.jpg
20130828_140233.jpg
20130828_140241.jpg

I reshaped the eyes a little bit. next one Ill take more care here when i build the pep.
after sanding and rounding the edges just a bit to make it look a lil nicer it was time to get some paint on.

first some black primer. sand... 2nd coat.. sand....then black. sand. second coat of black......
20130828_164107.jpg
20130828_164115.jpg
20130828_164127.jpg

Then came the red.....
20130829_190537.jpg
20130829_190547.jpg
20130829_190609.jpg
20130829_190623.jpg
20130829_190655.jpg
20130829_190733.jpg
20130829_190741.jpg

Im working on the badge, just cut some foam to use as the base. Only had 1 inch stuff here so I spent some time slicing it in half, then half again to get the right thickness..... let me tell you how much fun that was. The material for the visor is on its way and then its add some padding and look the part.
Sooooooo what do you all think?
 
Looks great!
Good tip putting the masking tape down before the foam tape. I wish I had done that, the foam tape left a horrible residue behind that was hard to get off.
 
Looks great!
Good tip putting the masking tape down before the foam tape. I wish I had done that, the foam tape left a horrible residue behind that was hard to get off.

I got lucky as the kind i used didnt leave anything behind. It did however want to stay where it was!

I put in some padding. I didnt want to just line the whole thing with padding or foam as helmets like that get really hot (think motorcycle ones) and until the padding breaks in its too tight. Instead I took a page from work. Im a Marine and all of our kevlar helmets have padding that is modular and attaches with velcro thats on the inside. So I went to supply and picked up a replacement pack of padding. Its 3/4" think and stick to velcro like crazy. However it also allows you to adjust the pads to for that perfect fit and still allows some air to pass. Not much but every little bit helps. Take a look.

20130831_113411.jpg
 
Another good idea. Mines fully lined, fixed in place with Velcro. Good to know I could get some more airflow with your setup if I'm suffering from the heat.
 
Very nice man, looks the dogs! Just got past the basic car filler stage on mine, sanding next :D!
Did you use semi gloss black spray btw?
 
the martin, that's a great Idea. I'm going to look into something similar. I found this:
New for USGI Military ACH Mich Helmet 7 Pads Fit Kit Adjust Set | eBay

There's also these:
Condor 213 New Attachment Pad Pads PASGT ACH Mich OD Olive Drab | eBay

what do you think?
Im pretty sure either one of those would work. I wouldnt pay more then 15 bux for em. here is whats printed on the back of mine. Then its some sticky back velcro. Go for the industrial strength stuff other wise the hook and loops are stronger then the glue on the back.
20130831_191402.jpg

BR3TT
I did indeed use semi gloss black. Then a coat of gloss metallic. The red is actually Burgundy. It gives it an overall dark, used look while still being glossy. Also lends a serious evil look to it in person. The next one Im going with Gloss Red.

Aslo.......The material for my visor came in! I found it on e bay for under $6 and with some careful planning I even have enough left over for a second one. No build pics of the stencil and fitting because I was too excited to have the helmet really start to take on the finished look. What I did was take a piece of card stock and trim it down so it fit in the helmet. Then i cut off pieces until it fit the way I wanted it to. I then traced the outline onto the visor material. I had a piece of masking down to make it easier. Once the visor was the right shape I left the protective film on and slid it into place. lots of trial and error here. I ended up using the pads on the side to help hold it in place. Once i found a happy place for it I traced its outline to the inside of the helmet and the matching spots on the protective film. removed the visor and used more velcro. Hooks on the helm and loops on the visor. I figure that since it was going to take a bit of adjusting that velcro was the way to go. also makes replacing it easy. no bolts to remove or tabs to fight with. The finished look. With my ugly mug behind it, and one with my not screen accurate but very real law giver. I really need to start on that.......
20130831_185014-1.jpg20130831_185910.jpg
 
This thread is more than 10 years old.

Your message may be considered spam for the following reasons:

  1. This thread hasn't been active in some time. A new post in this thread might not contribute constructively to this discussion after so long.
If you wish to reply despite these issues, check the box below before replying.
Be aware that malicious compliance may result in more severe penalties.
Back
Top