You are using an out of date browser. It may not display this or other websites correctly.
You should upgrade or use an alternative browser.
You should upgrade or use an alternative browser.
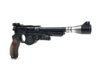
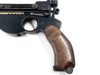
The Mando Project (S.A. Blaster, Metal Beskar Ingot and I guess maybe the whole darn suit...!)
- Thread starter JOATRASH FX
- Start date
This looks amazing my only worry in getting a kit is I'm not real confident in painting wood grips my Hellboy Samaritan was okay but not very realistic imo.
Know anyone who works in wood?
JediJohn182
Well-Known Member
Same apparently there’s a guy working on walnut grips that will fitKnow anyone who works in wood?
Thanks.This looks amazing my only worry in getting a kit is I'm not real confident in painting wood grips my Hellboy Samaritan was okay but not very realistic imo.
The grips on this have wood grain texture in them. Painting them is super-easy and I'll be describing the method. It's basically a base coat of brown, a "wash" of darker brown, then a careful dry brush of a lighter brown. (You can get more ambitious with layering different tones of brown if you want, but the real prop looks pretty simply painted.) Fake wood grips don't often even need to be sprayed, but can be hand-painted because the brush textures can be made to look like grain too.
I am talking with another RPFer who wants to make grips for it. I'll be sending him a set to CNC from and he'll be handling it as he sees fit.Same apparently there’s a guy working on walnut grips that will fit
I was thinking about making my own wood grips for this but I’m not sure if they’re interchangeable
Nothing on the real prop reference we've seen suggests the grips on it are removable, so I didn't include screw holes in mine. So swapping back and forth (if that's what you meant) might be hard. That said, you could just use the resin ones as a base to make your own.
Not really read up on current Solo rigs and I'm not 100% sure yet I'll collect an entire suit of Mando parts but it might be worth checking. Ideally, you want to wet-form a holster like this to a specific shape.I’ve seen one guy on FB start, but Corellian Dry Goods on insta, who, as we all know, does the most amazing Solo holster rig, is working on it right now. Hit him up and let him know you’re interested and, if we all do it, I know he’ll make it a priority if he has interested parties.
I generally don't do buildups because it tends to become too costly due to the time I have to set aside. It can easily be 3-4X the cost of a base kit. On very rare occasions I might do them, if I can do a few "assembly line" style, but generally I don't have the time for it.Are you offering them painted and weathered? Or just doing your own one, looks awesome so far
This looks amazing my only worry in getting a kit is I'm not real confident in painting wood grips my Hellboy Samaritan was okay but not very realistic imo.
Know anyone who works in wood?
Same apparently there’s a guy working on walnut grips that will fit
I am talking with another RPFer who wants to make grips for it. I'll be sending him a set to CNC from and he'll be handling it as he sees fit.
I'll be working with Joe and offering CNC'd solid walnut grips for his kit! Here's one I did for a fellow RPF'er's (jhusel) blaster based on an older design before we had better references.
Attachments

Scarecrow Joe
Sr Member
Painting plastic to look like wood is not that difficult. This is a 3D printed blaster:
 269A4833 by Oscar Baez Soria, on Flickr
 269A4809 by Oscar Baez Soria, on Flickr
Would the walnut grips be additional cost?
Would the walnut grips be additional cost?
Would the walnut grips be additional cost?
I'll be offering the walnut grips independently (both finished and unfinished), with JOATRASH FX 's blessing. I'm not sure what the costs will be just yet. I'm also looking into doing wooden parts for other props as well, but nothing definitive yet.
Would the walnut grips be additional cost?
As justinrowan wrote, just to be super-clear- I'm not at all involved in the making or selling the walnut grips beyond giving my blessing and helping with the dimensions. (I want a set or two myself, haha.) Any and all questions about the wood grips should be directed at justinrowan!
tennantlim
Well-Known Member
This looks amazing my only worry in getting a kit is I'm not real confident in painting wood grips my Hellboy Samaritan was okay but not very realistic imo.
If I may share my technique that I used on a test kit;
First I laid on a coat of Mahogany primer by Mr Hobby. Using an old, stiff flat brush, I applied raw sienna acrylic paint (no thinning) in long strokes from end to end. After it dried, I sprayed clear coat to seal the acrylic.
Next I brushed on raw umber acrylic in the same manner and sealed it with clear coat again.
Finally, I carefully airbrushed a heavily thinned coat of black to tie everything together and to give it dimension. It was finished with a final coat of gloss clear for a lacquered wood shine.
Hope this helps.
Yes, that's pretty much how it's done, using the brush strokes to emulate wood grain! (You don't need the clear coat between acrylic layers though, since acrylic paint will not dissolve itself once dried.)If I may share my technique that I used on a test kit;
However, keep in mind that with the grips on my Mando, there is wood grain embedded in the actual model, so using the regular brush-on method will "compete" with that grain unless you follow it precisely. In my grips, washes of dark brown will help to highlight the grain.
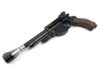
OK, so... the next step in painting the body of the Mando was spraying it with metallic lacquer to use as a "cast steel base" when weathering. I used my airbrush and Alclad, because I had extra paint loaded into my airbrush at the time and then coated it with gloss (IMPORTANT!) clear. In this case, it doesn't matter that I used a regular rattle-can clear that messes with the metallic sheen a bit as we don't need chrome reflectivity. What we do need on the other hand, is resistance to isopropyl alcohol, which will become clear soon. You can really use any old silver paint for this (Games Workshop's "Lead Belcher" is a great light gunmetal) as long as it doesn't rub off with alcohol and gloss paints are more resistant than mattes. Most normal rattle-can paints are good for this. Apologies, but I forgot to take a photo of the parts at this stage.
Once the silver is dry it's time to hit the parts with one coat of black ACRYLIC paint, gloss or matte. I use Tamiya's glass jars usually. The trick here is that you want this paint to be vulnerable to the alcohol. (You see where I'm going with this.)
After the black has dried, it's time to start with the stuff that will give you a nice chemical blued effect. I thin some Tamiya clear blue acrylic, then add just a drop (!) of a metallic gunmetal shade. Seriously... just a drop, because too much can ruin the effect. If you don't have an airbrush, you can probably use any clear blue rattle-can paint, as long as it's acrylic and not a lacquer or enamel. Again, we want it to be vulnerable to alcohol. If you can't get any clear blue that has all these properties, you might have to do weathering in a different way, by adding silver "on top" of the final coat later. In that case, you can skip the silver-spray mentioned earlier and just do the clear blue right after the black base coat.
Once the blue has dried it looks like this:

It's very hard to photograph, but you can see the blue tint at this stage, and we're not done yet!
More in a little bit.
Once the silver is dry it's time to hit the parts with one coat of black ACRYLIC paint, gloss or matte. I use Tamiya's glass jars usually. The trick here is that you want this paint to be vulnerable to the alcohol. (You see where I'm going with this.)
After the black has dried, it's time to start with the stuff that will give you a nice chemical blued effect. I thin some Tamiya clear blue acrylic, then add just a drop (!) of a metallic gunmetal shade. Seriously... just a drop, because too much can ruin the effect. If you don't have an airbrush, you can probably use any clear blue rattle-can paint, as long as it's acrylic and not a lacquer or enamel. Again, we want it to be vulnerable to alcohol. If you can't get any clear blue that has all these properties, you might have to do weathering in a different way, by adding silver "on top" of the final coat later. In that case, you can skip the silver-spray mentioned earlier and just do the clear blue right after the black base coat.
Once the blue has dried it looks like this:
It's very hard to photograph, but you can see the blue tint at this stage, and we're not done yet!
More in a little bit.
After-lunch update.
I hit all the brass parts and muzzle with Molotow chrome using my airbrush. Molotow is great for "bright" chrome (Alclad is generally darker) but very tricky to apply until you get the hang of it. Basically, you use VERY low air pressure and apply one medium-thick coat. You have ONE shot at it basically and if you mess up, it's time to strip and redo. Put it on too thin and it'll "frost" over and not give you the mirror finish. Put it on too thick and it'll take weeks to dry. (Either way you need to give it at least a day to dry. I always spray a scrap piece that I can press with my finger to test- if your fingerprint leave a mark, it's not cured yet.) Molotow is also fantastic for applying "candy" color to.
Here's the muzzle:

And the brass parts, covered with Alclad "candy gold" paint.

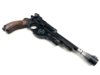
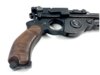
Some progress on the grips. These (still w-i-p) were done with (more or less) the method Tennantlim described above. I moved the brush in more of a wavy pattern to kinda follow the grain and added a wash of GW "Agrax Earthshade" ink and also their "Wyldwood contrast". (Yes, I do love Warhammer and their paints!) At this stage they look a bit like grips that are in the final stage of sanding, before oil staining.


Now for some weathering. I dip a Q-tip in diluted alcohol (isopropyl) and rub it along edges of the body panels. This takes off the blue and black coats, exposing the silver underneath. You can experiment in different ways of scuffing the surface using pieces of plastic, guitar picks, carefully scratching with a scalpel and so on to beat up the surface. You can take it as far as you want, to get light or heavy weathering.


This is all pretty basic stuff. Once the body panels are all weathered it's time to add some graphite powder, where the addition of the clear blue over black starts to pay off...
I hit all the brass parts and muzzle with Molotow chrome using my airbrush. Molotow is great for "bright" chrome (Alclad is generally darker) but very tricky to apply until you get the hang of it. Basically, you use VERY low air pressure and apply one medium-thick coat. You have ONE shot at it basically and if you mess up, it's time to strip and redo. Put it on too thin and it'll "frost" over and not give you the mirror finish. Put it on too thick and it'll take weeks to dry. (Either way you need to give it at least a day to dry. I always spray a scrap piece that I can press with my finger to test- if your fingerprint leave a mark, it's not cured yet.) Molotow is also fantastic for applying "candy" color to.
Here's the muzzle:
And the brass parts, covered with Alclad "candy gold" paint.
Some progress on the grips. These (still w-i-p) were done with (more or less) the method Tennantlim described above. I moved the brush in more of a wavy pattern to kinda follow the grain and added a wash of GW "Agrax Earthshade" ink and also their "Wyldwood contrast". (Yes, I do love Warhammer and their paints!) At this stage they look a bit like grips that are in the final stage of sanding, before oil staining.
Now for some weathering. I dip a Q-tip in diluted alcohol (isopropyl) and rub it along edges of the body panels. This takes off the blue and black coats, exposing the silver underneath. You can experiment in different ways of scuffing the surface using pieces of plastic, guitar picks, carefully scratching with a scalpel and so on to beat up the surface. You can take it as far as you want, to get light or heavy weathering.
This is all pretty basic stuff. Once the body panels are all weathered it's time to add some graphite powder, where the addition of the clear blue over black starts to pay off...
Last edited:
Thanks AirMech74!
Here' s most of the main body after weathering all the edges. Honestly, we could leave it at this level and it would look pretty OK. It's not far off from how the blaster looks a lot of the time (though it's even more scuffed in some episodes).

But let's take it up a notch or two.
After this stage, I scuffed up the surface with some fine steel wool, using straight movements with a very light touch. I also made sure that the scuffing was not uniform, leaving some patches more shiny and others taking off the blue topcoat, going down to the black underneath. Like so:

Next, the parts were covered in a rubbing of graphite powder, using a cotton swab, then the parts were washed in water and diluted (hand) dishwashing liquid. The graphite particles embed themselves into the paint, so they don't all wash off easily. (Sorry, no photo of this stage.) Inpsecting the blaster, I wasn't happy with the overall look- it was too "gunmetal" and uniform, so I decided to add more blue, and also some brown.
Going over all the parts carefully, I sprayed clear blue and clear orange over them, typing to keep a consistent method. This will help represent, in very subtle tones, the "oil slick" shifting you see in old blued weapons.
This is what that stage looks like:


Time for some more scuffing with steel wool and a little 1000 grit wetsanding paper, again with a very light hand! This builds up a feeling of "wear over time" instead of it just looking like you took a scrubbing to it. And after that, another rub-down with graphite, followed by a thorough washing wish dish soap again. (This time I used kitchen towel paper, the non-lint kind like they use at gas stations or workshops, because it's ever-so-slightly abrasive.)
That leaves us here. Not too far from what I was aiming for, but still a little too much "gunmetal".


Here's a real vintage blued S&W revolver piece to compare:

At the time of writing, I'm not 100% decided yet on what I'll do next. One option is to do a weathering rub using black oil paint, which will tone down the shine and darken it a little, but most likely I'll do another spray coating, with Tamiya clear "smoke" with a drop or two of black added, to darken the overall look.
Note: Those of you doing a simpler rattle-can-only variant of all this can just ignore all thes extra stages... it's overkill, but fun to experiment with.
The rattle-can blueing method would simply be:
Here' s most of the main body after weathering all the edges. Honestly, we could leave it at this level and it would look pretty OK. It's not far off from how the blaster looks a lot of the time (though it's even more scuffed in some episodes).
But let's take it up a notch or two.
After this stage, I scuffed up the surface with some fine steel wool, using straight movements with a very light touch. I also made sure that the scuffing was not uniform, leaving some patches more shiny and others taking off the blue topcoat, going down to the black underneath. Like so:
Next, the parts were covered in a rubbing of graphite powder, using a cotton swab, then the parts were washed in water and diluted (hand) dishwashing liquid. The graphite particles embed themselves into the paint, so they don't all wash off easily. (Sorry, no photo of this stage.) Inpsecting the blaster, I wasn't happy with the overall look- it was too "gunmetal" and uniform, so I decided to add more blue, and also some brown.
Going over all the parts carefully, I sprayed clear blue and clear orange over them, typing to keep a consistent method. This will help represent, in very subtle tones, the "oil slick" shifting you see in old blued weapons.
This is what that stage looks like:
Time for some more scuffing with steel wool and a little 1000 grit wetsanding paper, again with a very light hand! This builds up a feeling of "wear over time" instead of it just looking like you took a scrubbing to it. And after that, another rub-down with graphite, followed by a thorough washing wish dish soap again. (This time I used kitchen towel paper, the non-lint kind like they use at gas stations or workshops, because it's ever-so-slightly abrasive.)
That leaves us here. Not too far from what I was aiming for, but still a little too much "gunmetal".
Here's a real vintage blued S&W revolver piece to compare:
At the time of writing, I'm not 100% decided yet on what I'll do next. One option is to do a weathering rub using black oil paint, which will tone down the shine and darken it a little, but most likely I'll do another spray coating, with Tamiya clear "smoke" with a drop or two of black added, to darken the overall look.
Note: Those of you doing a simpler rattle-can-only variant of all this can just ignore all thes extra stages... it's overkill, but fun to experiment with.
The rattle-can blueing method would simply be:
- black base
- dry-brush silver OR use a Molotow pen on edges
- spray clear blue
- scuff so that the black undercoat shines through in some spots
- coat with graphite
- wash parts with water+dish soap
Not a huge update today, but here goes.
Hit some parts with a black wash (yes, GW paints again... Nuln Oil).

Gave the muzzle some paint and weathering. First I stuck it on the end of a drill at very low speed, then very, very very, lightly touched it will a soft sanding pad to make it look "machined". Coated the front with a 50-50 mix of black and Tamiya smoke- the idea here was to make it slightly translucent. It's not done yet... still need more weathering and will probably hit it with some Alclad sepia to add some heat discoloration.

The grips were coated with satin varnish, then sprayed with just a little bit of the same mixture as the muzzle, to emulate dirt and grime getting worn into the wood from lots of handling.

The body pieces were sprayed with a slightly darkened Tamiya smoke. (I added a little black and clear orange to it.) Note that other brands, like Vallejo's "smoke", will NOT work, because they are not transparent! An alternative to Tamiya smoke is to mix your own with a few drops of black paint in some "acrylic medium". (I would add a drop or two of orange and maybe brown to give it a slight brownish tone.)

It's hard to photograph under workshop lighting with a phone camera- the translucent nature of the multi-layer paint doesn't really show, but the effect really works in person. I suspect it will show up a little better once I hit it with a gloss clear, before final weathering and scuffing.

I've also ordered a couple Poe Dameron Nerf blasters so that I can gut the electronics.
Hit some parts with a black wash (yes, GW paints again... Nuln Oil).
Gave the muzzle some paint and weathering. First I stuck it on the end of a drill at very low speed, then very, very very, lightly touched it will a soft sanding pad to make it look "machined". Coated the front with a 50-50 mix of black and Tamiya smoke- the idea here was to make it slightly translucent. It's not done yet... still need more weathering and will probably hit it with some Alclad sepia to add some heat discoloration.
The grips were coated with satin varnish, then sprayed with just a little bit of the same mixture as the muzzle, to emulate dirt and grime getting worn into the wood from lots of handling.
The body pieces were sprayed with a slightly darkened Tamiya smoke. (I added a little black and clear orange to it.) Note that other brands, like Vallejo's "smoke", will NOT work, because they are not transparent! An alternative to Tamiya smoke is to mix your own with a few drops of black paint in some "acrylic medium". (I would add a drop or two of orange and maybe brown to give it a slight brownish tone.)
It's hard to photograph under workshop lighting with a phone camera- the translucent nature of the multi-layer paint doesn't really show, but the effect really works in person. I suspect it will show up a little better once I hit it with a gloss clear, before final weathering and scuffing.
I've also ordered a couple Poe Dameron Nerf blasters so that I can gut the electronics.
The latest progress.
Before going to town on the Mando brass parts, I did a weathering test on a Batman speargun tip, cause I didn't want to have to repaint the Mando brass parts if I messed up.

Here's another test I did, just out of curiosity. Started thinking that maybe I could cut down a step or two in the future, namely dulling down the graphite shine. So, I mixed in some other pigments with the graphite and rubber those directly onto matte black base. On the left is just a black base and other right is the graphite mixture. Not too shabby. With the right blend, it could look great. (The "rough" patches are a previous test-coat of Molotow, where I touched the surface before it was dry. Note how it looks like heavy corrosion!)

Onto the blaster. Sprayed all the parts, including the muzzle, with Alclad Aqua Gloss clear as a final protective coating. It's very thin, so you need to be careful, but it dries fast too and preserves the metallic look. I'm happy with this finish. The gloss coat brought back some of the subtle blue-brown tonal variation. A light scuffing and maybe an oil-wash and the main parts will be done.

Added a metal-burn sepia tone to the muzzle (before the Aqua Gloss).

Checking fit and look of the brass parts. They need just a tad more weathering (to match the hook above). Note that in the lower part of the image are a couple antique (over 100 years old) blued steel pieces. It's not too far off, and the Mando is supposed to be darker and look like it has been kept better anyway.


Time to start final assembly!
Before going to town on the Mando brass parts, I did a weathering test on a Batman speargun tip, cause I didn't want to have to repaint the Mando brass parts if I messed up.
Here's another test I did, just out of curiosity. Started thinking that maybe I could cut down a step or two in the future, namely dulling down the graphite shine. So, I mixed in some other pigments with the graphite and rubber those directly onto matte black base. On the left is just a black base and other right is the graphite mixture. Not too shabby. With the right blend, it could look great. (The "rough" patches are a previous test-coat of Molotow, where I touched the surface before it was dry. Note how it looks like heavy corrosion!)
Onto the blaster. Sprayed all the parts, including the muzzle, with Alclad Aqua Gloss clear as a final protective coating. It's very thin, so you need to be careful, but it dries fast too and preserves the metallic look. I'm happy with this finish. The gloss coat brought back some of the subtle blue-brown tonal variation. A light scuffing and maybe an oil-wash and the main parts will be done.
Added a metal-burn sepia tone to the muzzle (before the Aqua Gloss).
Checking fit and look of the brass parts. They need just a tad more weathering (to match the hook above). Note that in the lower part of the image are a couple antique (over 100 years old) blued steel pieces. It's not too far off, and the Mando is supposed to be darker and look like it has been kept better anyway.
Time to start final assembly!
tennantlim
Well-Known Member
Your updates are the highlights of my days, and perhaps for many others too. Phenomenal work.
Similar threads
- Replies
- 1
- Views
- 555
- Replies
- 2
- Views
- 522
- Replies
- 33
- Views
- 2,024
- Replies
- 12
- Views
- 808
- Replies
- 0
- Views
- 227