The Greatest American Hero Suit

bishopdonmiguel

Active Member
For people of a certain age, the March 18th, 1981, premiere of The Greatest American Hero easily won our hearts and would be the topic of conversation among friends during the subsequent school day. Especially during the early episodes, the show was a great mix of science fiction, action, drama and comedy. The writing would later get lazy & sometimes outright ridiculous but the actors performances were always enjoyable. For this old man who’s still just a kid at heart, it has been a long sought dream to wear “The Suit.”

An aside, I stopped contributing here after some of my posts were unilaterally removed without explanation or opportunity to correct whatever sin(s) were committed. I understand the need to enforce rules, even if arbitrary, but expending effort that simply goes into the trash without warning isn’t something I wan’t to repeat. Fool me once kind of thing. After trying to register with a GAH forum and receiving no activation email, I reconsidered and decided I’d try again because I hope there are others like me that have a fondness for this show. Sharing the love is, after all, why we post.

I will be authoring a rough how-to for any interested in trying their hand at making their own Suit. Full disclosure, I’m a prop builder not a seamsperson. While I’m proud of my effort, mistakes were made and I would do things differently should I ever create a Suit v2.0. Accordingly, there will be no detailed sewing instructions, just an overview of the materials I used and the steps I took.

I hope this thread will be helpful to others, or at the very least interesting.

To start, let’s see some shots of the goalposts…

R01.jpg

R03.jpg

R02.jpg
 
There is at least one thread somewhere on this forum discussing design aspects of “The Suit.” The information included there was quite helpful. In the end, I made decisions on what I felt looked best vs. sticking to those estimates.

First items to fabricate: (1) shirt, (1) pant and (2) spats.

There is a post on William Katt’s GAH FB page featuring he and his stuntman Dennis “Danger” Madalone tugging at the stunt shirt. Appears to be thickish with some stretch. The closest material that I could find at Joann Fabrics was this knit solid ponte…

IMG-7611.jpg


I ordered 4.25 yards. I figured this would allow for an “oops” or two.

Mistakes Made: I think this choice ended up being too bright red and too stiff. I would look for something a bit darker in tone and slightly softer with a tad more stretch, probably a cotton based fabric instead of polyester.
 
To create the shirt, I need a pattern. But what does one do when there is none? Cannibalize something cheap.

I found a $1 athletic shirt at Walmart that had the basic fit I wanted. Using a seam ripper, I deconstructed the shirt and laid the pieces flat on 8-mil contractor's paper I acquired from the hardware store. I like this paper because it’s heavy, easy to hold and cut for someone my age.

I traced the pieces using a Sharpie, leaving some extra material at the bottom of the torso halves as the shirt appears long from reference photos.

Cut the patterns from the contractor’s paper.

GAH01.jpg


Mistakes Made: The neck hole in the sacrificial shirt was quite large and I failed to reduce it enough. This created a problem later when adding a neck tight collar. Also, keep in mind that the hole should be round not elongated. I’d suggest measuring your neck. Depending on your head and the stretch of the material, your noggin’ may not fit through so an overlap closure may be necessary. One does appear present on the screen used Suit but this was a bit outside my current skill set.
 
Arrange the patterns on the material and trace for cutting. It is helpful to mark the pieces in some way to identify them. Also, be mindful to consider selvage, grain and the right-side of your chosen fabric. If the fabric may shrink, pre-washing may be desirable. Fortunately, the material I choose was easy to work with and none of these factors were an issue.

Cut the fabric with a sharp pair of scissors.

GAH03.jpg

GAH04.jpg


Mistakes Made: I used a water based pen to mark the fabric. Unfortunately, it did not wash out as I had assumed. There are fabric pens made specifically for this purpose and I regret not using one. There is also tailor’s chalk but it can be difficult to use with stretchy fabric as it is very dense. Sidewalk chalk can be helpful but you will give up crisp cut lines.
 
Time to sew the shirt together with some matching thread. Because this is a stretch fabric, I opted for flexible thread. That might not have been the best idea but it’s what I did.

I started with the torso pieces, remembering to sew inside out. I sewed the shoulders and sides using a long straight stitch and 3/8” seam allowance. Later, I’ll mark points for a better fit and sew the final seam with a final shorter stitch.

Next, I attached the shoulders. This is more difficult than it seems. I had to watch several video tutorials with some trial-and-error to get the hang of it. I gave that seam ripper some good use during this process. I expect I’ll be using it a lot more before I’m done.

Before I sewed up the arms, I gave the shirt a trial fit. Not too bad, but I will definitely need to tighten the overall fit and remove the excess length after the pants are done.

GAH07.jpg


Mistakes Made: The flexible thread breaks easily, both in the machine and if stretched too much while wearing. Not sure what can be done about that. I should have tried to test the fit before sewing. I think tailoring the fit could be difficult (i.e. no good way to close up the armpit area).
 
You may want to check your sewing machine manual. Many machines have special stitches specifically for "stretch" fabrics. If there are none called out by your machine you can use a zig-zag stitch to good effect. I have also used stitches which look like a lightning bolt. That stitch overlap is in the top-to-bottom direction (found mostly on embroidery machines where fabric dogs move the fabric up and down), just like the zig-zag overlap is side-to-side (where only the needle moves). I have used "elastic" and regular thread with both types of stitches. I try to use regular thread as much as possible. It is easier to find the correct color match and the thread seems to last longer. I do not know if this is as much about the strength of the threads, as how they react to laundering. I am following your work. I was a big fan in the day and this has motivated me to look for my old set of DVDs.
 
Great show. Loved Bill Maxwell. Great project. Keep going.
Thanks for the encouragement! The project got me thinking about how difficult it is for me to find new fun/lighthearted/enjoyable movies & shows. I know I’m just driven by nostalgia for the era and I swore I’d never turn into the kind of old fart that says “back in my day…,” yet here we are.

Love the damn song lol
I share your taste in music! At least this one :)

You may want to check your sewing machine manual. Many machines have special stitches specifically for "stretch" fabrics. If there are none called out by your machine you can use a zig-zag stitch to good effect. I have also used stitches which look like a lightning bolt. That stitch overlap is in the top-to-bottom direction (found mostly on embroidery machines where fabric dogs move the fabric up and down), just like the zig-zag overlap is side-to-side (where only the needle moves). I have used "elastic" and regular thread with both types of stitches. I try to use regular thread as much as possible. It is easier to find the correct color match and the thread seems to last longer. I do not know if this is as much about the strength of the threads, as how they react to laundering. I am following your work. I was a big fan in the day and this has motivated me to look for my old set of DVDs.
Thank you for kind suggestions. I have used a sewing machine previously for very basic things but never for a full costume. I’m a sewing knob and the different stitch settings look like an alien language for which I only understand one or two symbols. But you motivated me to actually look at the manual, something our everyman hero Ralph couldn’t do, and wow!, there is a setting for a straight stretch stitch! Definitely be using that in the future. Thanks!
 
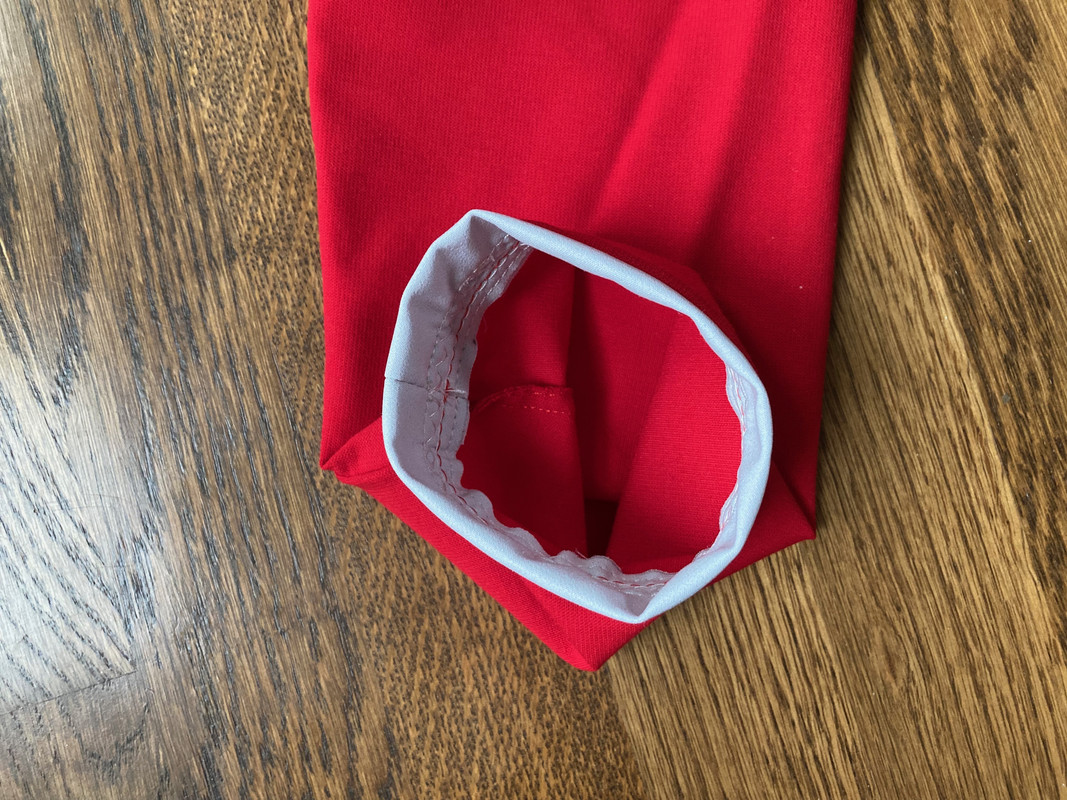
After getting the arms closed up and the shirt given a more tailored fit, I added the decorative grey cuffs.

Let’s address the grey trim. Clearly, there was more than one shirt. In the pilot episode, the grey trim seems lighter than the belt and the collar is also grey. The difference in color is probably due more to the varying reflective nature of the fabrics in camera under bright lighting vs. the color seen by the eye. Greys will appear white while whites will completely wash out and overexpose. In episode 2, the grey collar is present in some scenes and absent in others, eventually disappearing entirely. At some future point, the grey trim gets darker, more closely matched to the belt. So we have options.

As there is no right or wrong here, I’m opting for the lighter trim as it is what this old man remembers from the promotional shots and earliest episodes. I’m also eliminating the grey for a red collar, probably for the same reason the production did so. The grey collar stands out against the red & black cape and just doesn’t look right.

I wanted to use a fabric similar to the shirt but in light grey. Unfortunately, nothing like that was in stock so I opted for some athleisure fabric that had the contrast I was looking for.

The cuff is simply the fabric folded in half, stitched together and then attached to the inside end of the sleeve. Tutorial videos were again helpful here and I created cuffs that extended about 1/2”. I will add the lower waist trim after the pants are finished and I determine the final length of the shirt.

IMG-8879.jpg

GAH06a.jpg

GAH06b.jpg

GAH06c.jpg

GAH06.jpg


Mistakes Made: The althleisure fabric doesn’t have much stretch after it is doubled. It does fit over the wrist but I would have preferred something with a bit more stretch that could have resulted in a slightly tighter fit.
 
According to the video tutorials, the collar should attach in the same manner as the cuffs. Unfortunately as previously stated, I cut the neck hole too large so when I tried attaching the collar, it had a very loose fit. I tried multiple collar sizes but nothing worked and I considered giving up. Eventually, I resorted to a complicated curved collar that I attached in two pieces and manually sewed together at the shoulders. Kludge.

Very frustrating and not my proudest moment. But I got through it and it doesn’t look terrible. On a positive note, I did learn something new and it will be mostly hidden by the cape anyway.

For my first effort fabricating a shirt, I’m not completely disappointed in myself.

GAH06d.jpg


Mistakes Made: Don’t cut the neck hole too large!
 
I followed the same process for the pants as the shirt. I sacrificed an existing pair of leggings to use as a template, cut the patterns and fabric, then sewed together.

I put a high elastic waistline in the pants, over the hips near the belly button, to help hold them in place better. I’m hoping the belt will cover anything that might show through the shirt layer.

I also added a rear drawstring to the waistband as a backup plan and elastic foot stirrups to keep the pants from riding up the leg. It is important not to have slack or tension at the foot when marking.

GAH09.jpg

GAH09a.jpg

GAH09b.jpg


Mistakes Made: I added some allowance to the pants pattern just in case the material needed extra room. This was a mistake and required a lot of adjusting to get a reasonably good fit. As a result, the crotch fell a bit. As someone with an already shortish leg-to-torso ratio, makes my legs look even more weird.
 
The cape. From the promotional photos, this appears to be a simple semicircle with a neck hole so that’s how I will proceed.

I love me some maths. The diameter of the cape semicircle looks to be slightly longer than the arm span, so in my case that’s about 74”. That yields a radius of 37”. My neck is 16” in circumference so the radius of that circle is 16” / Pi / 2 = 2-9/16”… let’s call it 2.5”. With figures in hand, time to design the pattern.

I taped two sections of the contractor’s paper together to get the size I needed. I could have used a quarter circle but wanted to visualize the piece with a full size pattern.

Using a yardstick, screw bit, string and a Sharpie, I drew the semicircle from the midpoint of the 74” line. I added the neck hole near the edge of the midpoint line but provided an extra inch of material in case I needed it.

With my lines drawn, double check measurements and cut.

R05.jpg

GAH10.jpg

GAH11.jpg

GAH12.jpg


Mistakes Made: I didn’t need the extra 1” at the straight edge and ended up cutting that off. The next time I need a cape like this, leaving a 5/8” - 3/4” edge should be plenty.
 
With pattern in-hand, cutting the material is simple… provided you have plenty of floorspace!

I chose a knit fabric with some visual interest called crepe. It’s kinda fuzzy on one side in a subdued way and really diffuses light so it appears extra dark. Using a piece of street chalk to mark the edges, I cut the fabric.

The construction of the cape is straightforward. I added something called “bias tape” to the edges. I had not heard of this product before. This is something I quite enjoy about doing projects like this, discovering new things. It is offered in a wide variety of colors, although the material is a bit stiffer than I had hoped for.

After adding double snaps, it’s time for a trial fit.
IMG-8876.jpg

GAH13.jpg

GAH14.jpg

GAH15.jpg

GAH16.jpg

GAH17.jpg


Mistakes Made: The snaps I used don’t hold very tightly. I should have added a hook-and-eye to help hold the cape closed. This is something that should be easily fixed when some spare time comes my way.
 
Great work thus far!! Just remember 2 things one your project. 1- Nothing ever goes according to plan. 2- Mistakes will happen and it's the takeaways from the mistakes that set the path to success! Just keep at it and accept mistakes as learning curves. I recommend keeping notes on things that worked and did not. Will always come in handy for those wishing to take on a project like this. Believe it, or not YOU CAN MAKE IT HAPPEN!
 
Great work thus far!! Just remember 2 things one your project. 1- Nothing ever goes according to plan. 2- Mistakes will happen and it's the takeaways from the mistakes that set the path to success! Just keep at it and accept mistakes as learning curves. I recommend keeping notes on things that worked and did not. Will always come in handy for those wishing to take on a project like this. Believe it, or not YOU CAN MAKE IT HAPPEN!
I really appreciate the encouragement. Seeing mistakes as learning opportunities is exactly the right mindset with projects like these. Great advice!
 
Time for some shoes!

But which shoes? The production seems to have used several different pairs. They may have been painted, or at the very least treated with a matte coating to dull the shine. But I’d rather get something off the shelf so I am eliminating those possibilities as options.

You might be surprised to learn that there are shockingly few bright red oxfords available for purchase. There are exactly two options on the big internet warehouse I use… glossy patent leather and suede. Both could fill the role, and while I’m partial to the suede because it has no shine and might match the fabric better, my wife tells me that she would have zero complaints if I were to wear the glossy red ones out for an evening dinner some time. So this decision is an easy one. Click-click. Thanks to the magic of the internet, they arrive within 2 days.

I have two things to say about these shoes. First, damn!!! Second, they are surprisingly comfortable and seem true-to-size. Good choice.

GAHShoes.jpg


Mistakes Made: Not buying these shoes sooner.
 
Shirt… check. Pants… check. Cape… check. Shoes… check.

Next up… spats. Dang it!

The moment I have been dreading has arrived and I really have no idea what to do. I thought the spats might be “faux” and the piping simply sewed onto the legs of the costume. I say this because of the promotional photo of Ralph holding the suit... the spats just hang there looking well connected. While I had some ideas on how I might do that, it seemed way beyond my abilities at this point. Looking closer at the reference photos, maybe the little hidden zippers on the inside leg do something. No idea what that might be, but something.

R04.jpg


A choice must be made now so... separate spats with no zipper.

To accomplish this, I will utilize the magical mystery product called “duct tape.” No one knows what planet it originated from, but it works for everything.

I’m most of you know this process as duct tape casting. It’s new to me but sounds fun. Let’s do it!

I applied a base layer of Saran Wrap to prevent the duct tape from sticking to important things and reinforced it a bit with packing tape. Using 6” strips of duct tape, I covered my lower leg and shoe top. I couldn’t stand while doing this so I sat down but held my lower leg and ankle similar to that of a standing posture. I took care not to wrap long strips of tape around the leg. I wanted to follow the curvatures and the shorter lengths seem do that better.

When finished, I drew some curved lines around the upper calf and the front/back of the shoes. These will be the edges of the material with the grey piping. I also added straight lines from top-to-bottom on the front, back and sides. These will be the seam lines.

I carefully cut the front seam line with scissors, taking care not to cut the underlying clothing or shoes. After removing the template, I numbered the quadrant pieces counter-clockwise so I will know what order to reassemble. I cut the curved lines and remaining seam lines.

I pressed each template flat on contractor’s paper and traced. After that, I added a 3/8” seam allowance and cut. I almost forget to number the templates on the right side. This is important because I will be using the same templates to create a mirror fabric set for the other foot.

For my first duct tape adventure, not terrible.
GAH18.jpg

GAH19.jpg

GAH20.jpg

GAH21.jpg

GAH22.jpg

GAH23.jpg


Mistakes Made: The seam allowance should have been smaller or perhaps none at all since this is stretch material. The overall fit was good but I would prefer tighter.
 
Last edited:

Your message may be considered spam for the following reasons:

If you wish to reply despite these issues, check the box below before replying.
Be aware that malicious compliance may result in more severe penalties.
Back
Top