DizzyStrmtroopr
Well-Known Member
ive been working on this quite awhile on and off.
my goal is to eventually do runs of these to provide for the detachments. the base has been comprised of my modified bits and pieces of spacecowboy's tk, fierfek's atst driver, and ep3 clone helmet pepakura files so i have a base to work with and then i merge them all and build the bondo on top so it becomes a custom sculpt. the peps just serve as a skeleton persay.
heres the reference im using

spacecowboy dome printed at default scale, same size as a real bucket!

the cheek inset, you can see how ive modified it from a clone to the more sharp NC style

i resin and fiberglass the dome for strength while i take the flair from the atst driver, turn it inside out, and glue it in a way that i get the angle i want in the back and the sides

this deforms the rear quarters, so i make a couple relief cuts and glue in filler strips so the flair stays circular all around
left half has the relief, you can see how the right half is still oval/conal before the shimming

just putting on my kickaround helmet for an general idea of the correct flair angles.
after i build the face ill have to make a slight expansion to the back, but not too much as its realistic and you wouldnt be able to move your head

going on now are the cheeks and whole reworked face. i wait til the face is completed to cut the flair at the right angle, the back is good, but the sides will be cut to go up higher, so keep that in mind.
here you can see the clone face cut, angled, widened and glassed. this portion serves as "where the visor goes" as well as cheek support

the white triangles will keep the inner helmet correct as well as block resin when i cast it

getting the right angle and curvature of the nose bridge out of the tk

the tk neck ring cut up and glued in to seal the neck for casting and provide the look from the reference

and tk tubes

- - - Updated - - -
i added in these custom tube shim things

the lip at the correct angle, the frown will be cut out and teeth put in later, this is just for support for now

the nose bridge will be built up with bondo to get the right look, and the flair cut at the right height later, but heres some preliminary sketching to make sure im on the right track

the clone tube is modified too, its printed at full size then i squish it to an oval, widen the gap, and glass it to the cheek

the other side. the inner cone shape was flat, so you can see how its now a custom shape

the camera makes things look wider than they really are, its skinnier in person. but heres a comparison with my AP.

a few months of taking a break on it go by and here it is as of today
cut the flair the the correct angle, all dimensions are now correct

i cut the face off for casting purposes and there wont be a bridge above the visor as when the resin area is cut, there shall be a small gap between the visor and forehead for ventilation/anti-fogging

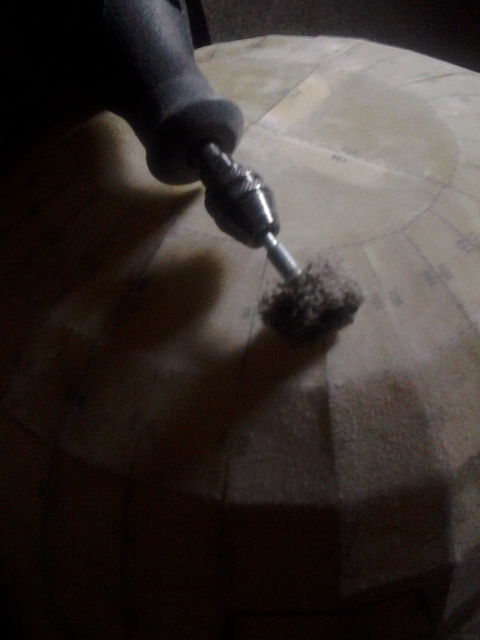
i rough up the resin coating with this dremel bit so the bondo sticks
first coat of bondo, while it cures i work on the face

my goal is to eventually do runs of these to provide for the detachments. the base has been comprised of my modified bits and pieces of spacecowboy's tk, fierfek's atst driver, and ep3 clone helmet pepakura files so i have a base to work with and then i merge them all and build the bondo on top so it becomes a custom sculpt. the peps just serve as a skeleton persay.
heres the reference im using
spacecowboy dome printed at default scale, same size as a real bucket!
the cheek inset, you can see how ive modified it from a clone to the more sharp NC style
i resin and fiberglass the dome for strength while i take the flair from the atst driver, turn it inside out, and glue it in a way that i get the angle i want in the back and the sides
this deforms the rear quarters, so i make a couple relief cuts and glue in filler strips so the flair stays circular all around
left half has the relief, you can see how the right half is still oval/conal before the shimming
just putting on my kickaround helmet for an general idea of the correct flair angles.
after i build the face ill have to make a slight expansion to the back, but not too much as its realistic and you wouldnt be able to move your head
going on now are the cheeks and whole reworked face. i wait til the face is completed to cut the flair at the right angle, the back is good, but the sides will be cut to go up higher, so keep that in mind.
here you can see the clone face cut, angled, widened and glassed. this portion serves as "where the visor goes" as well as cheek support
the white triangles will keep the inner helmet correct as well as block resin when i cast it
getting the right angle and curvature of the nose bridge out of the tk
the tk neck ring cut up and glued in to seal the neck for casting and provide the look from the reference
and tk tubes
- - - Updated - - -
i added in these custom tube shim things
the lip at the correct angle, the frown will be cut out and teeth put in later, this is just for support for now
the nose bridge will be built up with bondo to get the right look, and the flair cut at the right height later, but heres some preliminary sketching to make sure im on the right track
the clone tube is modified too, its printed at full size then i squish it to an oval, widen the gap, and glass it to the cheek
the other side. the inner cone shape was flat, so you can see how its now a custom shape
the camera makes things look wider than they really are, its skinnier in person. but heres a comparison with my AP.
a few months of taking a break on it go by and here it is as of today
cut the flair the the correct angle, all dimensions are now correct
i cut the face off for casting purposes and there wont be a bridge above the visor as when the resin area is cut, there shall be a small gap between the visor and forehead for ventilation/anti-fogging
i rough up the resin coating with this dremel bit so the bondo sticks
first coat of bondo, while it cures i work on the face

 then again he put a LOT of work into his, so i don't blame him for being the first to get it approved


