The Force Awakens Stormtrooper Armor Build [WIP]

Hey BarnOwlBy! Great to see someone else starting down this path.

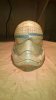
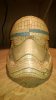
My number one caution to you as someone who hasn't used Pepakura before is: you may want to find some random pep piece to build that isn't a helmet on your first shot! Seriously, helmets have incredible detail and are arguably the easiest peps to identify mistakes in. I might find a gun or some other pep piece to build before the helmet, just because you will learn a LOT in the process of building your first piece. You don't have to go through the process of actually hardening it as well, but I would at least get a few hours of cutting/scoring/gluing in before setting the helmet in your sights.

My thread on the 405th of my MJOLNIR Mark VI (Master Chief) build would be a decent place to start for advice on pepakura basics!

As for the comment about eBay, I think the guy was saying that Pepakura files regularly find their way onto eBay. I can't say I have looked for hand made helmets on there, but I know I wouldn't sell anything I made on eBay -- not worth it!

Best of luck with your build!

Thanks for your advice! I'll go and have a look for some more simple pep that I can have a go at. Best of luck with the rest of your build!
 
Your helmet/project is awesome! :thumbsup
You also inspired me to build my own SW 7 Stormtrooper Armor but i have a dumb question about the helmet-Is the 28,1 cm scale a good choice or should i re-scale it?
The reason why i´m asking is, because you already finished this cool helmet and you can estimate the size better than me...

I wish you good luck with your project!

Hi Appo,

The scale of your helmet is going to depend on ... well, you! Here's the image that I used to figure out the scale of the helmet:

3JQi4MY.jpg


In this case, I didn't actually scale the helmet at all -- according to my calculations, it was already the right size. To figure out what the scale should be, I tried the method where you use a straight-on picture of the suit you want to build, measure it, and perform some math. Measure the figure from the printout, and the specific piece (helmet). Take that ratio and your own height, and solve for the height of the piece.

Sorry to say, there isn't really any perfect way to scale the pieces. Even using this method, there's no guarantee that it will fit perfectly. You just have to guess!

All files for the build that I am doing, including the SW7 version of the helmet, can be found at the link in this post!
 
Hi Appo,

The scale of your helmet is going to depend on ... well, you! Here's the image that I used to figure out the scale of the helmet:

http://i.imgur.com/3JQi4MY.jpg

In this case, I didn't actually scale the helmet at all -- according to my calculations, it was already the right size. To figure out what the scale should be, I tried the method where you use a straight-on picture of the suit you want to build, measure it, and perform some math. Measure the figure from the printout, and the specific piece (helmet). Take that ratio and your own height, and solve for the height of the piece.

Sorry to say, there isn't really any perfect way to scale the pieces. Even using this method, there's no guarantee that it will fit perfectly. You just have to guess!

All files for the build that I am doing, including the SW7 version of the helmet, can be found at the link in this post!


Ok thanks-Helped me a lot:thumbsup Now i´m working on my "perfect" scale
 
Well, I have a small update. I'll start by saying that things have been moving slower recently, which is kind of a bummer. I need to start hardening these pieces to keep my motivation high. All of this pepping is getting boring.


Anyways, I have been trying to figure out how to add the utility belt "things" to the ab plate. To clarify -- I'm not talking about the parts that attach to the rubber belt, I'm talking about the circle of 7 boxes above the belt. These pieces are represented in the files as separate from the ab plate, even though every completed version of this armor I have seen has them actually attached. This is just going to be a freehand situation, which usually makes for slow going.


I've made up the first three boxes that will be attached, and roughed-in where they will go. One thing is certain: these need to be built into the actual ab plate, not hardened separately and attached to the outside (some details on the Master Chief suit taught me that). As usual, I'm deferring the majority of the cleanup work to the bondo stage, but here's my strategy:


I've made up the pieces using the same scale factor as the ab plate, which has worked pretty well so far. I'm in the process of placing and drawing super rough outlines of where the pieces will go, and then I'll use a few tiny amounts of glue to tack the pieces into place. After that, I'll remove the inner paneling from the ab plate so that I can incorporate the utility belt things into the actual ab plate instead of keeping them as separate pieces. And finally, I guess I'll just keep my fingers crossed that the whole thing will still be flexible enough to bend and allow a human into it! I'm sure some weirdo maneuvering and/or part modification will be required to accommodate that.


Whatever, all in good time.


Js0fcJC.jpg

(I know the sharpie lines aren't straight, don't worry. They aren't attached yet.)


jbt4Qb1.jpg
 
I've been following this thread with great interest, and I'm wondering if you have made any more progress on your helmet yet? I just finished building my pep with the file you used (I'm probably going to rebuild it though, because I am not happy with how it turned out) and I'm curious to see how the hardening/finishing process goes for you.
keep up the good work,
Rey5
 
Great work Finch, I'm glad i'm not the only one who's undergoing certain difficulty when it comes to pepping the parts. I had mistakenly pepped the outer chest thinking it'd be a easy just to put over the back/underlayer . But it's too much of an angle so i'm not sure how to fix it, probably going to re-pep to accommodate the underlayer. I'm curious, since the "bra" piece is sort of a tight piece to get into. How are you planning getting into it? I'm thinking of cutting the whole piece into two where the sides meet and having a latch system on the shoulders to simply put over my chest. I'd love to hear your ideas :thumbsup
 
I'm curious, since the "bra" piece is sort of a tight piece to get into. How are you planning getting into it? I'm thinking of cutting the whole piece into two where the sides meet and having a latch system on the shoulders to simply put over my chest. I'd love to hear your ideas :thumbsup

Hey @SyntaxisDan, glad to know someone else is working on this!

I saw from the Anovos armor unboxing videos that they turned the inner chest piece into more of a yoke than a bra -- an ingenious idea. Since the front is going to be covered by the outer piece, and because the armor is as form-fitting as it is, I might end up going that route. The only viable alternative would be to split the piece like you're talking about, creating a clamshell with the front and the back. To wear it, the user would need clips that could attach and hold both sides together. I've found that those can be impossible to get open and closed without a handler (someone to help you put the suit on and take it off), so I will be trying to avoid that at all costs.

@Rey5 I have moved into the first phase of hardening with the helmet, although I haven't gotten any further than the inner and outer resin coats. I only have one picture of this phase though. My workshop for this part of the process is pretty far from my house, so I have limited time there :/

K3V9yNv.jpg
 
Last edited:
Quick post, I have the inner and outer resin coat completed on the helmet. Here they are!

9PkI1lJ.jpg


pmTLSkN.jpg


JE3Z2cJ.jpg


Going to put in some more time this week finishing the pep on the back closure piece/thermal detonator. The ab plate itself is finished at this point, and all of the little utility pieces are attached, just waiting for resin!
 

Attachments

  • IMG_2053.JPG
    IMG_2053.JPG
    47.1 KB · Views: 110
  • IMG_2054.JPG
    IMG_2054.JPG
    48.7 KB · Views: 112
  • IMG_2056.JPG
    IMG_2056.JPG
    279.9 KB · Views: 113
Last edited:
I am finally fully into the resin stage with several of the pieces!


In the world of pepping, I finished attaching the little cargo compartments to the ab plate, and have moved on to pepping the thermos (thermal detonator) that goes on the back plate. I admit that I am getting a bit tired of the pep work, but it is probably because of the slow freehand work that I had to do on the ab plate cargo areas.


I realize it kind of looks like crap, but once it gets fully into the hardening phase it's all going to come together. Before putting any resin onto the piece, I made sure to measure around my torso where I think the top and bottom of the ab plate will hit, and adjusted the piece accordingly. With the little paper brace in place, it fits into the bottom of the inner chest/back piece, and still (according to my measurements) is big enough for me to fit inside of it. I'll figure out how that's going to happen eventually; for now, I'm just happy to be finished pepping the damn thing.


G7vGSsW.jpg

I had a bad feeling about it, but it worked out.


As for resin work, I had some trouble sourcing the typical cheap-o paintbrushes from local dollar stores, so I was not able to move into this phase with many of the pieces until just recently. A week or so ago, I ordered a huge mass of crap brushes from Dollar Tree, and they have just arrived! With progress unblocked, I can officially continue with resin.


gbvVe4h.jpg

This is what $34 of paintbrushes looks like.


My progress is as follows:


Outer Resin Complete
Inner Chest/Back
Ab Plate
Back Plate


Outer and Inner Resin Complete
L and R Shoulders


Fiberglass in Process
Helmet


ZY015G9.jpg


I am obviously most excited to be moving forward with fiberglass for the helmet. I have it about one quarter of the way done, and should hopefully be over 2/3rds of the way complete by the end of this weekend!
 
Well done on your very impressive progress!

Just thought of a tip from a fellow RPFer that saved me a lot of money on brushes. Use a silicone basting brush. It washes clean in a very small amount of acetone and would probably shed any set resin even if you didn't wash it. They only cost a few dollars and last for quite a few uses.
 
Use a silicone basting brush.

Now that you mention this, I think I have seen someone using one of these before. Do you know what specific brand you're using? I feel like the size of the "bristles" of the brush might matter. Also, were you using the silicone brush to do the primary inner and outer resin coats as well as the actual fiberglassing portion?

I have a huge supply of these cheap-o brushes, but I am still interested in improving the workflow if possible!
 
I actually pinched it out of the kitchen drawer, :) Not sure of the brand. The bristles are about 2 inches long and although I thought there might not be enough of them, they hold the resin quite well. I've used it for placing resin as well as for placing and wetting down the cloth.
 
I actually pinched it out of the kitchen drawer, :) Not sure of the brand. The bristles are about 2 inches long and although I thought there might not be enough of them, they hold the resin quite well. I've used it for placing resin as well as for placing and wetting down the cloth.

I'm going to be starting up my own build soon and I really like this idea. Just to clarify: you're talking about a basting brush like these right? http://www.amazon.com/dp/B014K72JG6?psc=1
 
Fiberglass progress update!

I finished the preliminary glass on the helmet. I'll only have to circle back to fiberglass for the helm if there are weak spots/areas that were missed, or if I need deeper resin coverage to accommodate heavy sanding in the bondo phase. I AM SO EXITE.

tumblr_lojsg8bhRP1qjazks.gif


I will have to update with some images of how I handled the internal vented areas, and the mic/vocoder housing. It wasn't that difficult though, and all of that is wrapped up. Here she is, drying

FUXOkIf.jpg


The sports bra is now fully resin'd inside and out, and the ab plate is close -- fully done on the outside, and almost fully complete on the inside. The resin hasn't totally closed the gaps where I free-handed the utility pockets in, but I didn't expect that to happen until fiberglass anyways. Everything in that regard is progressing pretty much as I thought it would.

VwOkn6L.jpg


I also got one of the shoulders fully fiberglassed. One side of that piece was a little bit crooked (bent in), so I built out a little bailing wire brace to keep it positioned at the correct width while it cures. I could potentially heat the piece (before bondo) and re-shape it, but I figure this is an easier way to take care of the problem. We'll see if any further work is needed there.

UzcGn62.jpg

Here's the whole family so far.

No progress on the back plate (needs inner resin) or the thermos (still pepping). I'm realizing I will probably need to rondo the thermos once it's finished, since it will be an enclosed piece. That will be interesting!

For pep work, after the thermos is finished and attached to the back plate, I will probably go biceps > forearms > hand plates. All of these little pieces are mind-numbingly boring to cut out and fold, I tell ya.

Last thing for tonight is a realization I have come to. I need help figuring out what to make the eye pieces out of. I have no idea. I have looked around/left comments on previous builds, but haven't really gotten responses. Since it's the helmet, I need it to be as screen-accurate as possible! Anyone have ideas?

Pep In Progress
Thermal Detonator (Thermos)

Outer Resin Complete
Back Plate

Outer and Inner Resin Complete
R Shoulder
Inner Chest/Back
Ab Plate

Fiberglass Complete
Helmet
L Shoulder
 
Last thing for tonight is a realization I have come to. I need help figuring out what to make the eye pieces out of. I have no idea. I have looked around/left comments on previous builds, but haven't really gotten responses. Since it's the helmet, I need it to be as screen-accurate as possible! Anyone have ideas?

The eye pieces can be made using tinted acrylic sheets. Member Thorsolli made vacuformed bubble lenses using those. You can check it out here (#93).

On the other hand, you can use tinted motorcycle helmet visors. I don't know if you can vacuform it but you can just cut it into a lens shape and place it in the helmet as is. It's not as screen accurate as the bubble lenses though :lol

Great job on the build! Looking forward to see more :thumbsup
 
+1 for the motorcycle helmet visor idea. I saw someone elsewhere using this idea and it looks great. They also mentioned that there is no risk of distorted vision with the visor as opposed to the vacuformed acrylic, which seems like a solid plus to me.
 
This is beautiful - much less "bug-eyed" than some of the models I've seen. Amazing dedication. Hope I can do as well on my build.... Maybe this isn't the best 1st Pep attempt?
 
Back
Top