Hi everyone,
My company JCM: Custom Creations Ltd has developed what we believe is the most comprehensive and accurate ZF-1 model currently on the market. We are selling these either in kit or assembled model form.
The features of this kit include:
The cost will be: £1400 plus postage and packing. ($2000 shipped to US)
I will be shipping internationally from the UK.
Aluminium frames

Metal Box

DX Box 1

DX Box 2

Electronics Box

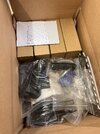
FDM printed bags

Lower liner and clear parts (Neoprene edging cord in bag in picture above)

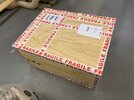
Shipping box

I have tried to do this prop justice by making it as authentic and as true to the original as possible. The shell and grip have been modelled from 3D laser scans of actual ZF1 shells and grips. The Star Trek model kits have each been modelled in detail, down to each window on Voyagers hull. All found components have been sourced and measured to create highly accurate representations.
.png")
The model has been designed so that assembly is relatively straightforward (given the complexity of the prop) and you do not need any experience with soldering or complex electronics.
It features many metal components, custom designed electronics for lighting, sound and movement effects, LED lighting circuit boards, NiMH battery and charger. It gives the prop maker all the components to build a ZF1, without the fuss of having to worry about the cost of buying a fibreglass/ABS shell, what servos and lights to use and how to program them and where to buy the £120/$150's(!) worth of Star Trek kits needed to detail the prop!

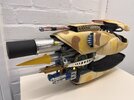
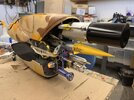
(A completed ZF1 built entirely from components found in the kit)
The kits feature many more precision CNC machined metal components, replacing almost all visible components on the replica. We only use resin printed components on the scope hull and lower detail parts, as well as the rocket tip and some smaller components.
The FDM printed shell is an exact replica of the fibreglass shells that are sometimes made available, however these are much lighter and come with all mounting and attachment points built in. They require some filling (use any standard automotive body filler) and sanding but can be made to look very good indeed. Size and fitting should be perfect.
(A completed, kit-built ZF1 in action)
Needed tools (absolutely necessary for building these kits):
The main shell will also need to be painted. I have created a series of painting guides and illustrations to help you with this process.
ZF-1 Component Painting Guide
ZF-1 Painting Templates

We provide a shell spraying service at £350 if you do not want to spray your ZF-1 shell. This will also increase the cost of shipping a small amount due to the larger sized container it needs to be sent in.
*******For new kit buyers*******
We have created a printable .pdf guide to help you assemble your ZF-1. This will be sent to you via email for downloading.
*******For older kit buyers*******
Please get in touch if you'd like a copy of our .pdf guide. Many stages are still compatible with this guide. We are also happy to send out updated .sla files or printed components to upgrade your kit (costs will vary depending on parts/electronics etc)
To help you assemble your new ZF1 kit, I have created a series of in depth video guides, detailing each and every step of the build process. These are updated regularly with feedback from other builders and my own experience, and I will be releasing new videos on areas not yet covered.
ZF-1 Video Assembly Guide
I have also produced another set of videos documenting building a single ZF-1, from start to finish. These hopefully demonstrate tips and tricks that can help you build your own.
ZF-1 Step-by-step
If you would like to see a sped up version of the build process, please watch this 4 minute video to help give you an understanding of how the prop is put together.
FOR PREVIOUS KIT BUYERS
Below is a link to my thingiverse page where you can download upgraded parts for the older ZF-1 kits.
JCM ZF-1 part upgrades
Assembled Model
We are also offering built ZF-1 models.
These are built in our workshop, using our facilities to ensure a professional finish and a prop that will look fantastic in your display cabinet.
The cost will be: £2400 plus postage and packing. ($3500 shipped to US)
I will be shipping internationally from the UK.
The following pictures are all built using our kits.


Accessories...
We have developed accessories for your ZF-1 replica. Please check them out below..
Please note metal upgrades, Maglite torches and flamethrower igniter upgrades are included as standard on kits and assembled replicas

Thanks!
Jake Eaton
My company JCM: Custom Creations Ltd has developed what we believe is the most comprehensive and accurate ZF-1 model currently on the market. We are selling these either in kit or assembled model form.
The features of this kit include:
- Aluminium frame and sub-frames (3mm and 1.2mm components).
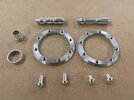
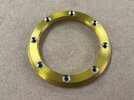
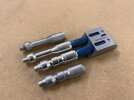
- Metal components: Almost all visible detail components including: Weapon nozzles (icer, flamethrower, top barrel etc), blue dart covers, stainless steel darts, stainless steel piston rods, aluminium main barrel, aluminium piston bodies, rocket rings, aluminium and steel weapon parts for top bay, steel conduit for scope detailing, aluminium gold side frames, plus many more metal detail components...please check pictures below
- SLA resin printed components: rocket vents, rocket tip, scope body and lower 'Star Trek' detail components and various other smaller components.
- 10 bags of FDM printed components: 3 bags are the shell. Others are components that are mainly hidden and form the movement mechanisms, brackets and other various structural components.
- Authentically modelled pistol grip and body shell (both from laser scanned originals) (Pistol grip is cast resin and shell is FDM printed)
- Movie matched lighting animations and movements.
- Custom produced movie accurate sound effects.
- 4 servos for full movie accurate motion (2 x left and right dart launchers, 1 x scope, 1 x top bay).
- 1 DC motor for red barrel actuation.
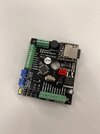
- Custom PCB 'control board' with easy to use 'servo trimming mode'.
- Large capacity NiMH battery and battery charger.
- Textured matting and neoprene edging cord (plus cutter!)
- Full assembly guide .PDF and YouTube videos.
- Supplied bending jigs for aluminium frames
- All screws and nuts supplied.
- No electronic experience necessary! (No soldering, no crimping)
The cost will be: £1400 plus postage and packing. ($2000 shipped to US)
I will be shipping internationally from the UK.
Aluminium frames
Metal Box
DX Box 1
DX Box 2
Electronics Box
FDM printed bags
Lower liner and clear parts (Neoprene edging cord in bag in picture above)
Shipping box
I have tried to do this prop justice by making it as authentic and as true to the original as possible. The shell and grip have been modelled from 3D laser scans of actual ZF1 shells and grips. The Star Trek model kits have each been modelled in detail, down to each window on Voyagers hull. All found components have been sourced and measured to create highly accurate representations.
The model has been designed so that assembly is relatively straightforward (given the complexity of the prop) and you do not need any experience with soldering or complex electronics.
It features many metal components, custom designed electronics for lighting, sound and movement effects, LED lighting circuit boards, NiMH battery and charger. It gives the prop maker all the components to build a ZF1, without the fuss of having to worry about the cost of buying a fibreglass/ABS shell, what servos and lights to use and how to program them and where to buy the £120/$150's(!) worth of Star Trek kits needed to detail the prop!
(A completed ZF1 built entirely from components found in the kit)
The kits feature many more precision CNC machined metal components, replacing almost all visible components on the replica. We only use resin printed components on the scope hull and lower detail parts, as well as the rocket tip and some smaller components.
The FDM printed shell is an exact replica of the fibreglass shells that are sometimes made available, however these are much lighter and come with all mounting and attachment points built in. They require some filling (use any standard automotive body filler) and sanding but can be made to look very good indeed. Size and fitting should be perfect.
Needed tools (absolutely necessary for building these kits):
- Allan keys
- Small hammer
- Pliers
- Craft knife
- Small flathead screwdriver
- Super glue (or two part epoxy)
- Single or two part filler (for shell)
- Paints
- Super glue activator (very useful!)
- Thread locker
- oil or lubricant
The main shell will also need to be painted. I have created a series of painting guides and illustrations to help you with this process.
ZF-1 Component Painting Guide
ZF-1 Painting Templates
We provide a shell spraying service at £350 if you do not want to spray your ZF-1 shell. This will also increase the cost of shipping a small amount due to the larger sized container it needs to be sent in.
*******For new kit buyers*******
We have created a printable .pdf guide to help you assemble your ZF-1. This will be sent to you via email for downloading.
*******For older kit buyers*******
Please get in touch if you'd like a copy of our .pdf guide. Many stages are still compatible with this guide. We are also happy to send out updated .sla files or printed components to upgrade your kit (costs will vary depending on parts/electronics etc)
To help you assemble your new ZF1 kit, I have created a series of in depth video guides, detailing each and every step of the build process. These are updated regularly with feedback from other builders and my own experience, and I will be releasing new videos on areas not yet covered.
ZF-1 Video Assembly Guide
I have also produced another set of videos documenting building a single ZF-1, from start to finish. These hopefully demonstrate tips and tricks that can help you build your own.
ZF-1 Step-by-step
If you would like to see a sped up version of the build process, please watch this 4 minute video to help give you an understanding of how the prop is put together.
FOR PREVIOUS KIT BUYERS
Below is a link to my thingiverse page where you can download upgraded parts for the older ZF-1 kits.
JCM ZF-1 part upgrades
Assembled Model
We are also offering built ZF-1 models.
These are built in our workshop, using our facilities to ensure a professional finish and a prop that will look fantastic in your display cabinet.
The cost will be: £2400 plus postage and packing. ($3500 shipped to US)
I will be shipping internationally from the UK.
The following pictures are all built using our kits.
Accessories...
We have developed accessories for your ZF-1 replica. Please check them out below..
Please note metal upgrades, Maglite torches and flamethrower igniter upgrades are included as standard on kits and assembled replicas
Thanks!
Jake Eaton
Attachments
Last edited:
")