Coz
Sr Member
Got a little bored awaiting my PKE shells, so a trip to the Pound Shop (UK Dollar Store) was in order.
One purchase of a Lint Brush later, I had the makings of a Cheapo PKE! Comparing to a printout of HProps plan, its a little short (and a lot thinner!), but I'm not looking for complete accuracy. This is just for fun, and to see how far you can go!
(Apologies for the Shaky-Cam pics - just think of it as Raimi-Vision)
Same type of Lint brush & finished PKE:
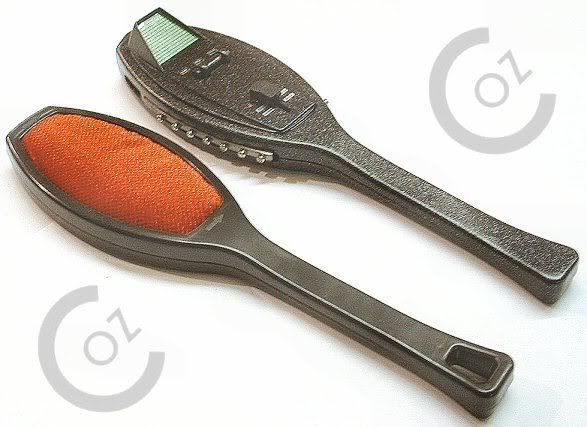
Filled the hanger hole, & removed the pads completely, and cut slots for the wings. The pointy top was added with Balsa wood & Super Glue, then filled & sanded.
Closer look:
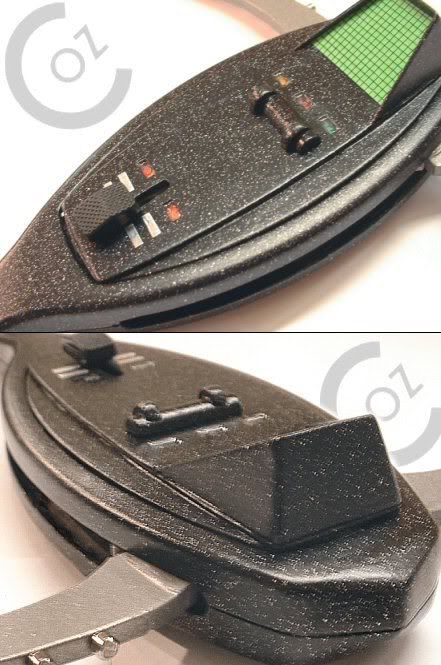
A couple of CD case fronts stacked worked well for the faceplate (HProps plan). Top layer is sheet styrene, with the LED holes cut out.
The screen box is more CD case plastic. The setting button was cut from a piece of wooden dowel, and the sticky-outy bits are balsa wood coated (like most of the balsa used) in Super Glue to give a little more strength.
Because I used clear CD case for the faceplate, I placed coloured foil behind it where the LEDs would be, which is quite visible. The Galvanic switches' are small pieces of chrome tape (I didn't bother with the extra ones on the grip).
No working lights, but the wings move! Pull back to open, release (or push forwards) to close:
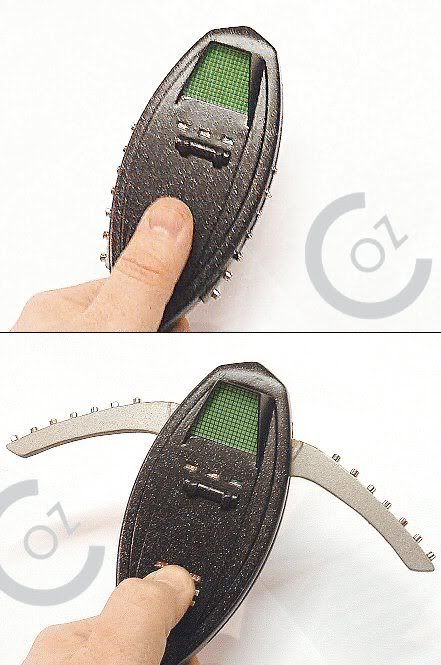
Wings from HProps template, slightly altered & bodged! A piece of Balsa wood with more CD case plastic glued to it for extra strength.
This didn't work too good for the 'wing bar' holes - had to cut some thin brass to make it more resilient!
Used silver earstuds in place of lights - the stones pick up the light quite well!
The reason why no lights - it too darn skinny!
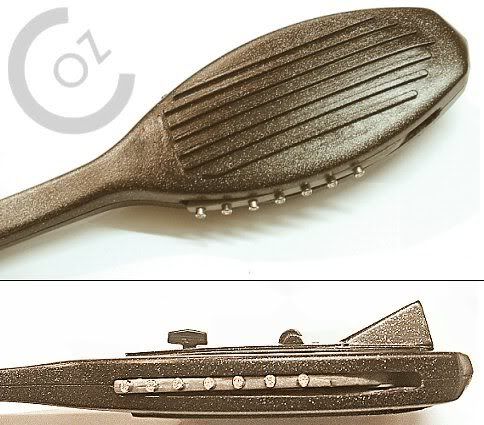
Back panel is Balsa wood again, one thick layer inside, and a thinner layer outside. Screws go through it for the wing axles and the rubber band post.
The ribs are lengths of plastic cable ties! Edges of the balsa were filled & sanded.
Made it with a removable face plate, in case the rubber band snaps!
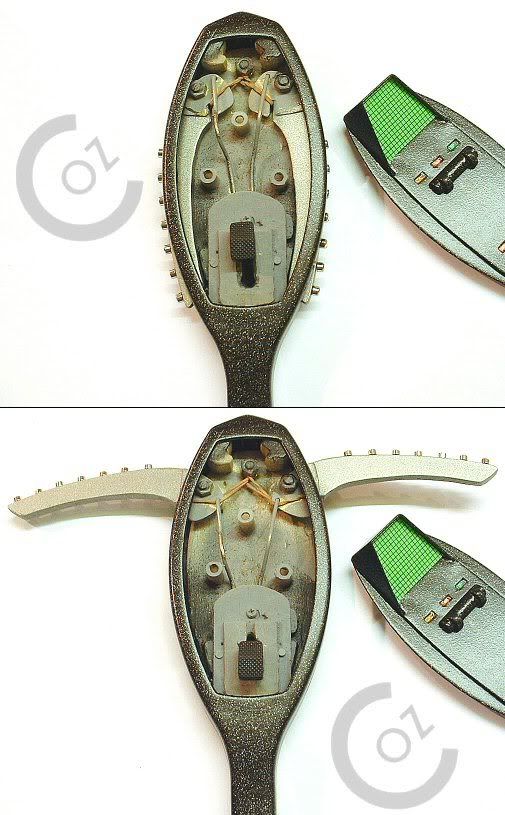
The three posts are for short pieces of model kit sprue glued to the back of the faceplace to reduce movement.
The screen is made from inkjet transparency film for the grid pattern, glued to a layer of flourescent green card.
Closer look at the gubbins:
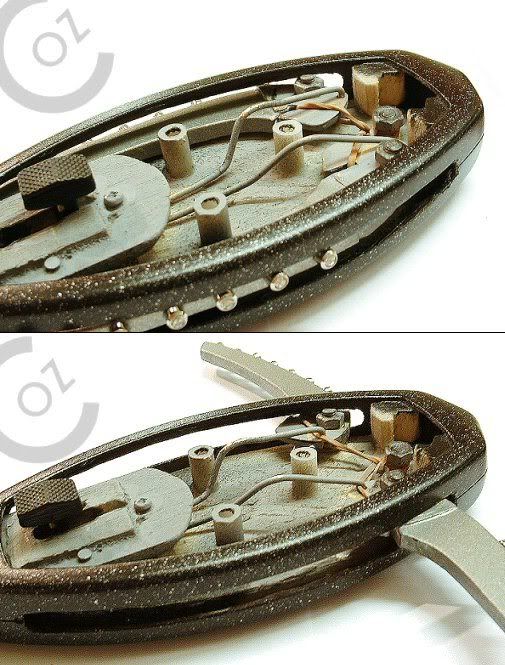
The two 'wing bars' are the arms of a pair of wire-frame sunglasses. Button is from s snap-off blade knife, thickened up with (what else) CD case plastic.
The box under the button is built up from pieces of Balsa wood to retain the wing bars. The tension of the rubber band pulls the wing back into the body (most of the time!).
Took a coupla days to work out the workings & iron out the kinks (then put the kinks back in again), but it was only a couple of hours here & there, really.
Filled, sanded & primered quickly & sprayed satin black with a silver ghosting using the old 'spray a cloud of paint in the air & wave the thing thru it' method).
Well, I'm pleased with how it turned out!
What do you think, sirs?
Coz.
One purchase of a Lint Brush later, I had the makings of a Cheapo PKE! Comparing to a printout of HProps plan, its a little short (and a lot thinner!), but I'm not looking for complete accuracy. This is just for fun, and to see how far you can go!
(Apologies for the Shaky-Cam pics - just think of it as Raimi-Vision)
Same type of Lint brush & finished PKE:

Filled the hanger hole, & removed the pads completely, and cut slots for the wings. The pointy top was added with Balsa wood & Super Glue, then filled & sanded.
Closer look:

A couple of CD case fronts stacked worked well for the faceplate (HProps plan). Top layer is sheet styrene, with the LED holes cut out.
The screen box is more CD case plastic. The setting button was cut from a piece of wooden dowel, and the sticky-outy bits are balsa wood coated (like most of the balsa used) in Super Glue to give a little more strength.
Because I used clear CD case for the faceplate, I placed coloured foil behind it where the LEDs would be, which is quite visible. The Galvanic switches' are small pieces of chrome tape (I didn't bother with the extra ones on the grip).
No working lights, but the wings move! Pull back to open, release (or push forwards) to close:

Wings from HProps template, slightly altered & bodged! A piece of Balsa wood with more CD case plastic glued to it for extra strength.
This didn't work too good for the 'wing bar' holes - had to cut some thin brass to make it more resilient!
Used silver earstuds in place of lights - the stones pick up the light quite well!
The reason why no lights - it too darn skinny!

Back panel is Balsa wood again, one thick layer inside, and a thinner layer outside. Screws go through it for the wing axles and the rubber band post.
The ribs are lengths of plastic cable ties! Edges of the balsa were filled & sanded.
Made it with a removable face plate, in case the rubber band snaps!

The three posts are for short pieces of model kit sprue glued to the back of the faceplace to reduce movement.
The screen is made from inkjet transparency film for the grid pattern, glued to a layer of flourescent green card.
Closer look at the gubbins:

The two 'wing bars' are the arms of a pair of wire-frame sunglasses. Button is from s snap-off blade knife, thickened up with (what else) CD case plastic.
The box under the button is built up from pieces of Balsa wood to retain the wing bars. The tension of the rubber band pulls the wing back into the body (most of the time!).
Took a coupla days to work out the workings & iron out the kinks (then put the kinks back in again), but it was only a couple of hours here & there, really.
Filled, sanded & primered quickly & sprayed satin black with a silver ghosting using the old 'spray a cloud of paint in the air & wave the thing thru it' method).
Well, I'm pleased with how it turned out!
What do you think, sirs?
Coz.
