You are using an out of date browser. It may not display this or other websites correctly.
You should upgrade or use an alternative browser.
You should upgrade or use an alternative browser.
TDKR Catwoman build/costume study ( pic heavy )
- Thread starter aelynn000
- Start date

SelinaKyle
New Member
View attachment 124402
Wow awesome catwoman suit, Im still looking for a fabric that looks even close to the original but damn its soo hard :cry
If can someone tell me where can I buy the fabric I really will appreciate that favor!
Here I share a picture of my custom goggles
Wow awesome catwoman suit, Im still looking for a fabric that looks even close to the original but damn its soo hard :cry
If can someone tell me where can I buy the fabric I really will appreciate that favor!
Here I share a picture of my custom goggles
Meow1940
New Member
Hi Selina!
Your goggles look GREAT! Did you make them with the 3 piece deluxe set aelynn was talking about earlier? If so, then I'm getting me a set ASAP. Hehe. Also, can you upload more pics of them up and down?
Fabric Mart :: Fabrics E-O :: Knit Fabrics :: Assorted Knit Fabric :: SPE4263 Cord-Like Textured Knit Black 56" Wide
That's the best I could find for fabric though.
SelinaKyle
New Member
Hi meow thanks for the fabric! ") :thumbsup .....No I didnt got the 3 piece set, I got one full catwoman costume that includes the goggles but are like a piece that doesnt move and I fix it for make them move and cut the plastic and put the red lenses, also had to modify the mask a bit, mostly the nose and the shape of the eyes (excuse my horrible english!! :lol ) ...
:thumbsup .....No I didnt got the 3 piece set, I got one full catwoman costume that includes the goggles but are like a piece that doesnt move and I fix it for make them move and cut the plastic and put the red lenses, also had to modify the mask a bit, mostly the nose and the shape of the eyes (excuse my horrible english!! :lol ) ...
:thumbsup .....No I didnt got the 3 piece set, I got one full catwoman costume that includes the goggles but are like a piece that doesnt move and I fix it for make them move and cut the plastic and put the red lenses, also had to modify the mask a bit, mostly the nose and the shape of the eyes (excuse my horrible english!! :lol ) ...Hey everyone. Thought I would share a picture of my TDKR Catwoman cosplay worn at Armageddon expo last month. My goggles are from the awfully cheap looking Halloween costume, just modified slightly. I took the goggles off the headband it came on and screwed them onto a wire one, but on an angle so they sit at the back of the head as opposed to on top. I also put some screws in the hinges to make them sturdier. Hope this helps anyone who may be struggling with goggles.


Last edited:

4505marcel
Active Member
Ive seen her somewhere before lol, great work as usuall Greg
KatieGeorge
New Member
Also, here's a Photobucket album where I've been collecting reference pictures of Anne Hathaway's Catwoman. Not sure if it'll help anyone, but I figured I'd post it here just in case it does.
Anne Hathaway pictures by The_Advent_Child - Photobucket
I'm very flattered! My airport Selina Kyle shows up in there a few times.
cborchardt82
Well-Known Member
Hey everyone. Im new here, but I've been reading this thread for a while watching everyones great progress. Im making a catwoman costume for the motorcity comic con in may. I get the fantastic task of making my costume (Catwoman), my husbands(Bane), my 4 year old (our mini Bane), 8 year old (Poison ivy) 10 year old (Riddler) 12 year old (Batman) and 14 year old (Joker) costumes. Phew, thats already exhausting!
I know that vinyl is normally frowned upon, but I was wondering if anyone has every tried maybe stamping it (reverse side) to make texture if the material is thick enough? I was gonna do the amazing yet exhausting puffy paint, but I hadn't known if anyones ever tried or if maybe it wouldnt hold the stamp? My leather motorcycle seat was stamped to be alligator skin (though its actually leather) but I have seen faux leather take shape as well. Just a thought
I know that vinyl is normally frowned upon, but I was wondering if anyone has every tried maybe stamping it (reverse side) to make texture if the material is thick enough? I was gonna do the amazing yet exhausting puffy paint, but I hadn't known if anyones ever tried or if maybe it wouldnt hold the stamp? My leather motorcycle seat was stamped to be alligator skin (though its actually leather) but I have seen faux leather take shape as well. Just a thought
faille
Active Member
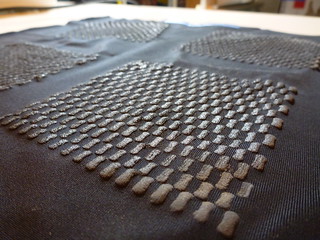
A few have messaged about my progress on this project. I haven't done a lot in the last few months, but I wanted to share what I HAVE done so people can continue along this line if they want to. Maybe someone has access to tools I don't or will have some great innovative breakthrough!
Fabric
All of my experimenting has been done using fabric I bought from Spandex House. It is the "Vinyl Matte" fabric in the 4 way stretch vinyl section.
I also bought some basic "black 70 denier lining". The plan is to use this to create a lining/undersuit so I don't have puff paint digging into my skin all day.
Texture
To create the texture I'm using Tulip brand puff paint in Black Matte from Joann/Michaels. Since it's being applied to the backside of the fabric you could probably use a sparkly pink for all it matters.
This is where it gets crazy-making. To apply the texture, I'm using a stencil. I found this adhesive stencil film sold in a roll at Michaels.
The adhesive stuff has worked well for testing, but it's not really sturdy enough for multiple uses. Since I am trying a different scale for each test this isn't really an issue, but scaling up for a full suit will be interesting.
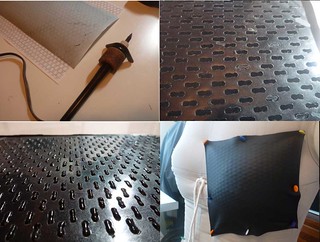
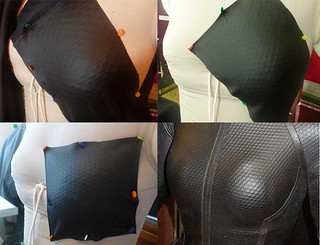
To test the scale, I've been taking pictures of the pinned fabric and overlaying it with some of the pictures that have been posted of this thread of the screen-used costume on display. I'm not nearly as tiny as Anne Hathaway, but it's a start.
Templates
The actual graphic for the template was made in Adobe Illustrator. I've gone through probably 5 iterations at this point and think I'm close.
Attached is a PDF version of what I'm calling the "15 x 38" swatch. In a 4" square, there are 15 pill columns and 38 rows. They are staggered in a checkerboard pattern.
I am pretty comfortable with the 15 columns, but I think I am going to do another swatch with 34 rows. The pills get a little further apart when the fabric stretches, but I think I am not quite at a "hexagon" spacing like you see on the suit. Maybe making the actual height of the pill shorter will help too.
Thoughts on the scale are welcomed - this is the main reason I haven't gone further with the project and any feedback would be wonderful!
Next Steps
There are still some things I need to work out that are preventing me from moving forward.
Hope someone finds this useful. If not, it was good to organize my thoughts and I'm motivated now to pick this project up again and try some more things! Ultimately I would be aiming for SDCC to complete. It might be time to start my own build thread, since I have a half-completed mask sculpt and shoes ready for modding and all sorts of thoughts on those too!
Fabric
All of my experimenting has been done using fabric I bought from Spandex House. It is the "Vinyl Matte" fabric in the 4 way stretch vinyl section.
I also bought some basic "black 70 denier lining". The plan is to use this to create a lining/undersuit so I don't have puff paint digging into my skin all day.
Texture
To create the texture I'm using Tulip brand puff paint in Black Matte from Joann/Michaels. Since it's being applied to the backside of the fabric you could probably use a sparkly pink for all it matters.
This is where it gets crazy-making. To apply the texture, I'm using a stencil. I found this adhesive stencil film sold in a roll at Michaels.
- Cut a piece of stencil material and tape it to a piece of paper
- Print the pattern onto the paper/stencil combo
- Cut out each 'pill' with a woodburner tool.
- Carefully peel the stencil off the backing and adhere to the REVERSE SIDE of my fabric. I do not stretch the fabric at all.
- Paint in each pill, trying not to go too far over the edges of the stencil.
- Let dry overnight, then carefully peel off the stencil. You may need to use tweezers to help keep the paint in place if you went over the edge.
- At this point I usually go over the lines again for added height.
The adhesive stuff has worked well for testing, but it's not really sturdy enough for multiple uses. Since I am trying a different scale for each test this isn't really an issue, but scaling up for a full suit will be interesting.
To test the scale, I've been taking pictures of the pinned fabric and overlaying it with some of the pictures that have been posted of this thread of the screen-used costume on display. I'm not nearly as tiny as Anne Hathaway, but it's a start.
Templates
The actual graphic for the template was made in Adobe Illustrator. I've gone through probably 5 iterations at this point and think I'm close.
Attached is a PDF version of what I'm calling the "15 x 38" swatch. In a 4" square, there are 15 pill columns and 38 rows. They are staggered in a checkerboard pattern.
I am pretty comfortable with the 15 columns, but I think I am going to do another swatch with 34 rows. The pills get a little further apart when the fabric stretches, but I think I am not quite at a "hexagon" spacing like you see on the suit. Maybe making the actual height of the pill shorter will help too.
Thoughts on the scale are welcomed - this is the main reason I haven't gone further with the project and any feedback would be wonderful!
Next Steps
There are still some things I need to work out that are preventing me from moving forward.
- Scaling up the production. This whole process is very time consuming. It takes me close to two hours to print, cut, and paint a 6" x 6" swatch. Spiderman people have mad respect from me, because the thought of doing an entire suit makes me want to cry.
I could save a lot of time by getting a more "permanent" version of the template. So if I decide to dive into an entire suit of puff paint I will definitely do that.
/ - What I really want to do is try screenprinting. I have done some reading on HD or puff inks, and I think I could get the height I needed while being able to cover a larger area.
However, I have it in my head that I want to do this all by hand. I feel like going to a screen printing place is cheating. Someone tell me it's not cheating!
Anyone in San Diego area have screen printing equipment that wants to experiment with me?
/ - Experiment more with Heat treating. In one of my first swatches, I went crazy with a heat gun on the fabric. It came out with a really great raised pattern that I wish I could reproduce.
When I first did it, I stretched the fabric around an acrylic rod that is used for rolling sculpy, and then ran the heat gun over that. The fabric needed the even pressure from bending around a curve to deform the fabric the right way, otherwise it just turned shiny without any "shrinkage" around the pills. I could only do a very very small area this way however.
/ - Embossing? The more I look at the suit, the more it looks embossed, not printed. Or, screenprinted and then embossed to "set" the pattern. But, no idea how to do this, so it will probably go unexplored by me.
Another nutty idea I had was to try to use spray glue and vac form the puff painted PUL layer to the underlayer to try to "emboss" it. I might still try that, just for fun
Hope someone finds this useful. If not, it was good to organize my thoughts and I'm motivated now to pick this project up again and try some more things! Ultimately I would be aiming for SDCC to complete. It might be time to start my own build thread, since I have a half-completed mask sculpt and shoes ready for modding and all sorts of thoughts on those too!
Last edited:
aelynn000
Well-Known Member
This is amazing! And hilarious...I was thinking of your technique while driving home yesterday and just said " What the heck, I have a lot of time, I should just puff paint it all and put a layer of thin stretch overtop ( on the inside ) so it doesn't stick to me " and then you posted the same thing!
Though I'm too lazy for the stenciling... I think what I would do is make the whole suit first, then fold it inside out and freehand away. I'd mark it with chalk first to keep things aligned but I can't imagine cutting out that repetitive of a stencil.
It might be tricky painting it onto the inside of a finished suit...but again, I'm WAY too lazy to do a mass amount of fabric and then cut out the pattern and just throw away the remains. That also leaves the issue of having to have every piece line up properly and in the right direction...where I usually twist and turn things to get the most I can out of the least fabric.
While I have a couple things ahead of this one now, I definitely want to revisit it and I think that is the route I will go. No deadline is a wonderful thing.
faille
Active Member
Quick update - I have access to a small screenprinting setup now, so in the next month or so I will be able to run a test on the fabric. Going to start with Puff Ink since that is the most accessible to me, then try a High Density Ink if the results aren't quite right. Will post pictures good or bad when I'm done!
cborchardt82
Well-Known Member
Quick update - I have access to a small screenprinting setup now, so in the next month or so I will be able to run a test on the fabric. Going to start with Puff Ink since that is the most accessible to me, then try a High Density Ink if the results aren't quite right. Will post pictures good or bad when I'm done!
good luck!
faille
Active Member
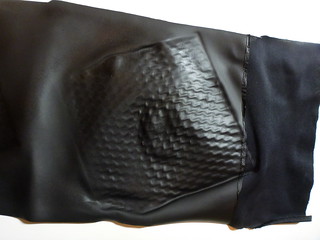
Over the weekend I finally made it to Makerplace to try out the screenprinting machine on my Catwoman Fabric. I promised to share the results, good or bad, so here they are!
I used plastisol inks, black and a puff additive. I mixed them at approximately 1 part puff to 6 parts black. This was done very scientifically by me using a plastic plant marker I found at Walgreens on the way down there to measure and mix. There is no doubt that my complete inexperience with screenprinting contributed to the less than stellar results. But hey, I am trying something new, and maybe with some practice this could work!
All pictures pop to Flickr. I can't figure out how you guys embed pictures and have them pop in a lightbox to a larger size in the browser?
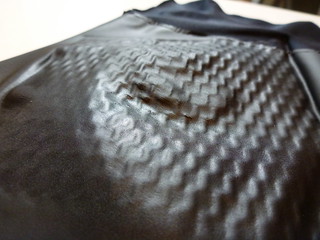
This is a set of swatches I did, at slightly different patterns. Looks cool, but not what I wanted.
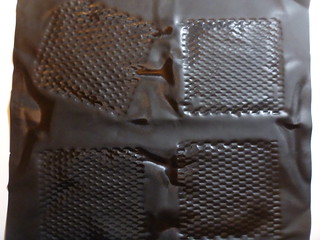
And the back looks like this, with the puff raised.

Closeup so you can see the front and the back.
Notice the uneven raised texture - totally my fault I'm sure!
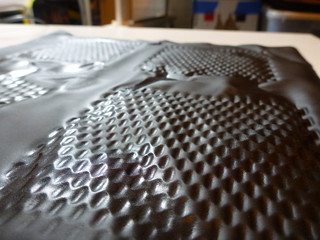
Thinking that if painting the "pills" gave me the opposite effect, then maybe I could reverse it, I then tried to screenprint the area around the pills. The paint puffed up too much, which made the holes get too small, which basically ruined the pattern. Plus, the fabric is so stiff it would not have any stretch left and be very uncomfortable (and probably hot!) to wear. I also tried a "reverse" print with just black ink, no puff, but that didn't work any better.
Pretty sure the big warped glob in the middle is just me overcooking it.
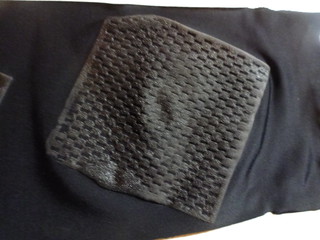
If you look close, you can see some puffing OUT, not IN, so this might be a step in the right direction.
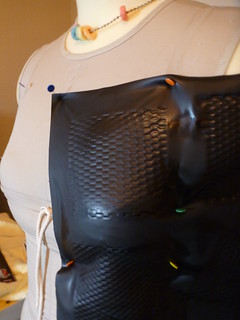
Finally, here is one of the swatches pinned to my dress form. Stretching it really brings out the problem with the inverted texture.
TL;DR:
1) After curing the ink, it had the OPPOSITE effect than what I wanted! Boooooo! Wherever the ink touched the fabric, it stayed sunk, and then where the heat hit the raw fabric it became more raised. This created an interesting effect on its own, but not what is needed for the Catwoman outfit.
2) It was very hard to "cook" the fabric just right with the heat source I have access to. Makerplace has a basic flash dryer unit meant for a single t-shirt that hovers over the platten. This means that the heat is somewhat uneven, so certain areas ended up shinier than others when I flipped it over. I think to do this on a large scale, I would either have to be a crazy with a heatgun, or have access to one of those roller dryers so that the entire thing cooks evenly for a set length of time.
3) I'm not giving up just yet! Next time I go down there I am going to try one more time with the "reverse" technique, except I am going to modify my pattern to draw little lines connecting all the pills instead of just printing the reverse of the existing pattern. Hopefully this will make the pattern pop out "just right" without adding too much stiffness to the fabric.
I used plastisol inks, black and a puff additive. I mixed them at approximately 1 part puff to 6 parts black. This was done very scientifically by me using a plastic plant marker I found at Walgreens on the way down there to measure and mix. There is no doubt that my complete inexperience with screenprinting contributed to the less than stellar results. But hey, I am trying something new, and maybe with some practice this could work!
All pictures pop to Flickr. I can't figure out how you guys embed pictures and have them pop in a lightbox to a larger size in the browser?
This is a set of swatches I did, at slightly different patterns. Looks cool, but not what I wanted.
And the back looks like this, with the puff raised.
Closeup so you can see the front and the back.
Notice the uneven raised texture - totally my fault I'm sure!
Thinking that if painting the "pills" gave me the opposite effect, then maybe I could reverse it, I then tried to screenprint the area around the pills. The paint puffed up too much, which made the holes get too small, which basically ruined the pattern. Plus, the fabric is so stiff it would not have any stretch left and be very uncomfortable (and probably hot!) to wear. I also tried a "reverse" print with just black ink, no puff, but that didn't work any better.
Pretty sure the big warped glob in the middle is just me overcooking it.
If you look close, you can see some puffing OUT, not IN, so this might be a step in the right direction.
Finally, here is one of the swatches pinned to my dress form. Stretching it really brings out the problem with the inverted texture.
TL;DR:
1) After curing the ink, it had the OPPOSITE effect than what I wanted! Boooooo! Wherever the ink touched the fabric, it stayed sunk, and then where the heat hit the raw fabric it became more raised. This created an interesting effect on its own, but not what is needed for the Catwoman outfit.
2) It was very hard to "cook" the fabric just right with the heat source I have access to. Makerplace has a basic flash dryer unit meant for a single t-shirt that hovers over the platten. This means that the heat is somewhat uneven, so certain areas ended up shinier than others when I flipped it over. I think to do this on a large scale, I would either have to be a crazy with a heatgun, or have access to one of those roller dryers so that the entire thing cooks evenly for a set length of time.
3) I'm not giving up just yet! Next time I go down there I am going to try one more time with the "reverse" technique, except I am going to modify my pattern to draw little lines connecting all the pills instead of just printing the reverse of the existing pattern. Hopefully this will make the pattern pop out "just right" without adding too much stiffness to the fabric.
KatieGeorge
New Member
I tried the Facebook group, but it more or less seems dead (or at least pretty quiet). I'm happy to see this thread is still active, as I've been following it for MONTHS! To be lazy, I'll copy-paste my post from FB...
(As a note, my original plan was to use wire mesh cloth to heat emboss spandex... I've changed my mind because I doubt it will work.)
So I've yet to follow through on my wire mesh cloth idea due to lack of time, but I did recently come up with an inexpensive alternative. JoAnn happened to have a very thin, silky, polished stretch knit (does that description not sound like the way Lindy described the fabric??) in the sale rack, and right across the aisle, they had their utility cargo netting with a hexagon pattern, which unfortunately only has a SLIGHT 2-way stretch. The only reason this layering trick works is because the polished stretch knit is ULTRA thin (and even then, it's still very subtle). I’m debating just using this method, rather than killing myself trying to emboss matte spandex with wire cloth and heat gun. Opinions welcome!

As a note, there was less than a whole yard of the polished stretch knit, so I've been trying to find more or an alternative for ages... So far, have had no success...
(As a note, my original plan was to use wire mesh cloth to heat emboss spandex... I've changed my mind because I doubt it will work.)
So I've yet to follow through on my wire mesh cloth idea due to lack of time, but I did recently come up with an inexpensive alternative. JoAnn happened to have a very thin, silky, polished stretch knit (does that description not sound like the way Lindy described the fabric??) in the sale rack, and right across the aisle, they had their utility cargo netting with a hexagon pattern, which unfortunately only has a SLIGHT 2-way stretch. The only reason this layering trick works is because the polished stretch knit is ULTRA thin (and even then, it's still very subtle). I’m debating just using this method, rather than killing myself trying to emboss matte spandex with wire cloth and heat gun. Opinions welcome!
As a note, there was less than a whole yard of the polished stretch knit, so I've been trying to find more or an alternative for ages... So far, have had no success...
KatieGeorge
New Member
Apologies for the double-post, but I have a question...
What's everyone doing for the zipper and the style lines on her suit? I've heard someone say with confidence that they're leather, but having stared at reference pictures for hours, I would have to disagree. The trim most definitely has a texture resembling polyester or nylon. It reminds me of the texture of all purpose zippers. I'd prefer to use elastic over nylon webbing, personally, because it's more forgiving, but I thought I'd ask what others are using.
As for the zipper, I'm thinking about using a matte, coated water resistant zipper because they have that invisible zipper look but the pull is larger, and can be silver, rather than being stuck with a black pull.
Any ideas outside my own would be much appreciated!
faille
Active Member
Here is the link that I was thinking of. Hers has an actual seam line between each piece, but I think I will use a modified version of the general idea for mine.
magpies_trek: Special Shiny Double-Bound Shoulder Seams
magpies_trek: Special Shiny Double-Bound Shoulder Seams
KatieGeorge
New Member
I am planning to use the backside if my PUL. To me, it looks like the seaming on some of the Trek costumes. The name is eluding me right now, but I'll find the link I am thinking of and post after the forums are back up
So you're using the spandex fused to the back of the PUL and going to do some sort of inverted flat-felled seam? That's an interesting idea! My tired brain could not wrap my head around that Trek seam binding tutorial, though... @_@
I bought a lot of black shiny bra elastic from China for a good deal, but I'm hem-hawing back and forth about using that or using 1/2" nylon webbing. @_@ I just wish I could have seen her costume in person when it was at Arclight!
Similar threads
- Replies
- 0
- Views
- 365