Thanks! I love taking my time with a prop and carefully planning it out step by step. Tomorrow I’ll get a coat of green on this piece along with more weathering chips.
You are using an out of date browser. It may not display this or other websites correctly.
You should upgrade or use an alternative browser.
You should upgrade or use an alternative browser.
Tales From The Loop - Stasis Device
- Thread starter ssdesigner
- Start date
love the weathering, totally legit wearDark green applied with the same liquid mask technique...
Thank you! I appreciate the feedbacklove the weathering, totally legit wear
Just wanted to let everyone know that I have opened up a new shop just for my props and digital downloads. Everything that I've posted here can be downloaded or purchased as finished props here:

 www.etsy.com
ssdesignerprops - Etsy
Shop scrupulous. solid. spot on. by ssdesignerprops located in Minneapolis, Minnesota.
www.etsy.com
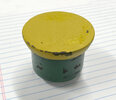
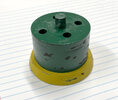
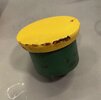
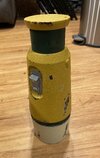
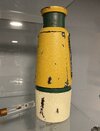
I've been working on this prop a little bit most days of the week and thought I'd show a quick progress pic. Most of the parts are about 50% painted to completion now. Lots of layers, taping, removing tape, re-taping. One of the things that I was never happy with was the yellow color for the top of the top part (the part the bracelets fasten to) and the main body. I tried a different brand of Zinc Chromate and it was awful. Looked like a lemon yellow. Really bad. So I looked again to find something that would match and, sadly, I just don't think that it exists in a can. And I don't have an auto body type sprayer to mix large amounts of paint. So, I looked at colors that had a little more green in them and all available looked like lime. Lime is too far in my opinion, so I went with a more industrial faded muted yellow. This is where I landed and I really like the color a lot:

CAT considers this their "old" or "vintage" CAT color. Modellers that paint CAT models use it to paint the vintage stuff. I really like how military it is. Only bummer is that it is gloss, but with 9 coats of paint on this thing already, what's one more coat of matte clear?
Also seen here is an amazing product called Rust paint. Made by Dirty Down. Water based paint that you apply and let dry for a rusty color, but the magic is in the follow up coats that you apply, let dry, and then dab at with a brush that has been dipped in water. You can get a lot of rust variance with layering this stuff and I really like working with it. It will ruin a good brush, so use your disposables with this stuff.
Genuine CAT Caterpillar Yellow Paint Aerosol 458-9587 4C4200 | United States | 0030937018182
CAT 4C4200. CATERPILLAR YELLOW PAINT 458-9587. Yellow Paint. The item is defective (unless it is an electrical part that was installed — see next section).
www.ebay.com
CAT considers this their "old" or "vintage" CAT color. Modellers that paint CAT models use it to paint the vintage stuff. I really like how military it is. Only bummer is that it is gloss, but with 9 coats of paint on this thing already, what's one more coat of matte clear?
Also seen here is an amazing product called Rust paint. Made by Dirty Down. Water based paint that you apply and let dry for a rusty color, but the magic is in the follow up coats that you apply, let dry, and then dab at with a brush that has been dipped in water. You can get a lot of rust variance with layering this stuff and I really like working with it. It will ruin a good brush, so use your disposables with this stuff.
Attachments
Learned something new right there, thank you. The technique couldn't look more real. The rust rings from the wash technique would be difficult to deny on an aging estimation.I've been working on this prop a little bit most days of the week and thought I'd show a quick progress pic. Most of the parts are about 50% painted to completion now. Lots of layers, taping, removing tape, re-taping. One of the things that I was never happy with was the yellow color for the top of the top part (the part the bracelets fasten to) and the main body. I tried a different brand of Zinc Chromate and it was awful. Looked like a lemon yellow. Really bad. So I looked again to find something that would match and, sadly, I just don't think that it exists in a can. And I don't have an auto body type sprayer to mix large amounts of paint. So, I looked at colors that had a little more green in them and all available looked like lime. Lime is too far in my opinion, so I went with a more industrial faded muted yellow. This is where I landed and I really like the color a lot:
Genuine CAT Caterpillar Yellow Paint Aerosol 458-9587 4C4200 | United States | 0030937018182
CAT 4C4200. CATERPILLAR YELLOW PAINT 458-9587. Yellow Paint. The item is defective (unless it is an electrical part that was installed — see next section).www.ebay.com
CAT considers this their "old" or "vintage" CAT color. Modellers that paint CAT models use it to paint the vintage stuff. I really like how military it is. Only bummer is that it is gloss, but with 9 coats of paint on this thing already, what's one more coat of matte clear?
Also seen here is an amazing product called Rust paint. Made by Dirty Down. Water based paint that you apply and let dry for a rusty color, but the magic is in the follow up coats that you apply, let dry, and then dab at with a brush that has been dipped in water. You can get a lot of rust variance with layering this stuff and I really like working with it. It will ruin a good brush, so use your disposables with this stuff.
Learned something new right there, thank you. The technique couldn't look more real. The rust rings from the wash technique would be difficult to deny on an aging estimation.
Very happy to help! I watched a number of youtube vids on this stuff and thought "It can't be that easy"......
Yeah, it's that easy, lol. Spendy little bottle, but worth every penny.
Last edited:
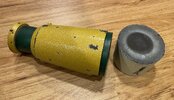
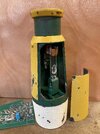
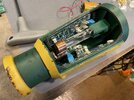
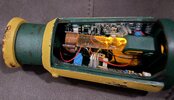
Most of the parts are now painted. Yellow body needs a matte coat yet. All weathering needs some rust or aging effects. Now I can focus my attention on the internals. Will add circuit boards inside next. Then add the LED light for the clear acrylic rod.
Attachments
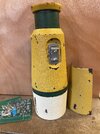
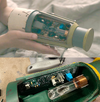
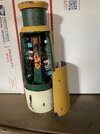
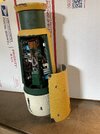
A bit further along now. Everything completely painted and ready for assembly. In this photo are all parts completed so far, along with the circuit boards that I'll cut up. Also in the photo are all of the loose circuit board add-on components that I will use to dress up the boards.
Attachments
freakin beautifulA bit further along now. Everything completely painted and ready for assembly. In this photo are all parts completed so far, along with the circuit boards that I'll cut up. Also in the photo are all of the loose circuit board add-on components that I will use to dress up the boards.
Thank you. I appreciate the feedback! It’s been a long road to get here and now that I have a lathe and mill, finishing this with aluminum bracelets is definitely going to happen.freakin beautiful
Thanks!! I’m really happy with how it’s looking so farWas away for a bit, so I missed out on some of your latest progress! Holy guacamole!!!
Just a reminder, this model is available in my etsy store. If you have purchased this model from me, please PM me. I have added a new file for the aluminum "kickstand" for the stasis.
Similar threads
- Replies
- 4
- Views
- 987
- Replies
- 3
- Views
- 803
- Replies
- 8
- Views
- 1,583
- Replies
- 4
- Views
- 485
- Replies
- 3
- Views
- 280