You are using an out of date browser. It may not display this or other websites correctly.
You should upgrade or use an alternative browser.
You should upgrade or use an alternative browser.
Tales From The Loop - Stasis Device
- Thread starter ssdesigner
- Start date
That's cool. Waterjet?
That's cool. Waterjet?
I think so? I have only ordered from these guys twice. The first time I ordered some 1/4” thick parts and they are super rough. This time I added the “deburring “ to the order and they need very little finish work. Probably just a light hit with a scotch bright pad and it’ll be ready.
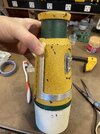
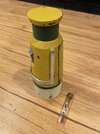
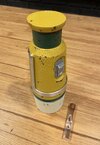
Kickstand installed. I put this in my display case after taking these photos and had a rare (for me) feeling of complete satisfaction. This is really coming together better than I anticipated.
Attachments
Wow, hard to believe that a year has nearly passed since I last worked on the stasis. Mostly because I wanted to make the final 2 parts myself out of aluminum. I will need to make 4 of these in total because you need more than a complete circumference to make one. On a hobby lathe this is very slow going, but I finally have one nearly made. I made my prototype in resin, so I can use that as a reference to section it in half and add the hinge + magnets.
Attachments
Perfection takes time. The level of detail on this project is well past "I think it is the original piece".
Perfection takes time. The level of detail on this project is well past "I think it is the original piece".
You are too kind, and thank you. It's been a really fun project and one that has allowed me to learn new processes as I go. My favorite!
")
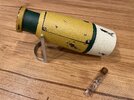
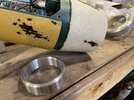
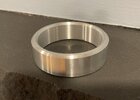
I wanted to share a piece of info with the RPF in hopes that it saves you time on the build. If you plan to have the bracelets machined out of aluminum, there is a VERY close tube out there as long as you print the stasis to the scale that allows for it. This is the tube that I just discovered and it will require very, very little machine work to get the outer and inner diameters. Hope this helps!

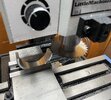
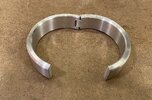
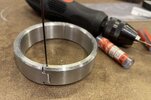
New tool day today. I have a slitting saw that works perfectly to create a clean cut to part out the rings. Made the first cut just below the halfway point on the ring to accommodate for the blade thickness. Rotated the ring in the vise 1/4” to allow extra material for the hinge and cut the other side. These little slitting saws make a really nice, clean cut.
Attachments

Thanks Leinads! I promise to be a kind world dominator
You will be the only person capable of fixing past mistakes....you'll be a great dominator. I'm sure of it.Thanks Leinads! I promise to be a kind world dominator
I want to say thanks to all of you folks for following me on this build. It really does mean a lot to me. It helps keep me motivated to push through when most of this project involves new processes for me. So thank you!!
It takes a steady hand and a whole lot of patience to drill and set those pins! Wow!
Gotta buy these bits in a 20 pack. I broke 3 so far but thankfully none broke deep inside the hole. Patience is definitely the key!
Small drill bits haunt my dreams. I don't envy the task.
Similar threads
- Replies
- 4
- Views
- 985
- Replies
- 3
- Views
- 797
- Replies
- 8
- Views
- 1,581
- Replies
- 4
- Views
- 482
- Replies
- 3
- Views
- 277