T1 and T2 Endoskeleton Research Thread

Yeah, 8 mio points is agreeable, I don't think you should go lower. It's a lot less than my scanners set limit to 8 mio triangles. You may lose what the blue laser brings to the table by reducing it too much.

EDIT: do you mean points or triangles?
 
Forgot to post this last night. Size looks good.
IMG_0373.jpeg


-Dana
 
Forgot to post this last night. Size looks good.
View attachment 1904819

-Dana
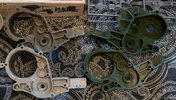
3D scanning and 3D printing are those pleasant technologies that take time but almost completely eliminate manual labor in copying (I mean, you don’t have to manually create shapes by eye and try to capture all dimensions and proportions). When I scanned these parts using photogrammetry and created an accurate CAD model, I also printed the models, and they matched very well in size with the original parts (the printer is very well calibrated to ensure that the dimensions are as accurate as possible after the plastic’s thermal shrinkage). Thus, I was convinced that even photogrammetry produces very accurate models without any geometric distortions.
 

Attachments

  • DSC02350-2.jpg
    DSC02350-2.jpg
    2.9 MB · Views: 91
8 Million points in the merged point cloud.
8 million points is not as many as I think. And how many triangles does the model have when the point cloud consists of 8 million points?

What is the maximum accuracy of your scanner in millimeters?
If you try to scan small details—for example, from the FLAK set—will this scanner provide acceptable results in terms of detail?

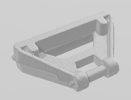
Here’s an example of my photogrammetry.
 

Attachments

  • Screenshot 2025-02-11 224533.png
    Screenshot 2025-02-11 224533.png
    195.8 KB · Views: 76
8 Million points in the merged point cloud.

8 million points is not as many as I think. And how many triangles does the model have when the point cloud consists of 8 million points?

What is the maximum accuracy of your scanner in millimeters?
If you try to scan small details—for example, from the FLAK set—will this scanner provide acceptable results in terms of detail?

Here’s an example of my photogrammetry.
You decide how many triangles you want to mesh to be when you convert the point cloud into a mesh. Obviously, if you don't have a lot of points, there's not sense in choosing a high triangle count. It's a balance between how much detail the object really has, how much detail you captured with the scanned points, and an appropriate triangle count that effectively capitalizes on the points captured.

Specs they claim:
Maximum resolution of 0.1mm
Dimensional accuracy up to 0.02mm

I don't think it will capture tiny objects as well as photogrammetry as you have shown there. The ideal distance you need to keep the scanner from the object means it's not going to capture those kit parts as well as it does a small-medium sized object.

-Dana
 
Yeah, there are specialized small scale scanners for those kind of objects.

I think it would be best to keep all models in the same triangle amount, despite the detail richness. I go with 8 mio triangles, which didn't diminish the HD quality too much, while keeping the file size manageable. I honestly don't think you should go lower on your scans of the endo parts, or you will start to add in softness to edges and sharp details.
 
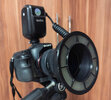
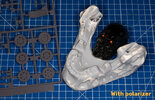
Since I'm satisfied with the photogrammetry results and don't really have a need to buy a 3D scanner, I decided to refine my photography technique to make it even more suitable for photogrammetry. To do this, I purchased a ring flash (with TTL) with a lithium-ion battery, attached a CPL filter to the lens, and 3D printed a holder for polarizing film on the flash so that its light would be polarized. This way, I created a shooting setup capable of providing good, almost shadowless, diffuse lighting at small apertures and short shutter speeds, and most importantly—without any glare from the flash itself.
 

Attachments

  • 2025-02-12 21.56.jpg
    2025-02-12 21.56.jpg
    699.3 KB · Views: 81
  • DSC08877-Enhanced-NR.jpg
    DSC08877-Enhanced-NR.jpg
    2.3 MB · Views: 87
  • DSC08876-Enhanced-NR.jpg
    DSC08876-Enhanced-NR.jpg
    1.8 MB · Views: 81
Since I'm satisfied with the photogrammetry results and don't really have a need to buy a 3D scanner, I decided to refine my photography technique to make it even more suitable for photogrammetry. To do this, I purchased a ring flash (with TTL) with a lithium-ion battery, attached a CPL filter to the lens, and 3D printed a holder for polarizing film on the flash so that its light would be polarized. This way, I created a shooting setup capable of providing good, almost shadowless, diffuse lighting at small apertures and short shutter speeds, and most importantly—without any glare from the flash itself.
Super cool that you are upgrading your tools using 3D printing. I too do this kind of work when I realize that I have the ability to design and fabricate a solution myself. It’s very satisfying. Hard work figuring it all out, but rewarding. Thanks for sharing that!

-Dana
 
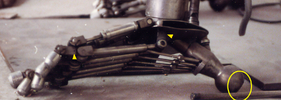
Does it have a flat back at the back of the heel or am I just seeing things? Encircled in yellow. Don't mind the arrows... I just used Quartz' picture.
 

Attachments

  • Research - T1 - Foot - Untitled-2.png
    Research - T1 - Foot - Untitled-2.png
    1.3 MB · Views: 79
More test printing. I’m playing with the idea of printing the structural hand parts as one static piece and not making tons of molds (at least not for now).
IMG_0380.jpeg


I’m diiscussing vacuum metallizing with a company and know that if I send them 100 pieces for the hands it will be a nightmare. Especially since I’m hoping to use different metal tones besides “chrome” for certain parts.

FDM printing for now. Already have a new pose that I’ll try over night. Having fun though.

-Dana
 
Last edited:
The hand on the left side of the next few images is Pose1, the right is Pose2.
IMG_0385.jpeg

IMG_0384.jpeg

IMG_0383.jpeg


I felt like Pose1 might be too curled for a neutral hand. Pose2 might be a bit extended/tense but it feels more Terminator to me. Also, I referenced the hand pose in the T2 teaser trailer right before the endoskeleton goes into the “skin machine” since it has T1 hands.

I currently have all the side knuckles washers/caps/axles as separate pieces so that’s why they aren’t part of these prints (for now). Still figuring out what if anything else to combine in the base hand print.

I don’t plan on using these LFS forearm parts, but I snapped this shot to see things in context:
IMG_0386.jpeg


And I’m using the prints to check hardware fit and placement for things like DuBro rod ends.
IMG_0387.jpeg


I think I’ll work out the hand piston assemblies next.

-Dana
 
Last edited:
Thank you! I’m making some more improvements to the model and I slightly adjusted the finger posing. The Heim joint (rod end bearing) that holds the thumb to the palm plate was undersized so that will also be better in the next print.
Waiting on some set screws and DuBro shaft collars to dial in some more decisons. Figuring out the linkages based on some new ref/discoveries I’ve had. I snapped a shot of Pose2 with the knuckle caps on:
IMG_0393.jpeg


And here’s some test pistons:
IMG_0394.jpeg


-Dana
 
Last edited:
Back
Top