T1 and T2 Endoskeleton Research Thread

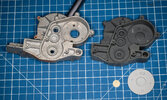
I may have. It's been a while since I worked on it. I just copied the LFS piece in my 3D model. I may have to revisit my LFS 3D models to make them more SWS, like I did with my toe pistons - even though I didn't get those 100%, though.

And yeah, I get what you are saying about the LFS kit. It's fun to figure out the sources of the parts, when possible. I may however have to let mine go, soon, though.
 
Certainly not research, but I just came across this photo and I couldn't resist posting this amazing moment I had when I visited Stan Winston's studio back in 2004. What a day...

IMG_7313.jpg


-Dana
 
Even though my foot design is done, I’m still figuring out how I want to separate/combine things. What will be printed, what will be real metal, how things will be attached, how parts might need to be altered for molding/casting, adjusting tolerances for assembly, etc. I’m not out of the woods yet. But I’m in the process of testing ideas on the first toe. I even designed and printed a little stand to hold the main foot/heel part up so I can align toes and check my angles.
IMG_0358.jpeg


Also, I keep my JR skull in front of me for “motivation”.

-Dana
 
Last edited:
Looks awesome.

I think the reason they put the big toe top piston lower on the original was to simulate the curve on the top of a human foot. It always looked weird to me how most replicas were just straight across and I couldn't figure out why the originals looked different until it was clear they put where the top pistons attach unevenly.

It may even be at a bit of an angle so the lower piston more easily can reach the bottom connector.
 
Did another quick test scanning @0.10mm and processing at “Ultra Detail”. I wasn’t focused on the gaps/holes, more on how much quality I could get. Looks a better, maybe subtle in these pics but there is more detail and sharpness.
IMG_0364.jpeg


I can more clearly make out my fingerprints in the clay border I made around the temple area
IMG_0363.jpeg


Cool tech!
-Dana
 
Last edited:
It’s a Creality Raptor. I really don’t like their 3D printers, so it took a lot of convincing for me to try their scanner. But, they don’t make it. It’s some other company that I believe they slap their branding on and market. The software is actually OK, not as good as Shining3D or several others. But good enough. I’ve never scanned anything before, watched videos on YouTube, and I think I’ll get the hang of it as I practice.

I am planning to test it on the Timeless piece itself (the casting was just easy and sitting there for me to grab) to see if the blue laser can handle the chrome. But, it is a dirty area of the bust and I know it’s not much cleaner than my casting.

Super interesting idea scanning the mold to get clear visibility on the inverse areas that are hard to reach! I wonder if the software will be able to be tricked into not treating those as backfaces and merging them properly!? Worth a test for sure! Great idea TMG!

-Dana
 
I've tried the mold and cast scanning trick before to get areas covered in one that I coudn't get to on the other and vice-versa. It worked fine for the David Laserscanner I had long ago. Haven't tried it with my Einstar.
 
Even though my foot design is done, I’m still figuring out how I want to separate/combine things. What will be printed, what will be real metal, how things will be attached, how parts might need to be altered for molding/casting, adjusting tolerances for assembly, etc. I’m not out of the woods yet. But I’m in the process of testing ideas on the first toe. I even designed and printed a little stand to hold the main foot/heel part up so I can align toes and check my angles.
View attachment 1903522

Also, I keep my JR skull in front of me for “motivation”.

-Dana
Foot looks better than anything in the past. Well done!! Would love to see more of that skull. ;)
 
Did another quick test scanning @0.10mm and processing at “Ultra Detail”. I wasn’t focused on the gaps/holes, more on how much quality I could get. Looks a better, maybe subtle in these pics but there is more detail and sharpness.
View attachment 1903844

I can more clearly make out my fingerprints in the clay border I made around the temple area
View attachment 1903846

Cool tech!
-Dana
I've been waiting for so long for you to return to the thread so I could see the progress in your modeling—and now I've finally been waiting! Could you please remind me: was that cast made from the Icons skull?
Have you seen it? T1 and T2 Endoskeleton Research Thread

Since you have a scan of your cast, it would be interesting to compare it with my scan of half of a gearbox. I can send you a simplified version of my scan so you can overlay it with your cast and confirm or refute whether the shapes of my gearbox and your cast match. If you're interested, just let me know.
I’m sorry to have been away so long. I’m glad we all keep coming back!

The scan I just posted is from a Timeless Collectible skull (also known as Icons V2). This is the larger but slightly distorted skull with the T1/T2 lineage.

I can certainly help do a comparison to your parts. Message me.

-Dana
 
I don't remember if I showed it here, but last year I made a copy of one half of a gearbox out of polyurethane. Its shrinkage is so low that the part has the same external dimensions as the original. After making the copy, I refined it a bit and inserted a round piece that I printed on a 3D printer, and in the center of that piece I placed a recast part from the FLAK set. I'm almost sure that in Stan Winston's studio these parts were made exactly that way (aside from the 3D printing, of course). But then I ran out of free time, changed jobs, and for almost a year I didn't work on Terminator.
 

Attachments

  • DSC08867-Enhanced-NR.jpg
    DSC08867-Enhanced-NR.jpg
    2.8 MB · Views: 86
  • DSC08868-Enhanced-NR.jpg
    DSC08868-Enhanced-NR.jpg
    2 MB · Views: 81
I don't remember if I showed it here, but last year I made a copy of one half of a gearbox out of polyurethane. Its shrinkage is so low that the part has the same external dimensions as the original. After making the copy, I refined it a bit and inserted a round piece that I printed on a 3D printer, and in the center of that piece I placed a recast part from the FLAK set. I'm almost sure that in Stan Winston's studio these parts were made exactly that way (aside from the 3D printing, of course). But then I ran out of free time, changed jobs, and for almost a year I didn't work on Terminator.
I didn’t see you post that before, but I was doing the same thing with my casting of a real gearbox as well. Too funny!

-Dana
 
More scan practice. Elbow @ 0.20 mm, processed @ “Ultra Detail” in Creality Scan.

IMG_0369.jpeg

IMG_0370.jpeg


I think if I resin printed this part straight from the solver without any clean-up that it would be nearly as good as the original kit piece. Look at the casting bubbles on the bottom (2nd image) and the radial sanding marks that were on the casting! I’m really impressed with what the Creality Raptor can do so far. Waiting to hit some kind of major problem. Hehe.

-Dana
 
Agreed! I’ve done cleanup on the physical resin elbow casting (some filling and sanding). There are still some imperfections, but like Gizmo I’m not looking to over sanitize my parts and lose that screen used feel. I’m working my way up to more complex items, this is the first test where I went all around a full part. Merged 4 separate point clouds. Here’s what my setup looked like:
IMG_0371.jpeg


I’m using the Blue Laser mode on the Raptor which relies on reflective markers for tracking. I’ve printed these little object that help maintain tracking as I rotate around the part. I’m printing some additional marker tracking stands that allow me to go even closer to the table as well as some that are good for scanning tall parts.

I also took the resulting elbow mesh straight into PrusaSlicer and I’m currently running an FDM print to check “round trip” accuracy. I’ll post a side by side when it’s done.

-Dana
 
I've been curious about that scanner for a while. Do you find it is great at figuring accurate shape from slices / point clouds when putting them together, or do you need to force it by doing a complete 360° spin around the object for one of the passes?

Another thing, can you limit the amount of generated triangles on the fused model, while keeping details and corners sharp? I set my scans to 8 mio triangles that made it come out at 400 MB and was pretty close to the no limits scan of the same object that came out at 2,56 GB and was impossible to rotate without crashing my old Mac.

Really looking forward to you doing a skull scan. I had serious troubles with scanning the grooves, sunken in bits and especially the inside of the nose. If you can canpture all that... then that will really show what the scanner is capable of. Another trick for detailed objects is to go slow.
I’m only a few scans in, and I’m new to scanning in general. I have experience with photogrammetry, but I’ve never used a scanner. So, I’ll just give you impressions so far.

None of the scans I’ve done so far have attempted to get a full 360 in one go for coverage. I’m always getting as much as I can see clearly without “shadows” and ensuring there are features that overlap for the merge. I’m not using a turntable and I’m waving the scanner smoothly over areas at different angles/orientations as I watch the point cloud get “greener”

I think the answer to the second question is “Yes”. My elbow scan with 4 merged point clouds was 7.9M points and I limited the solved mesh to 2M triangles. I haven’t tried using Creality Scan to lower the triangle count further. I would rather take the resulting OBJ into Blender and Decimate/Remesh the object there to have more control. My elbow OBJ @ 2M triangles is 103MB on disk.

-Dana
 
Back
Top