T1 and T2 Endoskeleton Research Thread

So these are my favourite Endoskulls. I have a couple of others but I don’t feel they fall in the same category.

From left to right.
1. The skull I got with my kit from Jamie at Jaz Creations. Original lineage.
2.This skull I got off Etsy. I was told it was a cast from an M1. It’s clearly not when you put them side by side. Has more/different details. The teeth were the same as originals/M1 but had been cut out. I put them back in.
3.M1
4.Resin cast of M1 with a few things improved.
They are all similar in size. The M1 is sitting back a bit so looks smaller but is the same size as the resin M1 cast next to it.

91B803BE-0827-4AA3-9812-956557BC8D16.jpeg


I also wanted to show that Vac Metalizing can look just like chrome plating. It’s all in the prep. The chest piece below has lots of sanding and priming multiple times then 2 coats of 2 pac clear followed by vac metalizing then another 2 coats of 2 pac clear to protect it.Obviously I will weather it down also. I believe both T1 and T2 were vac metalized.

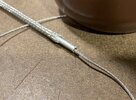
The piston below has little cleanup. I wanted various parts to emulate what the originals looked like. Pitting and rough looking.It’s also weathered down to bring the chrome brightness down.


A2E7C6C8-D0AB-4E0B-8C4B-29CCB84B3E69.jpeg

1D31DC98-E435-4279-A2D9-C90954D5B331.jpeg
 
Last edited:
Looking good. With that amount of corrosion on the piston it would make sense to really rust it up. Can't wait to see that.

I think the one you are uncertain of is an M1. Does it have the two dots on both sides beneath the temple opening? Sharper, different details doesn't mean it isn't an M1 - it just means it was worked on / fixed.

The difference I've found between vac-metalizing and chrome plating is that the latter usually seems thicker and has more rounded edges, whereas the vac-metalizing retains that sharpness needed for that machined metal look.

I completely forgot to post this Gordon Tarpley video. I think it would be the perfect way to create the machined piston look. To differentiate it from the other chromed parts.

 
Last edited:
The skull has the dots only the one side and features the details in the side parts that the M1 is missing. Also has the ports on top are rotated differently and in line with the Jaz skull. Plus it’s not sharpened like the M1 and doesn’t feature the slight warping.

Yeah I plan to rust up mine a fair bit. I don’t want a clean Endo. ;)
 
Yeah... it does have features that differ from M1. Damn... I need to check my eyes, 'cause I totally missed the rotated dimple on the front cover. And it has the grooves in the temple side walls that the M1 doesn't have.

I'm looking forward to dirty endo. :)
 
Me too.I can’t wait to see what you do with yours. I’ve always been in love with those beat up endos from T2. I find time to spend on these things isn’t as accessible as it used to be though. Adulting and renovating my house isn’t as much fun as playing with these things.

That skull we’re talking about isn’t the greatest cast. It was cheap on Etsy and wasn’t cast very well. Then the vac metal process didn’t go as well as planned. So it’s a bit rough. Was fun to play around with though.

Will watch Gordon’s video later. He’s very talented. I’ve watched a few of his videos.

Triple chrome plating definitely softens some details. Vac metalizing is only microns thick so it retains all details. Before we were putting a protective 2 pac layer on top I could literally scrape the metal off with my finger nails. Very delicate stuff.


Ben
 
Clean endos make no sense to me in a world where you don't have the time or need for it. That's why they always look wrong in all the other movies and licensed props and some fan made stuff. Whenever I see someone remove imperfections I'm like: "What are you doing? You are removing something that can add to the authentic look. You can work with it to make it make sense in the final piece." Pistons and such... sure... they can be mostly clean, but it still makes sense what you said above that they are just quickly machined and thrown together, so have a few scuffs and nicks here and there... and with further use.... will get even more damaged. Still think the hunter killers go out and round up any downed endoskeleton, brings it back and strips it for useable parts to use for new endos, sorta like what SWS did with theirs.
 
Oooh sounds great on the scanner.

And yeah I’ve played on lots of the casting imperfections to build towards damage and corrosion on my Endo. Don’t like the clean glossy ones. They just don’t look real world enough like you said.
 
I was able to cobble together braided stainless cables that will allow for stainless wire cable passthrough. I went with this 4mm braided cable:


And K&S sells 1/8" OD aluminum tubing in 36" lengths:


Looks like this when you run the aluminum tube through the braided cable and the stainless wire through the aluminum tube:
 

Attachments

  • IMG_1223.jpg
    IMG_1223.jpg
    1.2 MB · Views: 102
Cool.

When I'm done taking this little break from everything I will try and get back to rounding up as much reference for the T1 pistons as I can and figure out where they differ from the LFS kit and try to recreate them like I did with the foot models.
 
Looking great. Are you going to be switching out parts on your LFS Endo with these updated parts? I wouldn’t mind just printing some of the T1 parts just to have rather than put on my Endo. I plan to make mine with switchable skulls though as I have so many.

I have a limited time to get things chromed for free though. My sons stepdad plans to leave his workplace in about a year. It’s been a blessing having access to his workplace. I bought him a PS5 for doing it though just as a thank you.
 
I might use some of them, such as the T1 style feet, but I'll probably leave most of the kit as-is.

Found this when checking out the teaser trailer. Note, that skin box that closes around the endoskeleton is not a full size piece. It was sold on auction several years ago, but I thought the details at the tip on those raised circular bits that turn when it closes were interesting.

Another interesting thing is that the endoskeleton in that teaser trailer is said to be the T1 one, but it does not have the T1 rear cover, but looks like they have the same cover as put on the intro in flames bust. Sadly, couldn't grab a picture of that as whenever I pause, it gets blurry, but you can see it when the video is playing.

Always wondered why the rear port hole was so deep. Maybe that is made like that because the whole rear port cover is part of a long piece and we just see the end-cap?

Teaser Trailer Detail.png
 
As a side note. It is said that they used an iris shutter from a movie camera on the oversized endo piece when filing the iris closing and opening. Do anyone know how many blades are in one of those and if it would be doable to recreate that to fit inside an actual sized endo eye... or should we just go with something like this?


I might use some of them, such as the T1 style feet, but I'll probably leave most of the kit as-is.

Found this when checking out the teaser trailer. Note, that skin box that closes around the endoskeleton is not a full size piece. It was sold on auction several years ago, but I thought the details at the tip on those raised circular bits that turn when it closes were interesting.

Another interesting thing is that the endoskeleton in that teaser trailer is said to be the T1 one, but it does not have the T1 rear cover, but looks like they have the same cover as put on the intro in flames bust. Sadly, couldn't grab a picture of that as whenever I pause, it gets blurry, but you can see it when the video is playing.

Always wondered why the rear port hole was so deep. Maybe that is made like that because the whole rear port cover is part of a long piece and we just see the end-cap?

View attachment 1697644
Yeah. It's the T1 endo, and the teaser was directed by Stan Winston while Cameron was busy working on T2.

As a side note. It is said that they used an iris shutter from a movie camera on the oversized endo piece when filing the iris closing and opening. Do anyone know how many blades are in one of those and if it would be doable to recreate that to fit inside an actual sized endo eye... or should we just go with something like this?
I *believe* most common at the time was six-bladed shutters.

It is definitely doable.
Which links to this old vid:

There is plenty of talent out there!
 
Noticed, on the bottom of the knee part... about 4.5 mm has been trimmed off the bottom piece on the LFS. Where it stops on the LFS is supposed to be a groove and then it extends down further than that groove. So I will add that back into the model.
 
Is the encircled square of resin supposed to be there or should I just ignore it? It's not on the other one. And please ignore the roughness... I haven't worked on fixing them up yet.

It's hard to see that area on assembled original endoskeletons. I just don't want to add anything to the model that isn't original to the SWS castings. So if anyone have good pictures of the SWS knees, I would love to see them, so I can get them right.

Knee-Section-02.jpg
 
Back
Top