Well as Gamera said to here is some pics of my progress on my Kagametsu G4. Since I have some experiance with making lightsabers this is right up my ally.
A few days ago I made a first attempt / mock up to find out what exactly the issues I might run into. It went well but I needed to make a few changes mainly to allow the later added D ring at the end. Its a very minor change but i changed the end angle from 45 on the end to 35* to give me a few more mm's. (new one is on the top)
View attachment 368387
Here is the new back end slid in place on the main body so far. The back of the body slips into the front of the back end a 1/2 inch.
View attachment 368388
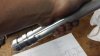
Slightly pulled apart (sorry its a bit blurry)
View attachment 368389
View attachment 368390
Here the back end is fully exposed. its actually 6 pieces here sas some are compressed in place and are basically now 1 piece
View attachment 368391
Having access to a Lathe and mill are nice so this is going rather smoothly. Only down side is its not go go go, for every piece I make i have to plan ahead 3-6 pieces so i can make sure they all remain "fit together" able. Any way this next explanation is more for the other Saber enthusiasts and for them looking to become one. Right now I am planning on using a Nano Biscotee soundboard with a single 18650 battery and a Tripple cree LED assembly (royal blue, Red, white). The Royal blue and a few ohms of resistance on the red give a great purple for the Photon Swords color. White will be for the Flash On Clash (so the purple blade flashes white when struck). Right now there is still potential to put a Petite crouton sound board in but atm the only reason to do that is for the Blaster block option (for this build think of it as a bullet slash effect sound i can trigger at any time i chose) but not sure I have the room for that battery option.
The Tight spot I still have to work on is the speaker and Recharge port. They both fit in this section easy enough it will just be tight to get the 3-4 wires for the recharge port past the speaker.
View attachment 368393
And the recharge port showing in the back end. (sadly this set up means the later added D-ring cant go fully through and meet end to end)
View attachment 368399
and heres me holding it so far. Later on I will add the set screws that hold it all together in the triangle set up it is on the central fins down the body. And good news I can take the old first attempt fin section and use it as part of the front end. yay less parts to fabricate for this. But I will have more pics over the next few days as it bets built, I only hope the sound board is in supply when I need it.
")