Markandson
Active Member
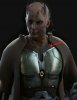
Hi Echo4Delta!
You represent (? - I hope this is the right word) an impressive guardian.
I like the Jedi version very much and your armor is great! :thumbsup The fabric you used is exactly fitting and your light saber is so cool!
In my opinion you should reduce the sleeves a little bit (terminate them just below the elbows) so that your powerful guntlets are visible!
As I still have some problems with my undersuit, I´m really interested what kind of undersuit you will choose...
Good luck and keep it up!


.jpg")