Going off of this comment, can you walk us through your paint process? What did you use for the base color, the stripes, the oversprays, etc...?
SB
I'd be happy to! Yeah, I need to work on doing actual build threads instead of a photo dump after the fact, haha.
Once I post some final beauty shots I can elaborate some more on the process. It's not very glamorous or fancy, and I mainly was treating this model as a test to see how well i could all the misting and coating. But basically here is what I did:
- After construction and sanding, I based it in about 2 coats of gray Rustoleum filler primer. Then sanded that down smooth and washed the model with water
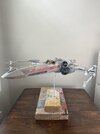
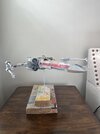
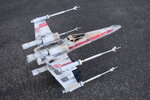
- Once that was done I did the white base coat. I used like three coats from a gloss white spray can from Glidden. I have been really liking their paints compared to Rustoleum or other cheap spray cans. I debated on using Tamiya AS20 or some kind of reefer white for a bit more accurate base, but figured any white would work given the misting to come.
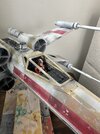
- After the white, the rest was airbrush paints. I did the primary yellow areas first, using a custom mixture of the starter-set Createx opaque yellow airbrush paint, combined with some Vallejo yellow ochre. It wasn't wanting to flow from the airbrush no matter what I did, so I actually ended up lightly brush painting the yellow on the engine nacelles and canopy. At this stage, I was somewhat frustrated and didn't like the look at all. No matter how I dulled the paint it looked like a highlighter!
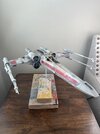
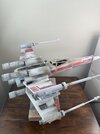
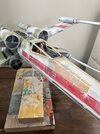
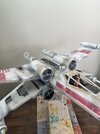
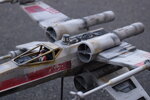
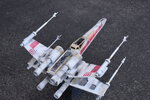
- I pressed on and did the red next. I masked some chips with a green chipping fluid and a sponge (forgot the brand right now). I used the Createx opaque red straight from the bottle. It was a very intense red but I started to like the look more at this point. For the stripes, I just masked it by hand. The stripes could definitely be cleaner, and on my next x-wing that is a big area I want to get more accurate. I took solace after studying some of the reference pics across red squadron, some of the stripes are pretty sloppy too.
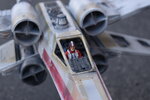
- After the red areas I did that orange-ish panel on the top of the forward fuselage near the canopy. This was also custom mixed and I was very happy with it. The airbrush cooperated well with the red and all the grays I did after that. Once this Createx set is done, I'm only using vallejo airbrush paints! (Or archive X if I really get into these).
- I then did the dark gray panel on the top of the nose. Can't recall what exact gray I used there. For all the grays and much of the misting on this bird, I used the paints from this set:
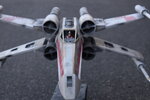
^ I find that these paints are really useful for quickly getting lots of variation in grays down. The primary one I used all over this x-wing was the light gull gray. After misting over the Glidden white I think it brings things close to that ILM off-white.
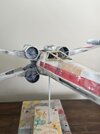
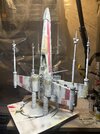
- Once I had a general misting down of the light gull gray over the white on the ship, I hit it with probably 7-8 coats of various grays from that airbrush set. For some areas I painted the airbrush paints on with a brush or sponge, dabbing it in and then feathering it back. At this stage, I knew that the original ILM photos were shot with a pretty harsh light on the model, so I compared my model against my phone's flashlight pretty often to make sure the colors matched under an intense light. By this point, I was liking the model quite a bit, and I wished that I had matched the chipping better on the red fuselage stripe, but oh well (that's what the next model is for, right?). I particularly tried to match the variations in yellow on the nose of this bird. In some shots it appears gray, with very little yellow, and in others it seems to have quite a bit of yellow on the bottom of the nose.
- Around this time i added the decals and misted those over too. Once content with the airbrushing, I hit the model with some hand painting, dabbing on grays, rusty orange (custom mixed from basic acrylics), and pure black (to intensify some of the smoky areas). I also attacked the model with some steel wool to bring out some white chipping. After all that, I clear coated in 2 coats of Rustoleum matte clear.
This got a bit long, sorry! It's kinda fun to describe the whole process. Hopefully my model (and my SS Y-wing) show that you don't necessarily need the expensive paints or a complex process to get a decent result.

 IMG_1582.jpeg1.9 MB · Views: 197
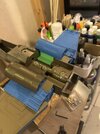 IMG_1485.jpeg1 MB · Views: 177
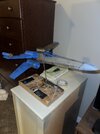 IMG_1492.jpeg1.1 MB · Views: 154
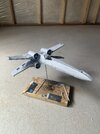 IMG_1495.jpeg2 MB · Views: 146
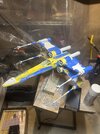 IMG_1569.jpeg1.7 MB · Views: 142
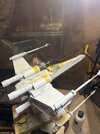 IMG_1573.jpeg1.5 MB · Views: 137
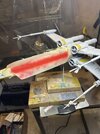 IMG_1574.jpeg1.6 MB · Views: 134
 IMG_1576.jpeg1.7 MB · Views: 163
 IMG_1577.jpeg1.7 MB · Views: 144
 IMG_1581.jpeg1.7 MB · Views: 163