You are using an out of date browser. It may not display this or other websites correctly.
You should upgrade or use an alternative browser.
You should upgrade or use an alternative browser.
Studio-scale TOS Shuttlecraft
- Thread starter Eric Ardros
- Start date
Eric, I believe it was 1" PVC that I used. Love watching this come together. It's really a great little ship and you are doing a great job on her!
[/QUOTE]
Oh yeah, I know. I remember reading that in your WiP thread over on ASAP. It was 3/32" thick (just shy of 1/8" thickness), if I recall correctly.
I just actually have to get out to that plastics supplier here in town and get some, lol.
And thanks for the encouraging words, Will. I'm rather proud of what I've been able to do so with her so far :)
Here is what progress I've made on other parts of the build today:
Studio-scale Shuttlecraft -- Pic 40 (Added more details to the rear landing gear; you can see the cross bars for the hinge, on both the hydraulic piston and landing pad)
Studio-scale Shuttlecraft -- Pic 41 (Also began putting together the forward control panel)
Studio-scale Shuttlecraft -- Pic 42 (These next three pics shows how it fits inside the bottom half of the hull, along with seat)
Studio-scale Shuttlecraft -- Pic 43
Studio-scale Shuttlecraft -- Pic 44
Last edited:
Although I haven't yet done anything more with the build today (been out and about for the better part of the day, so just got back in), here's a few pics showing the various parts of it together:
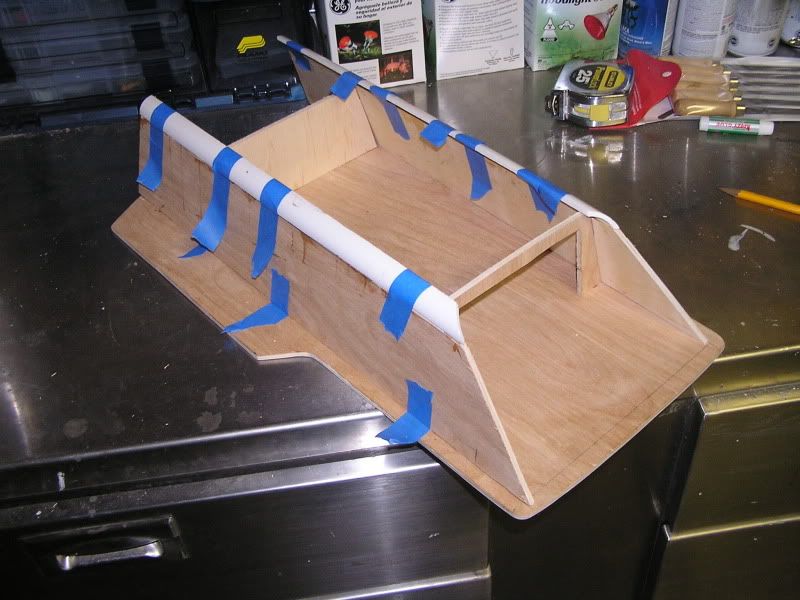
Studio-scale Shuttlecraft -- Pic 45 (Test fitting of all the major components; top and bottom hulls, hatch/door, forward control panel, pilot seat)
Studio-scale Shuttlecraft -- Pic 46 (Looking in through the viewports)
Studio-scale Shuttlecraft -- Pic 47 (Looking in through the hatch/door)
Studio-scale Shuttlecraft -- Pic 48 (Heading into the interior)
Studio-scale Shuttlecraft -- Pic 49 (Another close-up of the interior)
You can start to get an idea of how it'll look all done up. Pretty kewl, imho
I was planning to finish cutting the acrylic rods for the nacelles and curved edges for the top and bottom of the hull today, but my Dremel tool ran out of juice, so the battery's charging at the moment
While waiting on that, I decided to do a little more work on the smaller parts I've already started, and primered them all show detail better in these pics:
Studio-scale Shuttlecraft -- Pic 50 (group shot)
Studio-scale Shuttlecraft -- Pic 51 (rear landing gear)
Studio-scale Shuttlecraft -- Pic 52 (hatch/door parts)
Studio-scale Shuttlecraft -- Pic 53 (seat; it's nearly done)
Studio-scale Shuttlecraft -- Pic 54
Studio-scale Shuttlecraft -- Pic 55
Studio-scale Shuttlecraft -- Pic 56 (forward control panel; I added the bottom edge to the port and starboard control surfaces)
Studio-scale Shuttlecraft -- Pic 57 (it's mostly enclosed now, and has a decent weight to it)
Studio-scale Shuttlecraft -- Pic 58 (another angle to better show the bottom edge, indicated by the unpainted styrene)
Studio-scale Shuttlecraft -- Pic 59 (also began smoothing over some of the seams on the bottom half of the hull)
Studio-scale Shuttlecraft -- Pic 60 (the seams on the underside of the hull took the most effort)
Studio-scale Shuttlecraft -- Pic 61 (close-up of the bow details)
For all of the above, I smoothed everything over and removed any excess putty from the seams and overall surface, then primered each so I could more easily see the imperfections to be puttied/smoothed over.
Hopefully, I'll be able to get the nacelles and curved hull edges done a little later today. I really want to do more with the details on the nacelles, and get the support struts finished too.
Last edited:
Thanks!
Here's what progress I made today:
Studio-scale Shuttlecraft -- Pic 62 (started adding some of the finer details to the surfaces on the forward control panel)
Studio-scale Shuttlecraft -- Pic 63
Studio-scale Shuttlecraft -- Pic 64 (closer to finishing the nacelle support struts, too)
Studio-scale Shuttlecraft -- Pic 65 (cut the top edge at an angle so the struts sit at the correct angle when put in place)
Studio-scale Shuttlecraft -- Pic 66 (also added the beveled edges to the struts)
Studio-scale Shuttlecraft -- Pic 67 (started making the forward vents for the nacelles, as well)
Studio-scale Shuttlecraft -- Pic 68
Studio-scale Shuttlecraft -- Pic 69 (test-fitted with the other nacelle parts; lookin' good)
Studio-scale Shuttlecraft -- Pic 70 (finally got to work on the nacelles some more; started adding the rear vent details)
Studio-scale Shuttlecraft -- Pic 71
Studio-scale Shuttlecraft -- Pic 72 (did some work on the forward landing gear too, now that the rear one's nearly finished)
Studio-scale Shuttlecraft -- Pic 73
Studio-scale Shuttlecraft -- Pic 74
Though I didn't post any pics of the other nacelle, I did manage to finish cutting that one up too, and am now working on that forward landing gear.
The only thing I didn't get to today (that I'd wanted to do yesterday) was cut the curved edges for the top and bottom of the hull.
I'll either do that later today or tomorrow, if things aren't too busy over the weekend.
Last edited:
Well, as anyone else who knows me here are aware, given my anal-retentive standards for detail and accuracy, after looking over a few pieces of the build I've been working on, I've now noticed some things that I'm not quite happy with.
As such, that'll likely mean a complete redo of those parts.It's a shame, given all the time and effort I've already put into them, but I know I wouldn't be comfortable with sub-par parts for this build. It wouldn't sit well with me, and would always nag at me.
Didn't get anything more done over the weekend, as I was out of town on a day trip all day Saturday, and yesterday the gf and I were busy doing chores around the house. Today doesn't look good either, as I'm spending the day with a friend (haven't seen each other in a long time).
Tomorrow will probably be the first time this week I'll be able to do anything with it.
EDIT: This week is shaping up to be a very busy one (two days already come and gone, and no new progress to report). Got a lot of things to do around the house before this weekend, as we're hosting a gathering for the baptism of my gf's best friend's new-born daughter, so I honestly don't know if I'll get much more done on it than I've already shown here. I'll try to do what I can and post it here for you guys to check out.
Last edited:
Finally had the chance to do a little more work on this yesterday:
Studio-scale Shuttlecraft -- Pic 75 (managed to round out the corners of the view ports on the face plate)
Studio-scale Shuttlecraft -- Pic 76
Studio-scale Shuttlecraft -- Pic 77 (primered the forward control panel to look for further imperfections; still have to add the pilot controls on the left-hand side)
Studio-scale Shuttlecraft -- Pic 78 (did further refinements to the nacelle support struts)
Studio-scale Shuttlecraft -- Pic 79 (plotted out the slots for inserting the struts on the nacelles)
Studio-scale Shuttlecraft -- Pic 80
It's not much, but it's something. I should be able to get more done by the end of this week.
As for those parts that need to be redone, that'll include the rear landing gear and bottom part of the entry hatch. There may be something else, I'm not sure.
Oh, and I might have to do a rebuild of the bottom half of the hull, as I realized I didn't put enough of an angle on the bottom edge toward the rear (only 1/8", which is barely noticeable).
This project seems to be starting to get complicated. And to top things off, I don't have anymore disposable funds for additional supplies. So, it'll be interesting to see how this all progresses.
In any case, I'll keep everyone updated on this.
EDIT: The other part to be redone is the forward vents for the nacelles. Realized I made them way too thick compared to the 3/4-scale exterior mock-up.
Last edited:
Had a little time earlier today to do some more (Yay!):
Studio-scale Shuttlecraft -- Pic 81 (added details to the rear panel that goes underneath the main impulse engine)
Studio-scale Shuttlecraft -- Pic 82 (even cut out the large access panel to make it more "functional")
Studio-scale Shuttlecraft -- Pic 83 (added details to the underside of the bow; have also begun cutting away styrene for placement of the bottom curved edges of the hull)
Studio-scale Shuttlecraft -- Pic 84 (close-up of bow details)
Studio-scale Shuttlecraft -- Pic 85 (added details to both nacelles; also cut out the slots for inserting the support struts)
Studio-scale Shuttlecraft -- Pic 86 (perfect fit; this is just how I wanted it to sit in the slot, able to maintain the correct angle on its own)
Studio-scale Shuttlecraft -- Pic 87 (the port nacelle wasn't such a success; I guess I trimmed a little too much around the slot opening)
Studio-scale Shuttlecraft -- Pic 88 (but they both fit well, which was my main concern)
Studio-scale Shuttlecraft -- Pic 89 (redid the first of two forward nacelle vents; it's considerably thinner than the first one I did)
Studio-scale Shuttlecraft -- Pic 90 (now it looks more like it should, based on what ref pics I have of the 3/4-scale exterior mock-up)
I had to put my Dremel tool back on the charger (sucks only having one battery to work with), but once it's ready to go again I plan on cutting off the excess styrene along the edge of the top half of the hull for placement of the curved edges. Also have to finish cutting those so I can do that, lol.
Slowly but surely, she's getting there :$
EDIT: Just wanted to let everyone know progress on this project will likely slow down a good deal as I just got a one-month data entry contract. Working regular business hours, which means I'll have much less spare time on my hands to work on this, but will do what I can as quickly as possible.
EDIT # 2: Well, good news is that one-month data entry contract has now turned into a permanent position, so I'm now back among the fully employed. The only thing is, given the hours I'm working and the long commute to and from work (1 1/2 hours each way by bus), it hasn't really afforded me any time to work on this. I'm going to try and get back to it as soon as I can.
Last edited:
Hey Will. Thanks for touching base on this.
Unfortunately, it's been over two months since any sort of update on progress has been made, I'm afraid.
Don't want to bore anyone with the details, but aside from the aforementioned job situation (and the long bus commute to and from work, which has me getting in the door around 8:00pm) I've also been having to deal with some unexpected and sensitive family matters. So, needless to say, life's been keeping me busy.
Good news is, I've allotted myself the better part of today to get back to this project. My goal is to get the warp nacelles, nacelle struts and wings done, as well as finish trimming the "lip" running along the middle of the hull, and finally permanently secure the front plate (with viewports) in place.
I should have some pics to post sometime tomorrow.
Okay, here they are!
Things didn't start out too well on Saturday, as I found myself all thumbs with some of the parts, dropping a few of them. Most of them were alright, but the starboard nacelle strut took a bad hit:
Studio-scale Shuttlecraft -- Pic 91
But it fixed easily enough. I'll likely have to reinforce it so it remains intact during the initial molding process. Next up, I managed to make some more progress with both nacelle wings:
Studio-scale Shuttlecraft -- Pic 92
Studio-scale Shuttlecraft -- Pic 93
Studio-scale Shuttlecraft -- Pic 94
As I did with the nacelles, cutting slots to allow for ease of assembly and in the right place, I've created recessed ridges on the underside of each wing to keep the struts in the correct spot and correct angle (see next three pics):
Studio-scale Shuttlecraft -- Pic 95
Studio-scale Shuttlecraft -- Pic 96
Studio-scale Shuttlecraft -- Pic 97
I also managed to trim down the ridge running along the middle of the hull (realized it was sticking out too much, after going back to some ref pics). Looks much better now, imho:
Studio-scale Shuttlecraft -- Pic 98
(like on the screen-used models, I even added the slightly curved front edge on the bow)
Studio-scale Shuttlecraft -- Pic 99
I also used my Dremel tool and removed the excess styrene running along the top edges of the hull, to allow for placement of the screen-accurate curved edges:
Studio-scale Shuttlecraft -- Pic 100
The front plate is also now permanently affixed, I'm pleased to say:
Studio-scale Shuttlecraft -- Pic 101
Though it may not be very noticeable, on the bottom half of the hull I also began rounding out the edges railing from the bow to where the curved edges will be placed:
Studio-scale Shuttlecraft -- Pic 102
Studio-scale Shuttlecraft -- Pic 103
And for the last new WiP pics, a couple shots of the puttying work I've started to fill in the top and bottom seams of the front plate:
Studio-scale Shuttlecraft -- Pic 104
Studio-scale Shuttlecraft -- Pic 105
Studio-scale Shuttlecraft -- Pic 106
That's all I've got for now, but I plan on doing more as early as tomorrow. Hopefully I'll be able to get those pics sooner than this time around, lol.
Here's a bit of an update from Saturday (only had a few hours to work on it so not much done, but it's something):
Did a lot more on the nacelles, finally...
Studio-scale Shuttlecraft -- Pic 107
Put in recessed box enclosures for the forward landing gear...
Studio-scale Shuttlecraft -- Pic 108
Also put in the step on the port-side nacelle...
Studio-scale Shuttlecraft -- Pic 109
And fixed the forward end cap in place...
Studio-scale Shuttlecraft -- Pic 110
The port-side nacelle sub-assembly all together (mostly finished now)...
Studio-scale Shuttlecraft -- Pic 111
Started working on the cabin floor, marking where Scotty's access panel will go...
Studio-scale Shuttlecraft -- Pic 112
Aside from that, I did a little more putty work on the front plate of the Shuttlecraft, as well as on the seat and bottom half of the side hatch (had to readjust the "lip").
I only had a few hours to work on it as the gf and I had a planned "date night" that night, but I did what I could. Didn't have time at all on Sunday (went on a day trip out of town), but will be doing more throughout the week, as my schedule allows.
Should have another update to report sometime soon.
I know it's been some time since I've posted an update, and for that I apologize. Things have still been busy with work and those family matters I alluded to, and what with Christmas right around the corner I haven't really been left with any spare time to devote to this project.
On top of that, there's been a new (and rather upsetting) development.
About a week or so ago, with my gf's approval I went about clearing up a small make-shift work bench that was down in the storage room --> My New Workspace
The initial cleaning up of the work space went fine, and I managed to get everything set up just as I wanted it. But, not too long after I'd finished my gf came up to the prop room to tell me there had been an accident with my work bench downstairs.
To make a long story short, what had happened was the bottom-most shelf -- which was weighed down with some small 1/2 gallon paint cans -- came crashing down on top of my work area. As such, all of the interior set pieces I'd put together (ie. seat, forward control panel) were smashed to bits. Surprisingly, the rear landing gear somehow avoided destruction, although being in the same area.
Luckily, I'd put the main hull far enough away that when the shelf came down it didn't even come close, and the flat parts (ie. nacelle struts, wings) as well as the acrylic nacelles weren't harmed, but as of now I'll have to redo the interior bits.
So, I'm afraid that part of the build definitely won't be done before Christmas. Possibly the body kit, but as things haven't died down yet I can't make any guarantees. Anyway, just thought I should let those interested in this know of this unfortunate delay. Sorry, guys
Not so much an update (sorry to get anyone's hopes up), as I haven't touched this build in over six months, but more of an announcement that I will finally be getting back to this project very soon.
Not having worked on it in so long, just sorta idly looking at it overall in passing, has actually opened my eyes to a few things that I realize I'll need to revise before this is kit-worthy.
First off, there's one glaring flaw I found in the seat I'd put together, and considering that got smashed along with the control panel it gives me a fresh start on that to get it just right.
Also, I realized I'll have to shrink the interior a bit to allow a space inside the walls for the side hatch to slide into and out of sight, just like the 3/4-size mock-up.
But that will all likely come later on. First things first; I need to get the main hull done.
EDIT: And a question to anyone who was interested in this as a kit: would you want just the outer shell, nacelles and what not to make a 100% screen-accurate filming model, or would you also want the interior upgrade kit?
I ask because I'm trying to decide if I should just offer the shell kit at first, or offer both at once.
If just the shell kit, once that's done I should be able to kit it out sooner, but if both then it'll take some time to get it all done (with all the house projects right now, I'm lucky to get a few minutes to do any of this).
Very Sharp!
As for a kit - As with all kit type questions, it comes down to how much it will cost. I can't tell you how many awesome kits have come along that I could just not afford... then there's always te one you can't aford that you just ahve to have and you sell a kidney and risk divoce court to get. I like the TOS shuttle - but not enough to sell a kidney...
that being the case the cheaper shell kit with an interior option (purchased separately perhaps) would be welcom - assuming the outer shell is within reach...
Jedi Dade
I'd take a shell kit if you made them available. I'm more of a filming model fan anyway, and it didn't have an interior. Keep us posted!
@Jedi Dade: I think the whole cost thing goes without saying. Believe when I say I've been in that position more than once myself, so I understand how disappointing it is to come across that one kit you really want but sadly can't afford.
I can't say exactly what the cost for a kit would be at present, as I still need to complete the molding master and purchase the supplies I need to make a casting. Once that's done, I'll have a better idea.
Off the top of my head, I'd figure somewhere in the range of $100-200 USD for just the shell kit. But again, I'll know more precisely once I've gotten to the molding/casting stage.
@Tony Hardy: Doing an accurate replica of the original filming miniature is what I was going for in the first place, but then my imagination got the better of me, lol. Hence designing the interior to represent the 3/4-scale mock-up.
I figure it would be neat to offer people the choice of a straight-up filming model or an uber-detailed "idealized" representation of the two (filming model/life-size mock-up). And yes, the interior "upgrade" kit would be offered separate from the standard shell kit.
Similar threads
- Replies
- 52
- Views
- 6,291
- Replies
- 12
- Views
- 3,379